The Mini Log Cabin Bag Pattern is one of the most charming and timeless quilting designs for small bags, and it continues to captivate crafters around the world. Whether you’re a beginner or a seasoned quilter, this pattern brings together simplicity, tradition, and creativity in a small, portable project that’s both useful and stylish. The Mini Log Cabin Bag is not only functional for everyday use but also serves as a canvas to express your artistic flair with fabrics and colors.
At its core, the Mini Log Cabin Bag Pattern is based on the log cabin quilt block—a classic and beloved structure in the quilting world. This pattern is known for its unique ability to represent balance and contrast, typically using a central square surrounded by strips (or “logs”) that radiate outward. By adapting this traditional design into a miniature bag format, it opens up endless creative possibilities, ideal for gifts, travel pouches, or even as a fashionable statement accessory.
Throughout this article, we’ll explore everything you need to know about the Mini Log Cabin Bag, including materials, layout, assembly, design variations, and tips to personalize your project. Whether you’re looking to explore quilting as a hobby or you want to expand your crafting portfolio, understanding the Mini Log Cabin Bag Pattern will give you the skills and inspiration to make something truly special.
Understanding the Mini Log Cabin Design
SEE MORE PATTERNS
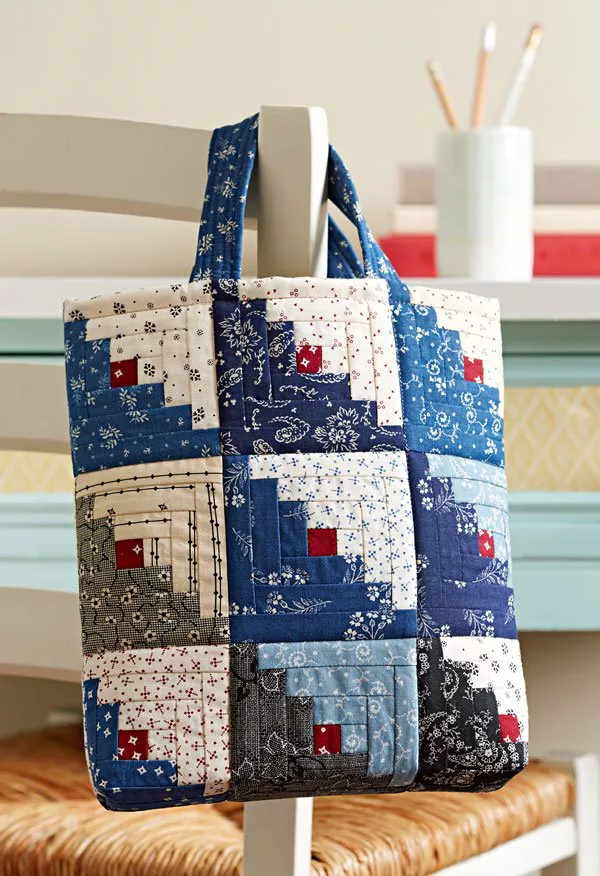
The heart of the Mini Log Cabin Bag Pattern is its block-based design. Typically, the block starts with a small central square, representing the heart or foundation of the project. From this square, fabric strips—known as “logs”—are added in a circular or spiral manner. This structured layering technique creates a distinctive visual rhythm that can range from symmetrical to artistic chaos, depending on the quilter’s vision.
One of the beautiful things about this pattern is its versatility in fabric selection. You can use bold, contrasting colors to make the structure stand out or go with a softer, harmonious palette for a more subtle effect. Each Mini Log Cabin Bag becomes a small expression of the quilter’s creativity and emotion, captured in fabric.
The size of each block can vary depending on your desired finished dimensions, but for most mini bags, the central square starts at around 1.5 inches, and the logs can be as narrow as ¾ inch. This compact format allows for quick assembly and less fabric waste, making it perfect for scraps and fat quarters.
Using foundation paper piecing can help ensure perfect alignment, especially if you’re aiming for a highly structured Mini Log Cabin Bag. Alternatively, freehand piecing gives the project a more rustic, organic feel, which is just as beautiful and more forgiving for beginners.
The pattern also allows for experimentation with directionality. You can rotate each block differently when assembling the bag panels to create different effects, such as chevrons, pinwheels, or even optical illusions, depending on fabric placement.
Finally, the block’s structure lends itself well to stability. This makes the Mini Log Cabin Bag a sturdy and reliable choice for holding items like cosmetics, hand tools, or personal belongings while still looking artistic and unique.
Essential Materials and Tools
To bring your Mini Log Cabin Bag Pattern to life, you’ll need a set of basic quilting and sewing tools. These are common items for any quilter or crafter but are especially crucial for such detailed work. The first item you’ll need is a rotary cutter and a cutting mat. These allow for precise trimming of the fabric logs that form the base of the bag’s visual design.
Next, consider your fabric choices. While the Mini Log Cabin Bag is ideal for scraps, you might want to coordinate your fabrics into a specific color scheme or theme. Choose cotton fabrics for easy handling and durability. Batiks and prints can add texture and depth to the finished project.
A ruler (preferably a quilting ruler) helps ensure all logs are the same width, which keeps the visual consistency of your Mini Log Cabin Bag Pattern. Pair this with fabric clips or pins to hold your pieces in place while assembling.
You’ll also need interfacing or batting for structure. This gives your Mini Log Cabin Bag form and durability. Fusible interfacing is especially popular because it’s easy to apply and doesn’t shift during sewing.
A quality sewing machine with a quarter-inch foot is recommended for piecing accuracy. Many quilters also prefer to use a walking foot when quilting the layers together, as it helps feed the fabric evenly.
Finally, you’ll need basic finishing materials like a zipper, lining fabric, and optionally, embellishments like buttons or decorative stitching. These final touches will personalize your Mini Log Cabin Bag and make it truly unique.
Step-by-Step Assembly Process
Now that you have your materials ready, it’s time to build your Mini Log Cabin Bag Pattern step by step. The first step is cutting your central squares and fabric logs. Remember, consistency is key—accurate cutting ensures a uniform and polished final product.
Begin assembling your blocks by sewing one log at a time around the central square. Press each seam flat as you go, alternating directions to keep the block straight and reduce warping. Repeat this process until your block reaches the desired size for your bag panel.
Once you have your front and back panels made from log cabin blocks, layer them with interfacing or batting and quilt them lightly. Simple straight-line quilting works beautifully here and doesn’t distract from the design. This adds not just beauty but structure and stability to the Mini Log Cabin Bag.
Next, prepare your lining and interior pockets if desired. Sew the front and back panels together with the right sides facing in, along with the lining, leaving an opening for turning the bag right-side-out later. This is where your Mini Log Cabin Bag Pattern truly takes shape.
Insert the zipper at the top using a zipper foot. Take your time with this part—an even zipper installation gives the bag a professional finish. Once the zipper is in, turn the bag right side out and close the turning gap with a ladder stitch or simple topstitching.
Give your bag a final press, and you now have a completed Mini Log Cabin Bag! Each step contributes to the overall beauty and utility of your handmade accessory, ensuring your creation is both functional and aesthetically pleasing.
Creative Variations and Personalization Tips
One of the best things about the Mini Log Cabin Bag Pattern is how adaptable it is to your personal style. You can start by changing the layout of the logs—try offsetting them to create an asymmetrical effect or alternating light and dark fabrics for a high-contrast design.
For a more modern look, try using solids instead of prints. Solids create bold geometry, allowing the structure of the log cabin block to take center stage. This minimalist approach is very popular in contemporary quilting circles.
You can also play with the size of the bag. Make it extra small for coin purses or larger for tablet sleeves or travel pouches. The same basic Mini Log Cabin Bag Pattern scales beautifully with just a few tweaks.
Add embroidery or applique to one side of the bag for a mixed-media look. This personal touch makes each bag a one-of-a-kind piece and adds even more dimension to the quilted surface.
You can even experiment with using leather straps, tassels, or custom zipper pulls to elevate the style of your Mini Log Cabin Bag. These small details turn a handmade item into a designer piece.
Lastly, consider making a series of bags in a matching theme or seasonal colors. These can be sold as sets, gifted to friends, or simply enjoyed for your own use. The flexibility of the Mini Log Cabin Bag Pattern truly makes it a staple in any quilter’s collection.
FAQ About Mini Log Cabin Bag Pattern
What is a Mini Log Cabin Bag?
A Mini Log Cabin Bag is a small, functional quilted bag made using the traditional log cabin quilt block pattern. It’s often used for storing personal items or as a fashionable accessory.
Can beginners make a Mini Log Cabin Bag?
Yes, this project is beginner-friendly. The pattern uses straight-line sewing and basic quilting techniques that are easy to learn and master.
How much fabric do I need for one bag?
You’ll need about four to six fat quarters depending on your design, plus fabric for the lining and interfacing. It’s also a great scrap-busting project.
Can I hand sew this project instead of using a machine?
Absolutely. While a sewing machine speeds up the process, you can hand sew the entire bag with patience and precision.
Do I have to quilt the panels?
Quilting the panels adds stability, but it’s optional. You can skip quilting for a softer, more flexible bag, though it may not hold its shape as well.
Can I customize the size of the bag?
Yes. You can increase or decrease the size of the log cabin blocks or add additional blocks to make a larger or smaller bag.
Conclusion
The Mini Log Cabin Bag Pattern is more than just a cute accessory—it’s a celebration of tradition, creativity, and craftsmanship. By learning the basics of the log cabin block and applying it to a practical item like a bag, you not only gain valuable quilting skills but also create something truly personal and beautiful.
Whether you’re making your first bag or your fiftieth, the Mini Log Cabin Bag offers endless possibilities for experimentation and joy. So gather your fabrics, fire up your sewing machine, and dive into a rewarding quilting adventure.
PATTERN here
We hope you enjoyed this guide! If you’ve tried making your own Mini Log Cabin Bag, leave your honest opinion below and feel free to share your suggestions or variations—we love hearing from fellow crafters!

