The Martha Washington’s Star Block by Tara Reed – Tutorial introduces a timeless quilt block that exudes both historical charm and intricate design. This star block, named after the first First Lady of the United States, has remained a favorite among quilters for generations.
It’s a beautiful pattern that allows for versatility in fabric choice and color placement, giving quilters the opportunity to personalize it to their taste. Tara Reed’s interpretation of this classic block is approachable, making it perfect for both beginners and seasoned quilters alike.
Whether you’re creating a stand-alone quilt or incorporating it into a larger project, the Martha Washington’s Star Block is sure to make a statement. The sharp points and geometric precision of this block highlight the craftsmanship involved in quilting, while the design itself evokes a sense of nostalgia. Let’s dive into the tutorial and walk you through the steps to create this elegant quilt block.
In this article, we’ll cover everything from fabric selection to piecing and assembly, ensuring you have all the information needed to complete the Martha Washington’s Star Block by Tara Reed. Follow along with the instructions below to bring this beautiful star block to life.
1. Fabric Selection and Preparation for Martha Washington’s Star Block
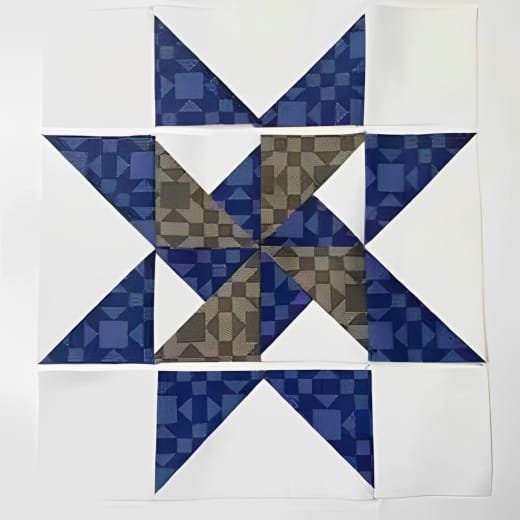
The first step in creating the Martha Washington’s Star Block by Tara Reed is selecting the right fabrics. For this pattern, it’s important to choose contrasting fabrics to highlight the star design effectively. The star is typically made from a bold or patterned fabric, while the background is a solid or low-volume print to allow the star to stand out.
Start by selecting three different fabrics:
- Star Fabric: Choose a bold print or bright color for the star points. This fabric will be the focal point of the block, so don’t be afraid to go bold.
- Background Fabric: For the background, opt for a neutral color or a light print. This will help the star shine and create contrast between the star points and the surrounding block.
- Center Fabric: You’ll also need a contrasting fabric for the center square. This can either match the star fabric or be another complementary color for added interest.
Before cutting your fabric, wash and press it to prevent any shrinkage later. This step ensures your block remains true to size throughout the quilting process. Now that your fabrics are ready, it’s time to cut your pieces.
2. Cutting and Piecing the Martha Washington’s Star Block
Accurate cutting is essential when making the Martha Washington’s Star Block by Tara Reed. This block is made up of triangles and squares, which come together to form the star pattern. The precision of your cuts will determine how well the pieces fit together.
Start by cutting the following:
- Four squares for the star points.
- Four triangles to frame the star.
- One square for the center of the block.
Using a rotary cutter, ruler, and cutting mat, ensure all pieces are cut accurately. To avoid confusion during assembly, lay out all of the pieces in the correct order on a flat surface. This will help you visualize how the block will come together.
When piecing the star block, work carefully to align the points of the triangles and squares. Use a ¼-inch seam allowance to sew the pieces together. As you assemble the block, press the seams flat with an iron to reduce bulk and ensure a smooth finish.
3. Sewing the Star Points and Assembling the Block
Now that your pieces are cut, it’s time to assemble the star. The Martha Washington’s Star Block by Tara Reed comes together through a series of simple steps, making it accessible even for quilters who are new to star patterns.
- Sew the Star Points: Begin by piecing together the star points. This involves sewing the triangles together to form the points of the star. Be sure to match up the edges carefully and use pins to hold the fabric in place while sewing.
- Add the Center Square: Once the star points are assembled, sew the center square into the block. This step involves attaching the star points to the center square to form the star shape. Keep the seams neat and press them as you go.
- Assemble the Background: With the star complete, it’s time to add the background triangles. Sew the background pieces around the star, forming a square block. Take care to match up the edges and corners so that the star remains centered within the block.
- Press the Block: Once the block is fully assembled, press the seams flat. This will help the block lay smoothly and ensure a clean finish. The Martha Washington’s Star Block is now complete!
4. Tips for Customizing Your Martha Washington’s Star Block
The Martha Washington’s Star Block by Tara Reed is a versatile design that can be customized in numerous ways. Whether you’re making a single block for a wall hanging or piecing multiple blocks together for a full quilt, here are some ideas for making this pattern your own.
- Color Variation: One of the easiest ways to personalize the Martha Washington’s Star Block is by playing with color. Consider using a gradient of colors for the star points, or alternating between dark and light fabrics for a striking visual effect.
- Size Adjustment: If you want to scale the block up or down, simply adjust the size of the squares and triangles. This allows you to create a smaller block for pillows or mini quilts, or a larger one for bed-sized quilts.
- Scrappy Style: For a more eclectic look, consider using scrap fabrics for the star points. A scrappy star block adds a fun and whimsical touch to any quilt, especially when using a variety of prints and colors.
- Fussy Cutting: Use fussy cutting techniques to showcase specific patterns or motifs in the star points or center square. This adds a unique, personalized element to each block, making it truly one-of-a-kind.
- Quilting Techniques: The way you quilt the finished block can also add texture and dimension to the design. Consider echo quilting around the star points or adding a decorative stitch in the center square.
- Combining Blocks: The Martha Washington’s Star Block pairs well with other traditional quilt blocks, such as the Ohio Star or Flying Geese. Combine different blocks to create a sampler quilt that showcases your skills.
FAQ About Martha Washington’s Star Block by Tara Reed
Q1: What size is the finished Martha Washington’s Star Block?
The size of the block depends on the measurements you choose for your squares and triangles. A common size for this block is 12 inches square when finished, but it can be scaled up or down as needed.
Q2: Is the Martha Washington’s Star Block suitable for beginners?
Yes, the Martha Washington’s Star Block is suitable for beginners. While it involves piecing triangles, the steps are straightforward, and with careful cutting and sewing, even a beginner can achieve beautiful results.
Q3: Can I use scraps to make this block?
Absolutely! The Martha Washington’s Star Block looks stunning when made with scrap fabrics. Mixing and matching different prints and colors can give the block a fun, scrappy look.
Q4: What is the best fabric to use for this block?
Cotton quilting fabric is ideal for this block, as it is easy to work with and holds its shape well. You can experiment with other fabrics, but keep in mind that fabrics of different weights or textures may affect how the block comes together.
Q5: How do I ensure my star points are sharp?
To achieve sharp star points, take your time when piecing the triangles. Be sure to use an accurate ¼-inch seam allowance, and press the seams open to reduce bulk.
Q6: Can I use this block in a larger quilt?
Yes, the Martha Washington’s Star Block is perfect for use in larger quilts. You can piece multiple blocks together or combine it with other blocks to create a variety of quilt designs.
Join our VIP broadcast list and gain access to exclusive patterns, all for free. As a VIP member, you’ll receive the best patterns daily, delivered directly to your device. ✨📱 It’s a unique opportunity to stay up-to-date with the latest trends and designs, curated just for you. Don’t miss out on enhancing your projects and discovering new inspirations with the best patterns every day! 🎨🔝
Conclusion
The Martha Washington’s Star Block by Tara Reed – Tutorial is a wonderful project for quilters looking to create a timeless and elegant design. This block offers endless possibilities for customization, allowing you to experiment with fabrics, colors, and layout to make it your own. Whether you’re using it as part of a larger quilt or a standalone piece, the Martha Washington’s Star Block is sure to impress.
I hope this tutorial has provided you with all the information you need to create your own Martha Washington’s Star Block. I’d love to hear your thoughts on the pattern and any suggestions for future tutorials. Please leave your feedback in the comments below!

