The Liberty Lemoynes Quilt Tutorial is an excellent project for both novice and experienced quilters. This timeless pattern brings elegance and a touch of classic beauty to any home. Whether you’re looking to create a quilt for yourself or as a gift, following this Liberty Lemoynes Quilt Tutorial will ensure you achieve a professional finish every time.
Quilting with the Liberty Lemoynes pattern allows you to blend vibrant colors and intricate designs, creating something unique. While it may appear complex, with a well-organized step-by-step approach, you’ll find that it’s an enjoyable and rewarding process.
By carefully following this tutorial, you’ll not only sharpen your quilting skills but also discover how to bring Liberty Lemoynes to life.
In this tutorial, we will cover everything you need to know about the Liberty Lemoynes Quilt, from selecting fabrics to final stitching techniques. The guide is structured to make each step easy to follow, ensuring a smooth and successful quilting experience. Let’s begin by diving into the basics!
1. Choosing Your Fabrics and Materials
When starting the Liberty Lemoynes Quilt Tutorial, your fabric selection is key to achieving a stunning quilt. The pattern relies on high contrast between light and dark colors, so choose fabrics that will highlight the design.
- Fabric Choices: Select high-quality cotton fabrics for durability. Cotton allows for easy sewing and gives the quilt a soft, luxurious feel. Look for fabrics in a variety of colors to bring out the beauty of the Liberty Lemoynes design.
- Color Coordination: The beauty of the Liberty Lemoynes Quilt comes from the contrast between different colors. Choose complementary colors or opt for bold contrasts like dark blues and bright yellows for a dynamic effect.
- Material Preparation: Before you begin, wash and iron all of your fabrics. Pre-washing ensures that the colors won’t bleed, and ironing will make the cutting process smoother.
- Other Materials Needed: In addition to fabric, you’ll need quilting tools like a rotary cutter, cutting mat, ruler, sewing machine, thread, and batting for the quilt’s middle layer.
- Backing Fabric: The backing fabric is equally important in this Liberty Lemoynes Quilt Tutorial. Choose a solid or simple patterned fabric to allow the front design to stand out.
- Batting: Batting gives the quilt its warmth and thickness. Select a high-quality batting material based on the desired thickness and warmth level.
2. Cutting the Pieces
Once you have your materials, the next step in the Liberty Lemoynes Quilt Tutorial is cutting your fabric into the necessary shapes. Precision is essential here to ensure a perfect quilt block assembly.
- Rotary Cutting Basics: Use a sharp rotary cutter to cut your fabric pieces. A ruler and cutting mat will help you make precise cuts for the Liberty Lemoynes block.
- Perfect Square and Triangles: The Liberty Lemoynes pattern relies on squares and triangles. Measure carefully to ensure all pieces are uniform in size. Accurate cutting prevents issues during assembly.
- Templates: If you prefer, you can use templates to ensure consistent cutting. Templates are especially helpful when cutting triangles, as they provide precise angles.
- Cutting in Bulk: To save time, stack multiple layers of fabric and cut them all at once. This technique works well if you have the same shapes repeated throughout your Liberty Lemoynes pattern.
- Marking Seam Allowances: Use a fabric marker or chalk to indicate where the seam allowances will go. This ensures that you sew along the correct lines, maintaining the integrity of your pattern.
- Double-Check Measurements: Before moving on to sewing, double-check your pieces to make sure they match the dimensions in the Liberty Lemoynes Quilt Tutorial. Even small measurement errors can cause problems later in the project.
3. Sewing the Liberty Lemoynes Quilt Blocks
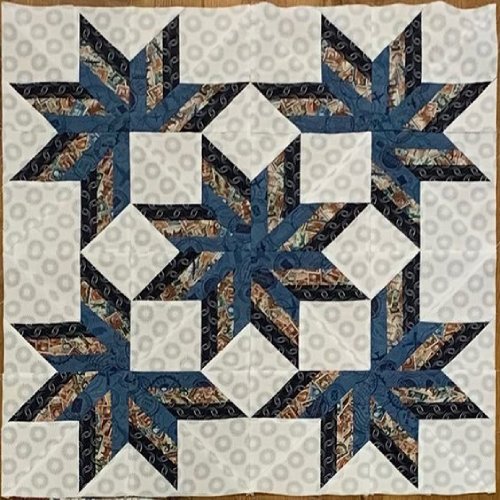
Now that all your pieces are cut, it’s time to sew them together into blocks. The Liberty Lemoynes Quilt pattern is built on a combination of squares and triangles, creating a star-like effect.
- Arranging the Pieces: Lay out the pieces for one block on your workspace. Start with the center square and then position the triangles around it. This step will give you a visual idea of how the block will come together.
- Sewing the Triangles: Begin by sewing the triangles to the edges of the center square. Use a 1/4-inch seam allowance and sew carefully to keep the lines straight.
- Pressing Seams: After sewing each triangle, press the seams open. Pressing helps keep the quilt flat and prevents bulky seams that can distort the Liberty Lemoynes pattern.
- Joining the Rows: Once your triangles are attached to the center square, sew the rows together. Make sure the seams align perfectly to maintain the block’s symmetry.
- Repeat for All Blocks: Continue sewing each block in the same manner until all of your quilt blocks are complete. Each block should be uniform in size and shape.
- Final Block Check: Before assembling the quilt top, lay out all your blocks to ensure they’re uniform and that the Liberty Lemoynes Quilt pattern is consistent.
4. Assembling and Finishing the Quilt
After sewing the individual blocks, it’s time to assemble the entire quilt top. This step brings the Liberty Lemoynes Quilt to life.
- Quilt Top Layout: Arrange the blocks in your desired layout. The Liberty Lemoynes pattern is versatile and can be arranged in several different ways depending on your design preferences.
- Sewing the Quilt Top: Once you’re satisfied with the layout, sew the blocks together row by row. Use straight seams and a 1/4-inch seam allowance to keep everything aligned.
- Adding Borders: Adding borders is optional, but it can enhance the overall look of the Liberty Lemoynes Quilt. Choose a fabric that complements the colors in your quilt blocks.
- Quilting the Layers Together: With the quilt top assembled, layer it with the batting and backing fabric. Baste the layers together using pins or a temporary adhesive.
- Quilting Techniques: You can quilt the layers by hand or use a sewing machine. Simple straight-line quilting works well for the Liberty Lemoynes Quilt, but feel free to experiment with more intricate designs.
- Binding the Quilt: The final step is binding the quilt. Use bias binding to finish the edges and give your Liberty Lemoynes Quilt a polished, professional look.
FAQ: Liberty Lemoynes Quilt Tutorial
Q: What fabrics work best for the Liberty Lemoynes Quilt?
A: High-quality cotton fabrics are recommended for durability and ease of use. Cotton also provides a soft and luxurious feel for the finished quilt.
Q: How long does it take to complete the Liberty Lemoynes Quilt?
A: The time required depends on your skill level and available time. On average, it may take several weeks to complete this quilt, especially for beginners.
Q: Do I need special tools to make the Liberty Lemoynes Quilt?
A: Basic quilting tools such as a rotary cutter, cutting mat, and a sewing machine are essential. Templates for triangles can also be helpful for accuracy.
Q: Can I hand-sew the Liberty Lemoynes Quilt?
A: Yes, the Liberty Lemoynes Quilt can be hand-sewn, but using a sewing machine will significantly speed up the process.
Q: Is the Liberty Lemoynes Quilt suitable for beginners?
A: While it may appear challenging, this tutorial breaks down each step to make it approachable for beginners who want to challenge themselves with a more complex pattern.
Q: How do I quilt the layers together?
A: You can use straight-line quilting or experiment with free-motion quilting to hold the layers together. Both methods will work for this pattern.
Join our VIP broadcast list and gain access to exclusive patterns, all for free. As a VIP member, you’ll receive the best patterns daily, delivered directly to your device. ✨📱 It’s a unique opportunity to stay up-to-date with the latest trends and designs, curated just for you. Don’t miss out on enhancing your projects and discovering new inspirations with the best patterns every day! 🎨🔝
Conclusion
This Liberty Lemoynes Quilt Tutorial offers a detailed, step-by-step guide to creating a beautiful and timeless quilt. From choosing fabrics to the final binding, this tutorial ensures that quilters of all levels can successfully complete the project. By following these steps, you’ll have a stunning quilt that showcases the elegance of the Liberty Lemoynes pattern.
We hope this guide has been helpful in your quilting journey. If you have any suggestions or feedback, we’d love to hear from you! Please leave a comment below with your thoughts or any tips you’d like to share with fellow quilters.

