The Liberty Legacy block is a timeless quilt design that combines traditional elements with a modern twist, making it a favorite among quilters. In this Liberty Legacy block – Tutorial, we will guide you step by step through the process of creating this beautiful quilt block.
Whether you’re an experienced quilter or a beginner eager to learn, this tutorial will provide you with everything you need to complete your project with confidence.
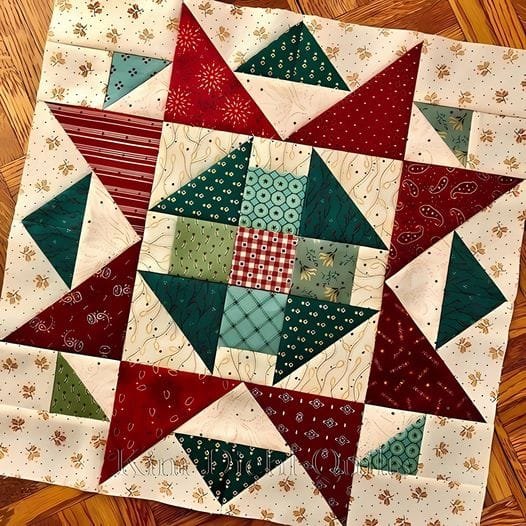
The Liberty Legacy block is known for its symmetrical design, showcasing sharp angles and intricate piecing, which creates a stunning visual impact.
Its versatility allows it to be used in various quilt layouts, whether you’re making a single quilt block for a sampler quilt or an entire quilt top using this block pattern.
With a few basic materials and some careful sewing, you’ll be well on your way to completing this gorgeous quilt block.
Before diving into the instructions, make sure you have all the necessary materials on hand, including fabric, a rotary cutter, a ruler, and a sewing machine. This Liberty Legacy block – Tutorial is designed to help you achieve precision and accuracy while allowing room for creativity.
1. Gathering Your Materials for the Liberty Legacy Block
The first step in any quilting project is ensuring you have the right materials. The success of your Liberty Legacy block depends on the quality and preparation of your tools and fabric.
- Fabric Selection: The Liberty Legacy block shines when you use fabrics with contrasting colors. Choose a combination of light and dark fabrics to create a visually striking block. Solids or small prints work well for maintaining the clarity of the design, while bolder prints can add more personality.
- Rotary Cutter and Ruler: A sharp rotary cutter and a reliable acrylic ruler are essential tools for making accurate cuts. A cutting mat is also recommended to protect your work surface and ensure clean cuts.
- Sewing Machine: While hand stitching is an option, using a sewing machine will speed up the process and allow for more consistent results. Make sure your machine is threaded with a color that complements your fabric.
- Thread: Use high-quality thread that matches your fabrics or blends into the background to keep your seams clean and discreet.
- Pins: Quilting pins are useful for holding your fabric pieces in place before sewing. This is especially important for ensuring that your block’s angles and seams line up properly.
- Iron: Pressing your seams is essential for a polished finish. Have your iron ready to press the fabric after each step of the sewing process.
With these materials gathered, you are now ready to begin constructing your Liberty Legacy block!
2. Cutting the Fabric for the Liberty Legacy Block
Cutting your fabric precisely is one of the most crucial steps in this Liberty Legacy block – Tutorial. Accurate cuts ensure that your block will fit together perfectly and that the design elements remain crisp and clean.
- Step 1: Start by pressing your fabric to remove any wrinkles. This will make it easier to achieve precise measurements when cutting your pieces.
- Step 2: Follow the cutting measurements outlined in the block pattern. Typically, you will need to cut squares, triangles, and rectangles, depending on the design of the Liberty Legacy block. Refer to your pattern for exact measurements, but make sure that all pieces are consistent in size.
- Step 3: Double-check your measurements before cutting each piece to avoid any errors that could cause issues during assembly. A ruler with clear markings will help you stay on track.
- Step 4: Cut the fabric using a rotary cutter, ensuring that your cuts are straight and even. A cutting mat with grid lines can help maintain accuracy as you slice through the fabric.
- Step 5: Once you’ve cut all the necessary pieces, organize them by shape and size. This will make the next steps of the tutorial easier to follow, and it will keep your workspace tidy.
- Step 6: Label each piece according to the block diagram if you’re working on multiple blocks or creating a larger project. This will prevent confusion as you progress through the assembly.
By taking your time to cut the fabric correctly, you’re setting yourself up for success as you move on to assembling the Liberty Legacy block.
3. Assembling the Liberty Legacy Block
Now that you have all your fabric pieces cut, it’s time to start sewing them together. This section of the Liberty Legacy block – Tutorial will guide you through assembling the block step by step.
- Step 1: Begin by sewing the smaller units together, such as squares and triangles, that will form the different components of the block. Always use a ¼-inch seam allowance to ensure consistency throughout the block.
- Step 2: After sewing each section, press the seams open or to the side, depending on the instructions in your pattern. Pressing is a crucial step that keeps your fabric flat and prevents unnecessary bulk in the finished block.
- Step 3: Start piecing the larger sections of the block together. Take care to align the edges and points accurately, using pins to hold the fabric in place if needed.
- Step 4: Continue pressing each seam after sewing to maintain a clean and professional look. Pressing as you go ensures that each part of the block fits together neatly.
- Step 5: Once the entire block is assembled, give it a final press with your iron to set the seams and smooth out any wrinkles. Proper pressing at every stage of the process will give your block a polished finish.
- Step 6: Trim any excess fabric along the edges of the block to square it up. Ensuring that your block is the correct size will make it easier to join with other blocks in a quilt or project.
Following these steps will result in a well-constructed Liberty Legacy block that showcases the intricate design elements.
4. Using and Customizing the Liberty Legacy Block
The Liberty Legacy block is a versatile design that can be used in various quilt layouts. In this part of the Liberty Legacy block – Tutorial, we’ll explore how to use your finished block and suggest ways to customize it.
- Step 1: Once you have completed your Liberty Legacy block, consider how it will be used in your project. This block can be incorporated into a full quilt, used as part of a sampler quilt, or even displayed as a wall hanging.
- Step 2: If you’re making multiple blocks for a larger quilt, plan out your color scheme in advance. Using consistent colors or varying the palette can give your quilt a unified or scrappy look, depending on your preference.
- Step 3: Experiment with different fabric patterns and colors for the Liberty Legacy block. Changing the fabric choices can dramatically alter the look of the block, giving it a more traditional or modern feel.
- Step 4: Consider adding borders to your Liberty Legacy block to frame the design and make it larger. Borders can be as simple as a single fabric strip or a more complex pieced border.
- Step 5: Use your sewing machine or hand-quilting techniques to quilt around the edges of the block. This will give your block additional texture and make it stand out in your quilt.
- Step 6: Once your block is part of a finished quilt, bind the quilt to complete the project. Binding adds a professional finish and helps protect the edges of the quilt.
By customizing the Liberty Legacy block, you can create a unique quilt that reflects your style and creativity.
FAQ: Common Questions About the Liberty Legacy Block
1. What size is the Liberty Legacy block?
The size of the Liberty Legacy block can vary depending on the pattern you’re following. A common size for this block is 12 inches by 12 inches, but it can be scaled up or down to fit your project.
2. Is the Liberty Legacy block suitable for beginners?
Yes, the Liberty Legacy block is a great block for beginner quilters. The block is straightforward to assemble, and its geometric design makes it a good project for practicing piecing skills.
3. What fabrics work best for the Liberty Legacy block?
This block looks best with fabrics that provide contrast. A combination of light and dark fabrics helps highlight the design elements and gives the block a crisp, clean appearance.
4. Can I make a full quilt with only Liberty Legacy blocks?
Absolutely! A full quilt made from Liberty Legacy blocks can create a stunning and cohesive design. Consider using different color variations for each block to add depth and interest to the quilt.
5. How can I ensure that my seams are accurate?
To ensure accurate seams, use a ¼-inch seam allowance when sewing the pieces together. Pressing your seams as you go and using quilting pins to hold pieces in place can also help maintain precision.
6. Can I customize the Liberty Legacy block?
Yes! You can customize the Liberty Legacy block by using different fabrics, colors, or even modifying the block size. Adding borders or experimenting with layout options can also personalize your project.
Join our VIP broadcast list and gain access to exclusive patterns, all for free. As a VIP member, you’ll receive the best patterns daily, delivered directly to your device. ✨📱 It’s a unique opportunity to stay up-to-date with the latest trends and designs, curated just for you. Don’t miss out on enhancing your projects and discovering new inspirations with the best patterns every day! 🎨🔝
Conclusion
In this Liberty Legacy block – Tutorial, we’ve covered everything from gathering materials to cutting fabric, assembling the block, and customizing it for your projects. The Liberty Legacy block is a beautiful and versatile design that can be adapted to fit a range of quilt styles. Whether you’re making a single block or creating an entire quilt, the steps in this tutorial will guide you through the process with ease.
PATTERN HERE
We’d love to hear from you! How did your Liberty Legacy block turn out? Feel free to leave a comment with your thoughts, suggestions, or any questions you have. Happy quilting!

