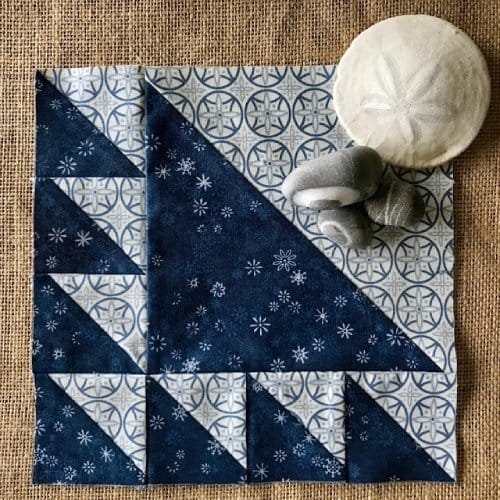
The Lady of the Lake Quilt Block is a timeless design that has been loved by quilters for generations. Its geometric elegance combines both half-square triangles and larger triangles, making it a visually striking pattern.
Whether you’re a beginner or an experienced quilter, this Lady of the Lake Quilt Block Tutorial will walk you through the steps to create this beautiful quilt block. Known for its versatility, the Lady of the Lake Quilt Block offers endless possibilities in color choices and layouts, which makes it perfect for various quilt projects.
In this tutorial, we’ll break down the process into manageable steps, ensuring you’ll have a clear understanding of how to piece together this block.
Using this Lady of the Lake Quilt Block Tutorial, you’ll be able to craft stunning designs that can either stand alone as a focal point or be repeated for an entire quilt.
We’ll also discuss some tips to ensure your fabric choices and piecing are precise, giving your quilt a professional finish.
Before we dive into the specifics, it’s important to gather your materials, including fabrics, a rotary cutter, a ruler, and a sewing machine. By the end of this tutorial, you’ll not only know how to create the Lady of the Lake Quilt Block, but you’ll also feel more confident in your quilting skills.
1. Understanding the Basics of the Lady of the Lake Quilt Block
The Lady of the Lake Quilt Block is primarily composed of triangles, and mastering the half-square triangle (HST) is essential for success. These triangles form the foundation of the pattern, creating the unique look of the quilt block. By learning how to make precise cuts and align your pieces, you’ll be able to bring this pattern to life with ease.
First, you’ll need to choose fabrics with contrasting colors to emphasize the geometric design of the Lady of the Lake Quilt Block. Traditional versions often use a dark and light color scheme, but you can play around with modern prints and shades.
Once you have your fabrics ready, the next step is to cut your fabric squares. The Lady of the Lake Quilt Block consists of several smaller squares and triangles, and accuracy is key when cutting these pieces. Use a rotary cutter and ruler to ensure all pieces are identical in size, preventing any misalignment during the sewing process.
Next, it’s time to sew your half-square triangles. This is done by placing two fabric squares right sides together, drawing a diagonal line from one corner to the opposite corner, and sewing a quarter-inch seam on both sides of the line. After sewing, cut along the drawn line and press the seams to one side.
After you have your HSTs, you can begin arranging the pieces to form the Lady of the Lake Quilt Block. Place the larger triangle in one corner and arrange the smaller half-square triangles around it to create the block’s signature look.
Lastly, sew all the pieces together, row by row. Press your seams as you go to keep the block flat and prevent any bulkiness.
2. Choosing the Right Fabrics for Your Lady of the Lake Quilt Block
Selecting the perfect fabrics is crucial for any quilt, and the Lady of the Lake Quilt Block is no exception. The contrast between the two fabric colors is what makes this block stand out, so take your time when deciding on your color palette.
Many quilters opt for a classic combination of dark and light fabrics, which highlights the sharp edges of the triangles in the block. If you prefer a more modern twist, consider using bold prints or even a monochromatic scheme with different shades of the same color.
When shopping for fabrics, consider using high-quality cotton quilting fabric. Cotton is durable, easy to sew, and holds its shape well, which is important for the precision required in the Lady of the Lake Quilt Block.
In addition to choosing fabric colors, think about the scale of any prints you use. Small-scale prints work well for the half-square triangles, while larger-scale prints may be better suited for the larger triangles in the block. Mixing and matching print scales can add depth and interest to your quilt block.
It’s also a good idea to pre-wash your fabrics to avoid any shrinkage after the quilt is completed. Washing the fabrics beforehand also ensures that any excess dye is removed, preventing bleeding during the quilting process.
Lastly, don’t be afraid to experiment! Quilting is an art form, and the Lady of the Lake Quilt Block offers a lot of room for creativity. Try different fabric combinations until you find the one that speaks to you.
3. Step-by-Step Instructions for Making the Lady of the Lake Quilt Block
Creating the Lady of the Lake Quilt Block is a straightforward process if you break it down into small, manageable steps. This section will guide you through each step to ensure your block comes together perfectly.
First, gather your fabric pieces. For one block, you’ll need one large square of fabric for the background and several smaller squares for the half-square triangles.
Begin by making the half-square triangles (HSTs). As mentioned earlier, place two squares right sides together, mark a diagonal line, and sew a quarter-inch seam on either side. Once sewn, cut along the diagonal line and press the seams.
After making your HSTs, it’s time to arrange them. Start by placing the large triangle in one corner and the smaller HSTs in a grid around it. This is where the design of the Lady of the Lake Quilt Block starts to take shape.
Next, sew each row of triangles together. Make sure to pin the seams where the triangles meet to ensure that your points are sharp. Precision is key for a professional-looking quilt block.
Once all the rows are sewn, join the rows together. Again, be mindful of your seam alignment to avoid any wonky angles. Press your seams after sewing to keep the block flat.
Finally, trim any excess fabric to square up the block, ensuring all sides are equal. Your Lady of the Lake Quilt Block is now complete and ready to be incorporated into your quilt!
4. Tips for Perfecting Your Lady of the Lake Quilt Block
Even the most experienced quilters can benefit from a few tips when making the Lady of the Lake Quilt Block. Below are some strategies to help you achieve the best results.
First, ensure your seams are accurate. Using a quarter-inch foot on your sewing machine can help keep your seam allowances consistent, which is critical for this block.
Second, always press your seams. Pressing, rather than ironing, helps to set the stitches and keeps your block flat. Press seams to one side or open, depending on your preference.
Third, consider using starch to keep your fabric stiff. Starch can help prevent the fabric from stretching or shifting while sewing, leading to more precise blocks.
If you find that your points are not aligning as they should, take the time to rip out the stitches and try again. It may be frustrating, but it’s worth it for the final result.
Also, don’t forget to square up your half-square triangles before assembling the block. Trimming them to the correct size ensures that all pieces will fit together perfectly.
Finally, practice makes perfect! If this is your first time making the Lady of the Lake Quilt Block, try making a test block with scrap fabrics before cutting into your chosen fabrics.
FAQ
Q: What is the Lady of the Lake Quilt Block?
A: The Lady of the Lake Quilt Block is a traditional quilt design that features triangles arranged in a striking geometric pattern. It’s made up of half-square triangles and larger triangles.
Q: Is the Lady of the Lake Quilt Block difficult to make?
A: While the block requires precision, it’s suitable for quilters of all skill levels. The key is to take your time with the cutting and piecing.
Q: Can I use patterned fabrics for the Lady of the Lake Quilt Block?
A: Absolutely! Patterned fabrics can add a unique touch to the block. Just ensure there’s enough contrast between the fabrics to highlight the design.
Q: What size should the finished block be?
A: The size of your finished Lady of the Lake Quilt Block depends on the dimensions of your fabric pieces. Common sizes range from 10 to 12 inches square.
Q: Do I need special tools to make this block?
A: You’ll need basic quilting tools, such as a rotary cutter, ruler, sewing machine, and iron. A quarter-inch foot for your machine is also helpful.
Q: How can I ensure my points are sharp?
A: Precision is key. Make sure to align your pieces carefully and sew accurate seam allowances. Pinning the seams can help keep everything in place.
Join our VIP broadcast list and gain access to exclusive patterns, all for free. As a VIP member, you’ll receive the best patterns daily, delivered directly to your device. ✨📱 It’s a unique opportunity to stay up-to-date with the latest trends and designs, curated just for you. Don’t miss out on enhancing your projects and discovering new inspirations with the best patterns every day! 🎨🔝
Conclusion
The Lady of the Lake Quilt Block is a beautiful and timeless design that can be adapted for a variety of quilt projects. By following this Lady of the Lake Quilt Block Tutorial, you’ve learned how to create this block step by step, from choosing fabrics to piecing and sewing.
We hope this guide has helped you feel more confident in your quilting abilities. Feel free to share your thoughts or suggestions in the comments below!

