The Kindred Pinwheels – Quilting Tutorial is a beautiful and dynamic project that blends traditional quilting techniques with modern design elements.
Pinwheel blocks are a timeless favorite among quilters, thanks to their simple construction and visually appealing look. This tutorial will guide you through creating your own stunning Kindred Pinwheels quilt, perfect for adding a touch of charm to your home or giving as a heartfelt gift.
The Kindred Pinwheels quilt uses basic quilting blocks, but the arrangement of colors and patterns can make it a striking centerpiece in any room. Whether you’re an experienced quilter or a beginner looking for an exciting project, this tutorial will provide step-by-step instructions to ensure success.
The Kindred Pinwheels – Quilting Tutorial focuses on precision and technique while keeping the process fun and accessible.
In this tutorial, you’ll learn about the necessary materials, quilting techniques, and assembly methods that will bring your Kindred Pinwheels quilt to life. Let’s dive into the process and discover how to create a masterpiece that reflects your creativity.
1. Gathering Materials for the Kindred Pinwheels Quilt
To begin your Kindred Pinwheels – Quilting Tutorial, it’s important to start with the right materials. Choosing high-quality fabric and tools will make the quilting process easier and more enjoyable.
- Fabric Selection: For a vibrant Kindred Pinwheels quilt, choose two or three contrasting fabric patterns or colors. Cotton is the most popular choice for quilting because it’s durable and easy to work with. A solid color paired with a patterned fabric will give the pinwheels a bold look.
- Rotary Cutter and Mat: A sharp rotary cutter and a self-healing cutting mat are essential for cutting your fabric pieces precisely. Clean cuts ensure that your quilt pieces align perfectly.
- Ruler: A quilting ruler will help you measure and cut the fabric accurately. This is especially important for the pinwheel shapes, as they require precise measurements.
- Sewing Machine: A reliable sewing machine will speed up the process, although hand quilting is also an option. Make sure your machine is set up with the correct tension and needle for quilting.
- Batting and Backing: Choose a lightweight batting for a cozy yet manageable quilt. Your backing fabric should complement the colors of the pinwheel blocks.
With all your materials ready, you’re well-equipped to start building your Kindred Pinwheels quilt.
2. Cutting and Preparing the Pinwheel Blocks
The next step in the Kindred Pinwheels – Quilting Tutorial is to cut and prepare the pieces for your pinwheel blocks. This stage is crucial to ensure that the pinwheels come together neatly.
- Step 1: Cutting Fabric Squares: Start by cutting fabric squares of equal size from both your patterned and solid fabrics. A standard size for pinwheel blocks is 5-inch squares, but you can adjust the size to suit your design.
- Step 2: Pairing Fabrics: Pair one square of patterned fabric with one square of solid fabric, placing them right sides together. This will create the contrasting effect needed for the pinwheel pattern.
- Step 3: Drawing Diagonal Lines: Using a fabric marker, draw a diagonal line from one corner of the square to the opposite corner. This line will serve as a guide for sewing.
- Step 4: Sewing Along the Lines: Sew a straight stitch on either side of the diagonal line, approximately ¼ inch away from the line. This will create two sewn triangles once cut.
- Step 5: Cutting the Triangles: Using your rotary cutter, carefully cut along the diagonal line, creating two triangles from each fabric pair. These triangles will form the basis of your pinwheels.
- Step 6: Pressing the Seams: Open the triangles and press the seams to one side. This helps flatten the fabric and makes it easier to align the pieces when assembling the blocks.
By following these steps, you’ll have the building blocks for your Kindred Pinwheels quilt, ready to be assembled into the iconic pinwheel design.
3. Assembling the Pinwheels
With the individual triangles ready, the next phase of the Kindred Pinwheels – Quilting Tutorial is assembling them into the classic pinwheel blocks. This part is where your quilt starts to take shape and come to life.
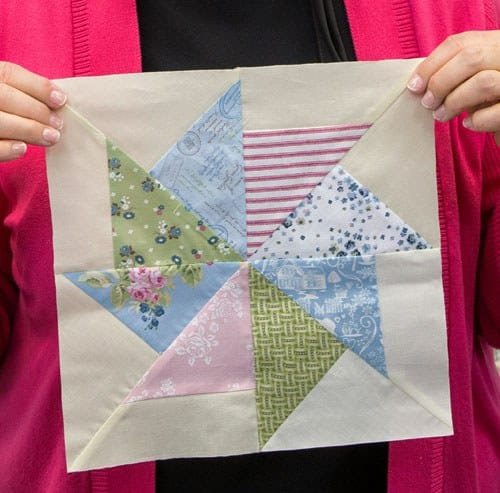
- Step 1: Arranging the Triangles: Arrange four triangles to form a pinwheel shape, alternating between the patterned and solid fabrics. The triangles should create a cohesive, swirling motion, which is the defining characteristic of the pinwheel block.
- Step 2: Joining Two Triangles: Start by sewing two triangles together, aligning their edges carefully. Use a ¼-inch seam allowance to ensure that the points of the triangles meet at the center of the block.
- Step 3: Creating Two Halves: Repeat the process with the other two triangles, creating two halves of the pinwheel. Press the seams to one side, and make sure they lie flat.
- Step 4: Joining the Halves: Once you have two halves, sew them together, again using a ¼-inch seam allowance. Pay close attention to the center of the block, as this is where all the points of the pinwheel should meet.
- Step 5: Trimming the Block: After sewing, trim any excess fabric to ensure that each pinwheel block is uniform in size. This will help later when you’re joining the blocks together into the quilt top.
- Step 6: Repeating the Process: Repeat these steps for each pinwheel block. The number of blocks you need will depend on the size of your quilt. A typical throw-size quilt might require 30 to 40 pinwheel blocks.
By completing this stage of the Kindred Pinwheels – Quilting Tutorial, you will have a series of pinwheel blocks that are ready to be pieced together into a quilt top.
4. Quilting and Finishing the Kindred Pinwheels Quilt
Now that your pinwheel blocks are ready, the final step of the Kindred Pinwheels – Quilting Tutorial is assembling the quilt top, adding the batting and backing, and quilting the layers together.
- Step 1: Arranging the Blocks: Lay out your pinwheel blocks in rows, arranging them to your liking. You can create a random placement of colors or a more structured pattern, depending on your preference.
- Step 2: Sewing the Rows: Start by sewing the blocks together in rows, ensuring that each seam aligns properly. Press the seams after each row to keep the quilt top flat.
- Step 3: Joining the Rows: Once all the rows are complete, join them together to form the full quilt top. Again, press the seams to one side to ensure a smooth surface.
- Step 4: Adding Batting and Backing: Lay the quilt top on top of the batting, and then place the backing fabric underneath. Smooth out any wrinkles, and pin the layers together to prevent shifting.
- Step 5: Quilting the Layers: Use your sewing machine or hand quilting techniques to quilt the three layers together. You can follow the lines of the pinwheel blocks or create a free-motion design to add texture and interest.
- Step 6: Binding the Quilt: To finish the edges of your quilt, sew on a fabric binding. This will give your quilt a neat, professional finish and protect the edges from fraying.
After completing these steps, your Kindred Pinwheels quilt is ready to be enjoyed! Whether it’s for personal use or a gift, the quilt is sure to impress with its dynamic pinwheel design.
FAQ
1. What size should I make the Kindred Pinwheels quilt?
The size of your Kindred Pinwheels quilt depends on your personal preference. You can make a small baby quilt, a throw-size quilt, or even a larger bedspread by adjusting the number of pinwheel blocks.
2. How do I choose the right fabric for the pinwheels?
Choose fabrics that contrast well with each other to make the pinwheels stand out. A combination of solid colors and prints works well for this pattern, creating a visually striking effect.
3. Can I hand sew the Kindred Pinwheels quilt?
Yes, you can hand sew the quilt if you prefer. It will take longer than using a sewing machine, but many quilters enjoy the meditative process of hand quilting.
4. What is the best batting to use for this quilt?
A lightweight cotton or polyester batting is ideal for the Kindred Pinwheels quilt. These materials provide warmth without making the quilt too bulky.
5. How do I ensure that my pinwheel points match up?
To ensure that your pinwheel points meet in the center, use precise cutting and sewing techniques. Pinning the pieces together carefully before sewing will also help align the points correctly.
6. Can I customize the pinwheel size?
Yes! You can adjust the size of your pinwheels by increasing or decreasing the size of your fabric squares. Just be sure that all the blocks are the same size for consistency.
Join our VIP broadcast list and gain access to exclusive patterns, all for free. As a VIP member, you’ll receive the best patterns daily, delivered directly to your device. ✨📱 It’s a unique opportunity to stay up-to-date with the latest trends and designs, curated just for you. Don’t miss out on enhancing your projects and discovering new inspirations with the best patterns every day! 🎨🔝
Conclusion
The Kindred Pinwheels – Quilting Tutorial is a perfect project for quilters of all skill levels. With its vibrant design and simple construction, this quilt is a great way to showcase your creativity. From selecting fabrics to assembling the pinwheel blocks, this tutorial has guided you through each step of the process.
We hope you enjoyed following along and are excited to create your own Kindred Pinwheels quilt. Please feel free to leave your honest feedback and any suggestions you may have. Happy quilting!

