The Jewel Box Block quilting pattern is a timeless favorite among quilters who appreciate both beauty and precision in their craft. Known for its dazzling visual appeal and geometric symmetry, this pattern is perfect for quilters of all levels, from beginners looking to challenge themselves to experts seeking a classic with creative potential. Whether you’re designing a full quilt or a smaller project, the Jewel Box Block pattern offers versatility and elegance in every stitch.
Using a mix of half-square triangles and four-patch units, the Jewel Box Block pattern creates a sparkling effect reminiscent of gemstones, hence its name. Each block contributes to a larger mosaic, which can range from traditionally uniform to uniquely modern depending on your fabric choices. The pattern is as adaptable as it is beautiful, making it an essential part of any quilter’s repertoire.
In this article, we’ll dive deep into the construction, variations, design strategies, and practical tips for mastering the Jewel Box Block quilting pattern. You’ll also find answers to frequently asked questions and a helpful conclusion to guide your next steps in this creative journey.
Understanding the Jewel Box Block Pattern
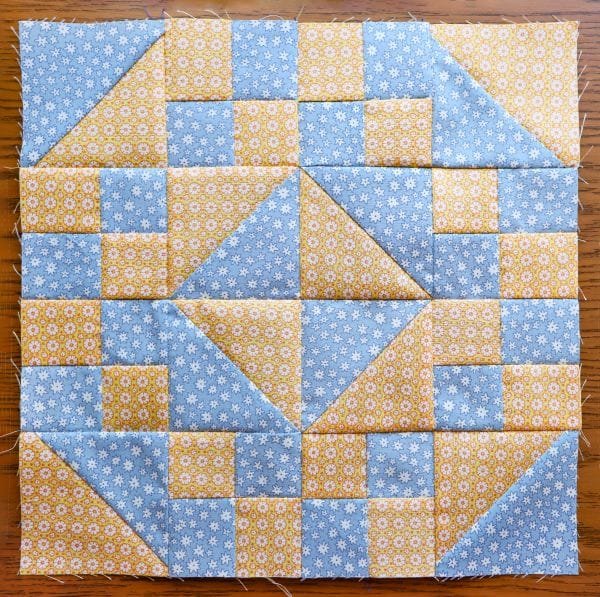
The Jewel Box Block pattern is built from simple units: half-square triangles (HSTs) and four-patch blocks. These elements combine to create an optical illusion of layered gems or tiles, offering a dynamic and multi-dimensional look. Traditionally, two contrasting color families are used — one for the “gems” and another for the background — but the pattern welcomes experimentation.
The typical size for a Jewel Box Block pattern is 12 inches when finished, though this can vary depending on your project’s needs. Many quilters enjoy enlarging or shrinking the design to create borders, wall hangings, or bed-sized quilts. Regardless of scale, the balance of symmetry and sparkle remains intact.
Another key feature of this pattern is its efficiency. Many blocks can be chain-pieced, saving time and fabric. The use of strip-piecing methods for four-patch units and quick-piecing for HSTs makes it beginner-friendly while offering enough complexity to keep seasoned quilters engaged.
To keep your blocks crisp and consistent, accurate cutting and pressing are essential. Seam allowances must be precise to ensure the HSTs and four-patch units align perfectly. When assembled correctly, the pattern naturally forms an intricate lattice that mimics a box of jewels.
Color placement plays a vital role in how the pattern is perceived. By using a range of light, medium, and dark tones, you can emphasize depth and dimension. Batiks, solids, or small-scale prints all work well in this context, depending on the desired effect.
The layout options are virtually endless. While the traditional grid layout is most common, rotating blocks or introducing negative space can modernize the overall look. You can easily personalize the Jewel Box Block quilting pattern to fit your unique quilting style.
Fabric Selection and Color Theory
Selecting the right fabrics for the Jewel Box Block pattern is one of the most enjoyable and important parts of the process. This pattern thrives on contrast, so understanding color theory can help you make choices that elevate the final result.
Start by choosing two main color groups — traditionally, a light background and a dark or colorful gem section. Jewel tones like sapphire blue, ruby red, emerald green, and amethyst purple are ideal for the “jewels” in your design. These vibrant colors pop beautifully against neutral backgrounds.
Consider using tone-on-tone fabrics to add texture without overwhelming the design. These prints have subtle patterns in a single color, which can add richness without making the quilt feel busy. This is especially useful if you want your Jewel Box Block pattern to have an elegant or vintage feel.
For a modern twist, experiment with low-volume prints or even solid white as the background. Pair this with bold, saturated colors to create a quilt that feels fresh and contemporary. Grayscale or monochromatic palettes can also be stunning when used thoughtfully.
Pre-cuts like fat quarters and jelly rolls work well with this pattern. Their variety in color and pattern makes it easy to create the visual diversity the Jewel Box Block pattern thrives on. Plus, they save cutting time and reduce fabric waste.
When selecting fabrics, lay them out together and view them in both natural and artificial light. This helps ensure the contrast is strong enough to highlight the intricate elements of each block. The more contrast, the more the “jewels” will stand out.
Keep in mind that the final layout will affect how the colors interact. You might love a fabric in isolation, but it may not work as intended within the full quilt. Always test your blocks first before committing to your final selection.
Techniques and Piecing Tips
Success with the Jewel Box Block quilting pattern comes down to mastering a few essential techniques. The two foundational units — the four-patch and the half-square triangle — need to be precise and consistent.
Start with your four-patch units. The easiest way to create them is by strip piecing: sewing two strips together, pressing the seams, and then sub-cutting into smaller segments. This method ensures your squares are perfectly aligned and quick to assemble.
For half-square triangles, use the two-at-a-time method: place two squares right sides together, draw a diagonal line, sew on both sides of the line, then cut down the center. This method creates uniform, accurate HSTs that are easy to duplicate.
Pressing is just as important as sewing. Always press your seams in opposite directions to create nesting seams. This makes block assembly easier and reduces bulk at the corners where multiple units meet.
When assembling your block, lay out all your pieces first to ensure correct placement. This is especially important if you’re using directional prints or experimenting with color gradation. A design wall or even a clean floor space can help visualize the layout.
Maintain a consistent 1/4-inch seam allowance. Many quilters use a special presser foot to help guide their stitching. If your seams are off, your blocks may not align properly, which can throw off the entire quilt.
Finally, square up your units before joining them. Even slight size variations can result in wonky blocks. Investing time in trimming ensures that each Jewel Box Block pattern piece fits together perfectly in the final layout.
Project Ideas and Creative Variations
The Jewel Box Block quilting pattern can be adapted to fit countless projects beyond a standard quilt. Its balanced structure and eye-catching design make it suitable for both decorative and functional pieces.
Try making a table runner using only a few Jewel Box Blocks. Choose seasonal colors or holiday themes for a festive centerpiece. This is also a great way to use leftover scraps or test fabric combinations before committing to a larger project.
Wall hangings are another excellent application. A mini-quilt with 4 to 9 blocks framed and quilted can serve as artwork for your sewing space or gift for a fellow quilter. This size also allows you to focus on fine details without the commitment of a full quilt.
Pillows featuring the Jewel Box Block pattern add elegance to home décor. Simply make a single block or a panel of smaller blocks, add a quilted backing, and insert a pillow form. It’s a fast way to showcase your favorite fabrics.
You can also turn your blocks into tote bags, notebook covers, or even garment accents. Quilting isn’t limited to blankets — with the right stabilizers and techniques, your Jewel Box Block pattern can be wearable or utilitarian.
If you’re feeling adventurous, play with scale. Oversized blocks give the quilt a modern, minimalist feel, while tiny blocks offer intricate charm. Mixing sizes within a single quilt can add movement and visual interest.
Another creative idea is using negative space. Instead of a full grid of blocks, leave some blank areas filled only with background fabric and detailed quilting. This draws more attention to the jewel-like qualities of each block.
FAQ – Frequently Asked Questions About the Jewel Box Block Pattern
What is a Jewel Box Block in quilting?
The Jewel Box Block is a traditional quilt block made from four-patch and half-square triangle units. It creates a jewel-like appearance when repeated in a grid pattern.
Is the Jewel Box Block pattern beginner-friendly?
Yes! It’s perfect for beginners familiar with basic piecing techniques like HSTs and four-patch construction. With proper guidance and precision, any quilter can enjoy making this pattern.
What size should the Jewel Box Block be?
Most quilters use a 12-inch finished block, but you can resize it according to your project. Smaller or larger blocks can be used depending on the desired scale of the final quilt.
Can I use pre-cut fabrics with this pattern?
Absolutely. Fat quarters and jelly rolls are ideal for the Jewel Box Block pattern. They provide variety and make fabric coordination simpler.
How do I make sure my blocks align correctly?
Focus on accurate cutting, consistent seam allowances, and proper pressing. Trimming your units to size before assembling the blocks ensures clean, sharp results.
What kind of quilting works best with this block?
Straight-line quilting, grid quilting, or echo quilting around the “jewel” shapes works beautifully. It emphasizes the structure of the block without overpowering the fabric design.
Conclusion
The Jewel Box Block quilting pattern is a stunning example of how simple units can combine to create intricate, eye-catching designs. With endless fabric and layout options, it empowers quilters to craft something truly personal and beautiful. Whether you’re sewing a table runner, a bedspread, or a decorative wall piece, the versatility and charm of this pattern make it a must-try.

