Are you looking for a fun and easy quilting project? Our Jelly Roll Strip Cushion Cover Tutorial is just what you need!
This free quilt pattern is perfect for both beginner and experienced quilters who want to create a stylish and practical cushion cover using jelly roll strips. In this tutorial, we’ll guide you through the steps of making this beautiful cushion cover, offering tips and tricks to make the process smooth and enjoyable.
Using jelly roll strips in your quilting projects can save time and add a beautiful, coordinated look to your creations.
These pre-cut fabric strips are versatile and make it easy to achieve a professional finish without the hassle of cutting and measuring each piece individually.
Whether you’re updating your home decor or crafting a gift for someone special, this cushion cover is a delightful project that adds a touch of charm to any space.
Follow along with our detailed instructions to make your own jelly roll strip cushion cover. This tutorial will provide step-by-step guidance, ensuring you have all the information you need to create a stunning quilted cushion.
Let’s dive into the materials you’ll need and the techniques you’ll use to make your project a success.
1. Materials and Tools Needed
To start your Jelly Roll Strip Cushion Cover Tutorial, gather the following materials and tools. These are essential for ensuring your cushion cover turns out beautifully:
- Jelly Roll Strips: Choose a jelly roll that matches your decor or personal style. A jelly roll typically contains 40 strips of fabric, each 2.5 inches wide and 42-45 inches long.
- Backing Fabric: You’ll need a piece of fabric for the back of the cushion cover. This can be a coordinating fabric that complements your jelly roll strips.
- Batting: Batting provides extra padding and comfort. For a cushion cover, use a thin layer of batting to avoid excessive bulk.
- Thread: Choose a thread color that blends well with your fabric to ensure a clean and professional finish.
- Sewing Machine: A standard sewing machine is sufficient for this project. Make sure it’s in good working condition and ready for quilting.
- Basic Sewing Supplies: Prepare your sewing essentials, including pins, a rotary cutter, cutting mat, and quilting ruler.
With these materials and tools at hand, you’ll be ready to start creating your jelly roll strip cushion cover.
2. Cutting and Preparing Your Fabric
Before you begin sewing, proper preparation of your fabric is crucial. Here’s how to cut and prepare your jelly roll strips for the cushion cover:
- Choose Your Layout: Decide on the layout for your strips. You can arrange them in a random pattern or a specific design like a checkerboard or striped pattern.
- Cut the Jelly Roll Strips: Depending on your design, you may need to trim the strips to fit your cushion cover dimensions. Measure and cut accordingly.
- Prepare the Backing Fabric: Cut the backing fabric to the size of your cushion form, allowing extra for seam allowances.
- Cut the Batting: Cut the batting to the same size as the backing fabric. This ensures that the cushion will have uniform padding.
- Press Your Fabric: Iron the jelly roll strips and backing fabric to remove any wrinkles. This step helps achieve crisp seams and a polished look.
- Assemble the Fabric Layers: Layer the batting between the backing fabric and the jelly roll strips. Smooth out any wrinkles and ensure everything is aligned properly.
Proper cutting and preparation will set the stage for a successful sewing process.
3. Assembling the Cushion Cover
Now that your fabric is prepared, it’s time to assemble your jelly roll strip cushion cover. Follow these steps for a seamless assembly process:
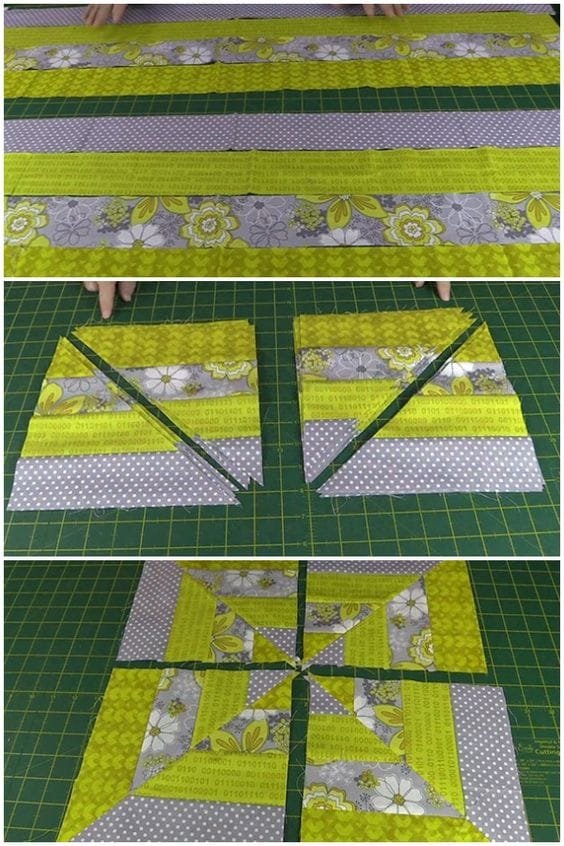
- Arrange the Strips: Lay out the jelly roll strips on a flat surface according to your chosen design. Arrange them in the desired order.
- Sew the Strips Together: Start by sewing the strips together in rows. Use a 1/4-inch seam allowance for accurate stitching. Press each seam after sewing.
- Join the Rows: Once you have completed all the rows, sew them together to form the cushion cover top. Press the seams open to reduce bulk.
- Attach the Backing Fabric: Place the backing fabric on top of the assembled strips, right sides together. Sew around the edges, leaving an opening for turning.
- Turn and Press: Turn the cushion cover right side out through the opening. Press the edges and corners to ensure a crisp finish.
- Insert the Cushion Form: Place the cushion form inside the cover. Hand-stitch the opening closed for a neat finish.
With these steps, your jelly roll strip cushion cover will come together beautifully.
4. Finishing Touches
To complete your Jelly Roll Strip Cushion Cover Tutorial, add some final touches to ensure your cushion cover looks polished and professionally made:
- Topstitching: Add topstitching around the edges of the cushion cover for a clean, finished look. This step also helps keep the layers in place.
- Add Decorative Elements: Consider adding decorative elements such as fabric flowers or buttons for an extra touch of style.
- Final Press: Give your cushion cover a final press to remove any remaining wrinkles and ensure it looks its best.
- Inspect the Seams: Check all seams and edges for any loose threads or imperfections. Trim and tidy up as needed.
- Clean Up: Remove any stray threads and clean your workspace. This helps prepare for your next project and keeps your sewing area organized.
- Enjoy Your Cushion Cover: Place your finished cushion cover on your cushion form and enjoy the fresh, handmade look it brings to your home decor.
These finishing touches will enhance the overall appearance of your cushion cover and make it a standout piece in your home.
FAQ
1. What is a jelly roll in quilting? A jelly roll is a collection of pre-cut fabric strips, each 2.5 inches wide and 42-45 inches long. It’s a convenient way to get coordinated fabrics for quilting projects.
2. Can I use any type of fabric for a jelly roll cushion cover? Yes, you can use any type of fabric, but quilting cotton is commonly used due to its ease of handling and variety of patterns.
3. How do I choose the right size cushion form for my cover? Measure your cushion form and add seam allowances to determine the size of your cushion cover. Choose a form that matches these dimensions for a snug fit.
4. Can I customize the cushion cover pattern? Absolutely! You can rearrange the jelly roll strips, add additional embellishments, or modify the design to fit your personal style.
5. How do I care for my finished cushion cover? Check the fabric care instructions, but generally, you can machine wash your cushion cover in cold water and tumble dry on low. Always follow the care instructions for specific fabrics.
6. Can I use this tutorial for other quilting projects? Yes, the techniques used in this tutorial can be adapted for various quilting projects, such as table runners, wall hangings, or placemats.
Join our VIP broadcast list and gain access to exclusive patterns, all for free. As a VIP member, you’ll receive the best patterns daily, delivered directly to your device. ✨📱 It’s a unique opportunity to stay up-to-date with the latest trends and designs, curated just for you. Don’t miss out on enhancing your projects and discovering new inspirations with the best patterns every day! 🎨🔝
Conclusion
In this Jelly Roll Strip Cushion Cover Tutorial, we’ve walked through the entire process of creating a stylish and functional cushion cover using jelly roll strips. From gathering materials to assembling and finishing your cushion cover, each step is designed to help you achieve a professional result. We hope you enjoyed this tutorial and find it useful for your quilting projects.
Feel free to leave a comment with your thoughts and suggestions. We’d love to hear how your cushion cover turned out and any tips you might have for fellow quilters!

