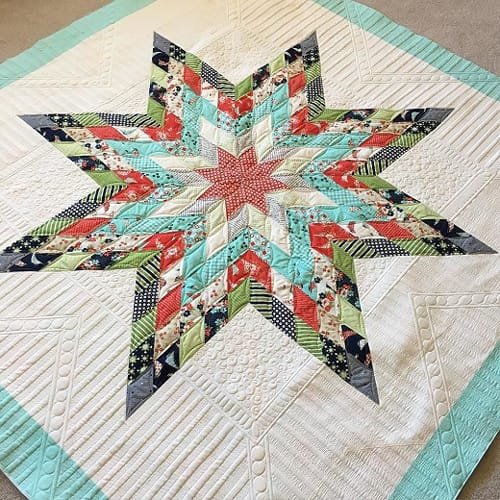
The Jellied Lone Star Quilt – Tutorial is your ultimate guide to creating one of the most visually stunning and timeless quilt patterns.
This design, known for its radiating star made of vibrant fabric strips, captures the attention of quilters for its geometric precision and dazzling appearance.
Whether you are an experienced quilter or a passionate beginner, this step-by-step tutorial will make creating your own Jellied Lone Star Quilt approachable and enjoyable.
This iconic quilt pattern combines tradition with modern flair, allowing quilters to experiment with colors, textures, and layouts.
The Jellied Lone Star Quilt is not only a work of art but also a meaningful keepsake that can be cherished for generations.
By following the instructions in this tutorial, you’ll learn the techniques needed to construct a striking centerpiece for your home or a thoughtful handmade gift.
Dive into this guide as we cover essential materials, piecing techniques, tips for assembling the star, and how to achieve a polished finish. Get ready to bring the beauty of the Jellied Lone Star Quilt to life with confidence and creativity!
1. Gathering Materials and Tools for the Quilt
Preparation is key when working on the Jellied Lone Star Quilt. Start by collecting the right materials and tools for a seamless quilting experience.
- Fabric Selection: Choose high-quality cotton fabric in eight contrasting colors to create a vibrant and balanced star pattern.
- Cutting Tools: Use a rotary cutter and a cutting mat for precise cuts. Rulers with 45-degree angles are essential for this design.
- Sewing Machine: A reliable sewing machine with a 1/4-inch presser foot ensures consistent seam allowances.
- Thread: Use a high-quality, neutral thread to complement the fabric colors.
- Iron and Board: Pressing seams is crucial for achieving flat, precise quilt blocks.
- Backing and Batting: Select a coordinating fabric for the quilt’s back and lightweight batting for softness and structure.
2. Cutting and Preparing the Fabric Strips
The hallmark of the Jellied Lone Star Quilt is its precise fabric strips, which create the star’s intricate design.
- Measuring the Strips: Cut fabric into 2.5-inch strips to maintain uniformity. Using a jelly roll can simplify this process.
- Color Arrangement: Lay out the strips in your chosen color order, ensuring a harmonious gradient or contrasting effect.
- Joining Strips: Sew the strips together lengthwise to form a “strip set.” Press seams open or to one side based on your preference.
- Creating Diamonds: Use your ruler to cut 45-degree diamonds from the strip set. Ensure each diamond is of equal size for perfect alignment.
- Organizing Pieces: Label or stack the diamond pieces to maintain the correct sequence while sewing.
- Test Layout: Arrange the diamonds on a flat surface to visualize the star pattern and make adjustments before sewing.
3. Assembling the Lone Star Pattern
Piecing the star is a rewarding process that requires attention to detail and patience.
- Joining Diamonds: Sew diamonds together in pairs, ensuring the points align perfectly at the seams.
- Creating Star Points: Combine the pairs to form larger sections, eventually completing the eight points of the star.
- Checking Seam Allowances: Use a consistent 1/4-inch seam allowance to avoid gaps or puckering.
- Pressing Seams: Press seams carefully after each step to ensure a smooth and flat finish.
- Joining Sections: Assemble the star by sewing the sections together, starting with opposite sides and working toward the center.
- Testing Fit: Lay the completed star on the background fabric to confirm it fits and adjust if needed.
4. Completing the Quilt Top and Finishing Touches
The final steps bring the Jellied Lone Star Quilt to life, ready to be enjoyed or gifted.
- Adding Background Fabric: Attach the star to the quilt top by sewing it onto the background fabric, ensuring alignment at all points.
- Borders and Sashing: Add borders or sashing around the star for additional framing and a polished look.
- Layering the Quilt: Layer the quilt top, batting, and backing fabric. Baste them together using pins or temporary spray adhesive.
- Quilting the Layers: Choose a quilting design that complements the star. Echo quilting along the star’s edges enhances its visual impact.
- Binding the Quilt: Finish the edges with a binding made from coordinating fabric. Sew the binding securely around the quilt’s perimeter.
- Final Press: Give the quilt a final press to remove any wrinkles and achieve a crisp finish.
FAQ: Common Questions About the Jellied Lone Star Quilt
1. Is the Jellied Lone Star Quilt suitable for beginners?
While it requires precise cutting and sewing, beginners can attempt this project with patience and a willingness to learn.
2. How long does it take to complete the quilt?
The time varies based on experience and quilt size but typically takes several days to weeks.
3. Can I use a pre-cut jelly roll for this quilt?
Yes! Jelly rolls are perfect for this pattern, as they provide pre-cut 2.5-inch strips in coordinated colors.
4. How do I ensure my star points align perfectly?
Use a consistent 1/4-inch seam allowance, press seams carefully, and pin pieces together before sewing.
5. What quilting designs work best for the Lone Star Quilt?
Echo quilting around the star or intricate patterns in the background enhance the quilt’s visual appeal.
6. Can I customize the size of the quilt?
Absolutely! Adjust the number of diamonds and the size of the background fabric to create a smaller or larger quilt.
Join our VIP broadcast list and gain access to exclusive patterns, all for free. As a VIP member, you’ll receive the best patterns daily, delivered directly to your device. ✨📱 It’s a unique opportunity to stay up-to-date with the latest trends and designs, curated just for you. Don’t miss out on enhancing your projects and discovering new inspirations with the best patterns every day! 🎨🔝
Conclusion
This Jellied Lone Star Quilt – Tutorial has guided you through every step of creating a dazzling quilt with precision and style. From gathering materials to finishing the quilt, each stage contributes to a stunning final piece that showcases your creativity and skill.
We’d love to hear your thoughts on this tutorial. Did it help you master the Jellied Lone Star Quilt? Share your feedback and any suggestions for future tutorials in the comments below. Happy quilting!

