If you’re looking to combine timeless elegance with a love of literature, the Jane Austen Quilt by Sheree Antoinette Mackintosh – Tutorial is the perfect project.
Inspired by the iconic English novelist, this quilt is a tribute to Jane Austen’s refined style and enduring legacy. Designed by Sheree Antoinette Mackintosh, this quilt blends classic patterns with intricate detailing, making it a treasure for quilters and Austen fans alike.
The Jane Austen Quilt by Sheree Antoinette Mackintosh is more than just a sewing project—it’s an experience that allows quilters to weave history, storytelling, and craftsmanship into a tangible work of art.
Whether you’re crafting it for your own collection or as a gift for a fellow Austen enthusiast, this quilt will be a cherished piece for years to come.
This tutorial will guide you step by step through creating your own Jane Austen Quilt, ensuring you can recreate its beauty and authenticity with confidence. Gather your materials, find a cozy workspace, and let’s begin!
1. Materials Needed for the Jane Austen Quilt
Starting any quilting project requires preparation, and the Jane Austen Quilt by Sheree Antoinette Mackintosh – Tutorial is no different. Below is a comprehensive list of materials to help you get started:
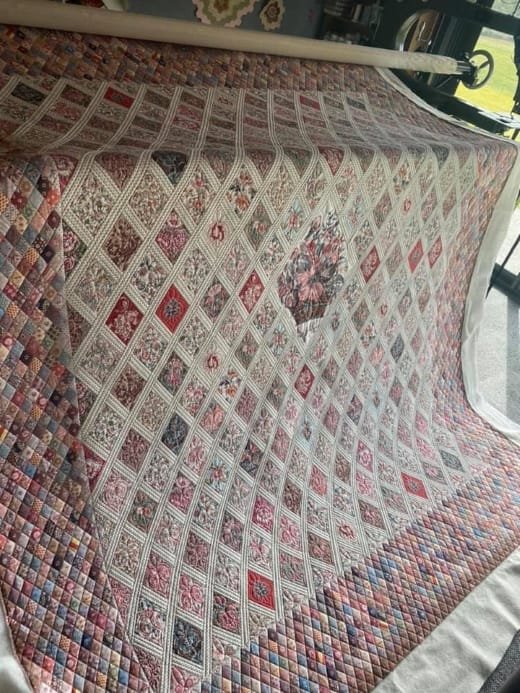
- Fabric Selection: Choose fabrics with vintage-inspired prints or muted tones reminiscent of the Regency era. Look for florals, stripes, or soft solids.
- Thread: High-quality cotton thread in colors that complement your chosen fabrics.
- Quilting Tools: A rotary cutter, self-healing cutting mat, and a quilting ruler are essential for precise cuts.
- Sewing Machine: While hand-stitching is an option, a sewing machine with a ¼-inch presser foot will speed up the process.
- Batting: Select a medium-weight batting for a cozy, finished quilt.
- Backing Fabric: Choose a fabric that harmonizes with the quilt’s overall color scheme.
- Pins and Clips: Use these to hold pieces together securely while sewing.
- Iron and Pressing Board: Pressing each seam as you sew ensures a polished finish.
With your materials ready, you’re set to begin the journey of recreating this iconic quilt.
2. Cutting and Piecing the Blocks
The Jane Austen Quilt by Sheree Antoinette Mackintosh consists of intricate blocks inspired by traditional Regency-era patterns. Follow these steps for cutting and assembling the quilt blocks:
- Plan Your Layout: Study the pattern to understand the placement of each fabric. Organize your pieces by color and size to simplify the process.
- Cutting Your Pieces: Using your rotary cutter and ruler, cut the fabrics into the shapes specified in the pattern. Precision is key to ensuring the blocks align correctly.
- Sewing the Blocks: Start by sewing smaller pieces together, gradually building up each block. Use a consistent ¼-inch seam allowance for accuracy.
- Pressing Seams: Press seams open or to one side, depending on the instructions. This helps reduce bulk and ensures a smooth finish.
- Assembling the Blocks: Arrange your blocks according to the layout. Double-check the alignment before sewing them together.
- Adding Sashing: Sashing strips can separate blocks and add visual balance to the quilt.
Completing the blocks requires patience and attention to detail, but the result is worth the effort.
3. Assembling and Quilting
Once the blocks for the Jane Austen Quilt by Sheree Antoinette Mackintosh are complete, it’s time to bring the quilt together.
- Join the Blocks: Sew the blocks together row by row, using sashing or borders if desired. Keep seams aligned for a uniform look.
- Add Borders: Borders can frame the quilt and add a finishing touch. Choose fabrics that complement the overall design.
- Prepare the Quilt Sandwich: Layer the backing fabric, batting, and quilt top. Smooth out wrinkles and secure the layers with basting spray, pins, or stitches.
- Quilting the Layers: Decide on a quilting pattern, such as straight lines, free-motion designs, or hand quilting. This step adds texture and secures the layers.
- Trim the Edges: Once quilting is complete, trim the edges to prepare for binding.
- Attach the Binding: Sew binding strips around the quilt’s edges, folding them over for a neat finish.
This process transforms your blocks into a cohesive, finished quilt ready for display or use.
4. Tips for Success with the Jane Austen Quilt
Creating the Jane Austen Quilt by Sheree Antoinette Mackintosh can be a rewarding experience. These tips will help you achieve the best results:
- Test Your Design: Make a sample block to practice before starting on the final quilt.
- Stay Organized: Label your fabric pieces and keep them sorted to avoid confusion.
- Use Quality Tools: Invest in sharp rotary blades and sturdy rulers for precise cuts.
- Take Breaks: Quilting can be time-intensive. Take breaks to avoid mistakes from fatigue.
- Join a Community: Connect with other quilters online or in local groups for inspiration and support.
- Document Your Process: Take photos of your progress to celebrate milestones and share with others.
By following these tips, you’ll enjoy the process of creating this stunning quilt while achieving professional-quality results.
FAQ
Q1: Is the Jane Austen Quilt beginner-friendly?
While some experience with quilting is recommended, beginners can attempt this project by taking their time and practicing on sample blocks first.
Q2: How large is the finished quilt?
The size depends on the pattern and the number of blocks. Common dimensions range from lap quilts to full-size bedspreads.
Q3: Can I hand-stitch the quilt?
Yes, hand-stitching is an option, but it requires more time and patience compared to using a sewing machine.
Q4: Where can I find the pattern for the Jane Austen Quilt by Sheree Antoinette Mackintosh?
Patterns are often available through online quilting platforms, specialty stores, or directly from the designer.
Q5: What type of fabric works best for this quilt?
Vintage-style fabrics with muted tones and floral prints are ideal for capturing the quilt’s Regency-era aesthetic.
Q6: How do I care for the finished quilt?
Wash the quilt in cold water with gentle detergent. Air dry or use a low-heat dryer setting to preserve its quality.
Join our VIP broadcast list and gain access to exclusive patterns, all for free. As a VIP member, you’ll receive the best patterns daily, delivered directly to your device. ✨📱 It’s a unique opportunity to stay up-to-date with the latest trends and designs, curated just for you. Don’t miss out on enhancing your projects and discovering new inspirations with the best patterns every day! 🎨🔝
Conclusion
The Jane Austen Quilt by Sheree Antoinette Mackintosh – Tutorial is a beautiful way to honor both quilting traditions and literary history. Its timeless design makes it a treasured piece for any quilter or Jane Austen fan.
We hope this tutorial has inspired you to embark on this creative journey. Share your thoughts, feedback, and suggestions in the comments below. Happy quilting!

