The Irish Chain Quilt is a classic design that has stood the test of time, beloved by quilters for its simplicity and elegance. This quilt pattern features a repeating chain-like motif that can be made in various colors and sizes, making it perfect for both beginners and seasoned quilters.
In this comprehensive tutorial, we will guide you through the process of creating your own Irish Chain Quilt, ensuring you understand each step along the way. From selecting your fabric to finishing your quilt, this guide will cover everything you need to know to achieve beautiful results.
One of the appealing aspects of the Irish Chain Quilt is its versatility. The pattern can be adapted to suit various styles and tastes, whether you prefer a traditional look with soft, muted colors or a more modern aesthetic with bold, vibrant fabrics.
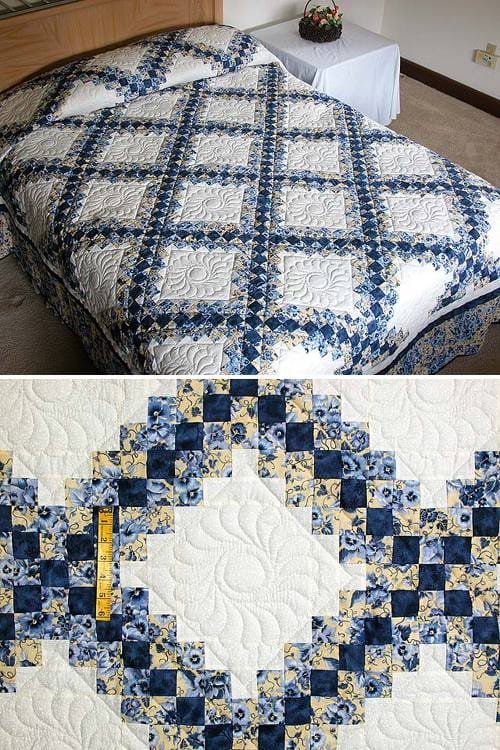
This adaptability allows quilters to express their creativity while still following a straightforward pattern. Additionally, the Irish Chain Quilt can be made in a variety of sizes, from a small throw to a large bed quilt, providing options for every project.
As you prepare to embark on your quilting journey, remember that the process is just as important as the finished product. Each stitch you take brings you closer to creating a cherished piece that can be passed down through generations. So gather your materials, set up your workspace, and let’s dive into this Irish Chain Quilt tutorial!
1. Choosing Your Materials for the Irish Chain Quilt
Before you can start making your Irish Chain Quilt, you’ll need to select the right materials. The choice of fabric plays a crucial role in the overall look and feel of your quilt.
Begin by choosing your fabric. For a traditional Irish Chain Quilt, you’ll typically need two contrasting fabric colors: one for the chains and one for the background. This contrast is what gives the quilt its distinctive appearance. Consider using high-quality cotton fabric, as it’s durable and easy to work with. Many quilters prefer to use fabric collections that offer coordinated colors and patterns, making it easier to create a cohesive design.
In addition to fabric, you will need a few essential tools. A rotary cutter and a cutting mat are indispensable for cutting your fabric accurately. Pair these with a quilting ruler for precise measurements, and you’ll be well-equipped to prepare your pieces. You will also need sewing thread that matches your fabric, as well as quilting pins to hold your fabric in place while you sew.
An iron is also essential in quilting. Pressing your seams as you go will help your quilt lay flat and maintain a polished look. A pressing mat can enhance your ironing process, allowing for better control when working with smaller pieces.
Lastly, don’t forget about batting and backing fabric. These materials will complete your quilt and provide warmth. Choose a batting that suits your desired warmth level, and select backing fabric that complements your design.
With all your materials gathered, you are now ready to begin the cutting process for your Irish Chain Quilt!
2. Cutting Your Fabric for the Irish Chain Quilt
Once you have chosen your materials, it’s time to cut your fabric for the Irish Chain Quilt. This step is crucial, as accurate cutting will ensure that your pieces fit together perfectly.
Start by washing and ironing your fabric before cutting. This not only removes any wrinkles but also pre-shrinks the fabric, helping to prevent distortion later on. After ironing, lay your fabric on the cutting mat and align it with your quilting ruler.
For a standard Irish Chain Quilt, you’ll typically cut squares and rectangles. A common size for the chain squares is 5 inches, while the background squares may also be cut to the same size or slightly larger, depending on your design. Use your rotary cutter to slice through multiple layers for efficiency, ensuring that you keep your cuts straight and even.
Once you have cut the necessary pieces, sort them by color and type. Organizing your fabric will streamline the assembly process, allowing you to quickly grab the pieces you need as you start sewing. This is especially helpful in the Irish Chain Quilt, where you will be alternating between chain blocks and background blocks.
After cutting and sorting, take a moment to review your layout. The beauty of the Irish Chain Quilt lies in its pattern, so experimenting with different arrangements can help you achieve the look you want.
With your fabric cut and organized, you are now ready to start assembling the blocks for your Irish Chain Quilt!
3. Assembling the Blocks for the Irish Chain Quilt
Now that your fabric is cut, it’s time to start assembling the blocks for your Irish Chain Quilt. This is where your quilt begins to take shape!
Begin by sewing the chain squares together. Take two squares of your chain fabric and place them right sides together. Pin along one edge and sew with a ¼-inch seam allowance. After sewing, press the seam open to reduce bulk. Repeat this process to create a row of chain squares.
Once you have a row of chain squares, you will need to add background squares. Take a background square and place it at one end of the chain row. Pin and sew the background square to the chain row, ensuring the edges align. Press the seam flat. This step is crucial for creating the chain effect that the Irish Chain Quilt is known for.
Continue this process, alternating between chain squares and background squares until your row reaches the desired length. Once you have finished one row, repeat the process to create additional rows for your quilt top.
When assembling the quilt top, take care to align the seams as you join rows together. This attention to detail will help maintain the integrity of your Irish Chain Quilt design. Pin the rows together and sew them using a ¼-inch seam allowance, pressing the seams flat after each addition.
After all rows are joined, take a moment to inspect your quilt top for any loose threads or uneven seams. Trim any excess threads to ensure everything looks neat and tidy. Your Irish Chain Quilt top is now ready for the next stages of quilting!
4. Finishing Your Irish Chain Quilt
With your quilt top completed, it’s time to finish your Irish Chain Quilt. This involves layering your quilt, quilting the layers together, and binding the edges to create a polished look.
Start by preparing your quilt sandwich. Lay the backing fabric right side down on a flat surface, then place the batting on top of it. Finally, lay your quilt top right side up on the batting. Smooth out any wrinkles to ensure that your quilt layers are flat and aligned.
Next, you will need to baste your quilt layers together. This can be done using safety pins, basting spray, or long stitches along the edges. Basting holds the layers in place and prevents shifting while you quilt. Be sure to space your basting pins evenly across the quilt to provide adequate support.
Now it’s time to quilt! You can choose to quilt by hand or use a sewing machine. The quilting design can be as simple or intricate as you desire. For the Irish Chain Quilt, straight-line quilting along the seams can enhance the chain pattern, while free-motion quilting allows for creative expression.
After quilting is complete, it’s time to trim any excess batting and backing fabric. Make sure your quilt edges are even and neat before moving on to the binding process.
For the binding, cut strips of fabric, usually 2.5 inches wide, and sew them together end to end to create one long strip. Fold the strip in half lengthwise and press. Attach the binding to the edges of your quilt, mitering the corners for a polished finish. Hand stitch or machine sew the binding in place to complete your Irish Chain Quilt.
FAQ about Irish Chain Quilt – Tutorial
Q1: What is an Irish Chain Quilt?
The Irish Chain Quilt is a traditional quilt pattern featuring a chain-like design created by alternating squares of contrasting fabrics.
Q2: What materials do I need for an Irish Chain Quilt?
You will need fabric (both for the chains and background), batting, backing fabric, sewing thread, a rotary cutter, cutting mat, quilting ruler, quilting pins, and an iron.
Q3: How do I cut the fabric for the Irish Chain Quilt?
Cut squares and rectangles from your fabric, typically using sizes like 5 inches for chain squares and varying sizes for the background squares. Use a rotary cutter and ruler for accuracy.
Q4: Can I customize the colors in my Irish Chain Quilt?
Absolutely! The Irish Chain Quilt is versatile, allowing you to choose any color combination that suits your style, from traditional to modern.
Q5: How do I ensure my quilt blocks are the same size?
Use accurate measurements and maintain a consistent ¼-inch seam allowance when sewing. Pressing seams flat will also help keep blocks uniform.
Q6: What is the finished size of an Irish Chain Quilt?
The size can vary depending on the number of blocks and the arrangement you choose. Each block typically measures 5 inches square, allowing for various sizes of quilts.
Join our VIP broadcast list and gain access to exclusive patterns, all for free. As a VIP member, you’ll receive the best patterns daily, delivered directly to your device. ✨📱 It’s a unique opportunity to stay up-to-date with the latest trends and designs, curated just for you. Don’t miss out on enhancing your projects and discovering new inspirations with the best patterns every day! 🎨🔝
Conclusion
In this comprehensive tutorial, we’ve walked through the process of creating an Irish Chain Quilt from start to finish. From selecting materials and cutting fabric to assembling blocks and finishing your quilt, each step is crucial in crafting a beautiful and timeless piece. The Irish Chain Quilt not only serves as a cozy blanket but also as a wonderful expression of creativity and skill.
We hope you feel inspired to take on this project! If you have any experiences or suggestions, please share your thoughts in the comments below. Your feedback is invaluable and can help fellow quilters in their crafting journey!

