Creating a quilt can be one of the most fulfilling crafts. In this tutorial, we will explore the Indian Trail Quilt Block, a beautiful design that adds a touch of elegance to any quilt.
This block is not only visually appealing but also serves as a fantastic introduction to quilting techniques for both beginners and seasoned quilters. Throughout this article, we will delve into the materials needed, step-by-step instructions, tips for success, and creative variations for this block.
Whether you’re making a quilt for a special occasion, a cozy throw for your living room, or simply honing your skills, the Indian Trail Quilt Block offers endless possibilities. With its unique layout and colorful patterns, it stands out among traditional quilt blocks.
This guide will equip you with all the knowledge you need to create stunning quilts with this block, ensuring that your quilting journey is enjoyable and rewarding.
Before diving into the tutorial, let’s take a moment to appreciate the history and significance of the Indian Trail Quilt Block. Named for the paths that early settlers and
Native Americans used, this block symbolizes journey and exploration, making it a perfect addition to your quilting repertoire. With a combination of triangles and squares, it creates a dynamic look that will keep your quilting projects fresh and interesting.
1. Materials Needed for the Indian Trail Quilt Block
To get started on your Indian Trail Quilt Block, you will need a few essential materials. Here’s a comprehensive list to ensure you have everything you need before you begin:
- Fabric: Choose a selection of fabrics in different colors and patterns. You will need a fabric for the background, and at least two contrasting fabrics for the triangles and squares. Cotton is a preferred choice for quilting due to its durability and ease of handling.
- Rotary Cutter and Mat: A rotary cutter makes cutting fabric much easier and more precise. Pair it with a cutting mat to protect your surfaces and maintain clean cuts.
- Ruler: A clear quilting ruler will help you measure and cut your fabric accurately.
- Sewing Machine: While hand sewing is an option, a sewing machine speeds up the process and provides more consistent stitches.
- Thread: Choose a thread that matches your fabric. A 100% cotton thread is recommended for quilting, as it is strong and blends well with most fabrics.
- Iron and Ironing Board: Pressing your fabric pieces is crucial for achieving clean seams and a polished final look.
- Quilt Batting: If you’re planning to turn your block into a quilt, you’ll need batting to provide warmth and cushioning.
Having these materials at hand will ensure that you can focus on the creative process without interruptions.
2. Step-by-Step Instructions to Create the Block
Now that you have your materials ready, let’s dive into the step-by-step instructions for creating the Indian Trail Quilt Block. Follow these guidelines carefully for the best results:
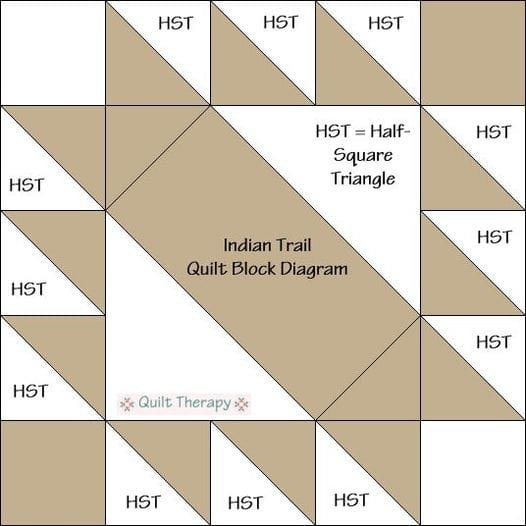
- Cut the Fabric: Begin by cutting your fabric into the necessary pieces. For the Indian Trail Quilt Block, you’ll typically need 4 squares (6.5” x 6.5”), and 8 triangles (4.5” x 4.5”). Ensure your cuts are accurate to maintain the block’s integrity.
- Make Half Square Triangles (HSTs): Take two squares of contrasting fabrics and place them right sides together. Sew a quarter-inch seam around the edges, then cut the square diagonally to create two triangles. Press the seams open or to one side.
- Arrange the Pieces: Lay out your squares and HSTs in the desired layout for the Indian Trail Quilt Block. Typically, you’ll arrange them in a way that creates a pathway or trail effect. This is a great time to play with different color combinations to see what looks best.
- Sew the Rows: Start by sewing together the pieces in each row. Use a quarter-inch seam allowance and be careful to match up your seams. Iron each row flat as you go to keep everything neat.
- Join the Rows: Once you have your rows completed, sew them together. Make sure to match seams carefully for a professional finish. Press the final seams to set your block.
- Trim and Square Up: After assembling the block, trim it down to ensure all sides are even. A square block typically measures 12.5” x 12.5” once finished.
Taking the time to follow these steps will help you achieve a beautiful Indian Trail Quilt Block. Remember, practice makes perfect, so don’t be discouraged if it doesn’t turn out perfectly on the first try.
3. Tips for Success with the Indian Trail Quilt Block
Achieving the perfect Indian Trail Quilt Block takes practice and patience. Here are some helpful tips to ensure your quilting experience is smooth and successful:
- Pre-Wash Your Fabric: Pre-washing your fabric can help prevent shrinking and color bleeding after the quilt is finished. It also helps soften the fabric, making it easier to work with.
- Use Quality Tools: Investing in good quality cutting tools, rulers, and a sewing machine will make a significant difference in the quality of your block.
- Accurate Cutting: Ensure your fabric pieces are cut accurately. Using a rotary cutter and ruler will help you achieve precise cuts, leading to better-seamed pieces.
- Practice Your Seams: If you’re new to sewing, practice your seam allowance on scrap fabric. Consistent seam allowances will result in better-fitting blocks.
- Don’t Rush: Take your time while sewing. Rushing through the process can lead to mistakes that might be hard to fix later on.
- Seek Inspiration: Look for other quilting projects or blocks that incorporate the Indian Trail design. This can spark your creativity and give you new ideas for your own quilt.
These tips will help enhance your quilting skills and make the process more enjoyable, allowing you to create a stunning quilt block.
4. Creative Variations of the Indian Trail Quilt Block
Once you’ve mastered the basic Indian Trail Quilt Block, you might want to explore variations that can add a unique twist to your projects. Here are some creative ideas to consider:
- Color Variations: Experiment with different color palettes. Using monochromatic shades can create a modern look, while bold, contrasting colors can produce a striking effect.
- Mixing Fabrics: Combine different fabric types, such as cotton and linen, to create texture within your quilt. This adds depth and interest to your designs.
- Incorporating Appliqué: Add appliqué elements to your blocks to create personalized designs. This can be especially fun for seasonal quilts or themed projects.
- Adding Borders: Frame your Indian Trail Quilt Block with borders of contrasting fabrics. This not only enhances the design but also adds size to your finished quilt.
- Creating a Quilt Layout: Consider how different Indian Trail Quilt Blocks look together in a larger quilt. The layout can significantly affect the overall appearance of the quilt.
- Using Different Sizes: Experiment with resizing your block. Making smaller or larger versions of the Indian Trail Quilt Block can lead to unique layouts and designs.
These creative variations will inspire you to think outside the box and make the Indian Trail Quilt Block your own.
FAQ
1. What is the history of the Indian Trail Quilt Block?
The Indian Trail Quilt Block has its roots in traditional quilting, symbolizing pathways taken by settlers and indigenous peoples. It reflects journeys and exploration.
2. How do I choose the right fabric for my quilt block?
Opt for fabrics that complement each other in color and pattern. Consider using contrasting colors to highlight the design of the block.
3. Can I hand sew the Indian Trail Quilt Block?
Yes, hand sewing is an option, although it may take longer than using a sewing machine. Ensure you maintain consistent seam allowances for the best results.
4. What other blocks can I combine with the Indian Trail design?
Consider combining the Indian Trail block with other traditional quilt blocks, such as the Nine-Patch or Log Cabin, for a varied look.
5. How can I make my quilt more personal?
Incorporate personal touches such as appliqué, embroidery, or fabric with special meanings to you or your family.
6. What should I do if my quilt blocks don’t match up perfectly?
Small discrepancies can often be fixed by trimming the edges. If they’re significantly off, you may need to re-sew the affected seams.
Join our VIP broadcast list and gain access to exclusive patterns, all for free. As a VIP member, you’ll receive the best patterns daily, delivered directly to your device. ✨📱 It’s a unique opportunity to stay up-to-date with the latest trends and designs, curated just for you. Don’t miss out on enhancing your projects and discovering new inspirations with the best patterns every day! 🎨🔝
Conclusion
In this tutorial, we explored the Indian Trail Quilt Block, detailing everything from materials to step-by-step instructions and creative variations. This block not only adds beauty to your quilts but also tells a story of journeys and exploration. Whether you’re a beginner or an experienced quilter, the Indian Trail Quilt Block is a wonderful addition to your quilting skills.
As you embark on your quilting journey, remember to have fun and express your creativity. We would love to hear your thoughts on this tutorial. Please leave us a comment with your feedback or any suggestions you might have for future articles. Happy quilting!

