The Hunter’s Star Quilt Block by Michele Conrad – Tutorial is a timeless and intricate quilt pattern that has captivated quilters for years. Known for its stunning design and versatility, this block can be used to create a range of different quilts, from classic to modern styles.
If you’re looking to add a new skill to your quilting repertoire, this Hunter’s Star Quilt Block by Michele Conrad – Tutorial will walk you through the step-by-step process of crafting this beautiful block.
In this tutorial, we will break down the components of the Hunter’s Star Quilt Block by Michele Conrad, explore tips for accurate cutting and piecing, and provide techniques for assembling your blocks efficiently.
Whether you’re a beginner or an experienced quilter, following this guide will help you master the Hunter’s Star Quilt Block with ease.
So, gather your fabric, quilting supplies, and let’s dive into the Hunter’s Star Quilt Block by Michele Conrad – Tutorial to learn how to create this intricate design.
1. Understanding the Basics of the Hunter’s Star Quilt Block
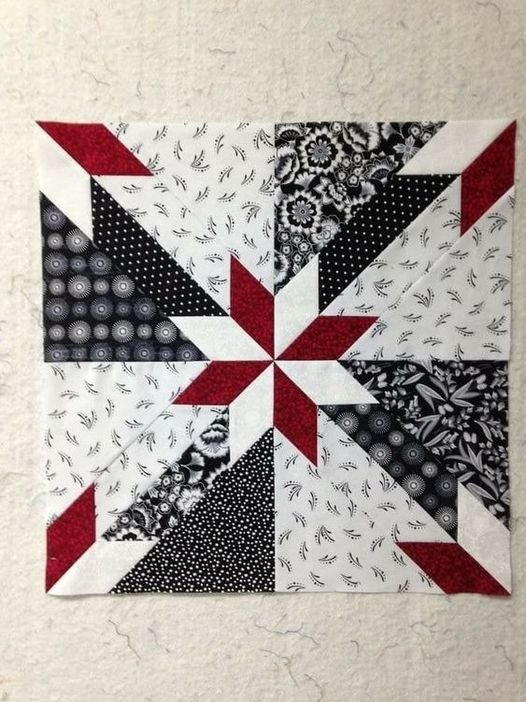
The Hunter’s Star Quilt Block by Michele Conrad is constructed from triangles and diamonds, forming star shapes that alternate between light and dark colors. This block is often admired for its complex appearance, but with careful attention to cutting and piecing, it becomes an achievable project for quilters at all skill levels.
The block starts with two contrasting fabrics—one light and one dark. By combining these two colors, the star pattern stands out vividly. This contrast is key to the overall aesthetic of the quilt block. To get started, make sure you choose fabrics that offer a striking contrast to make the design pop.
Precision is essential when cutting the triangles and diamonds for the Hunter’s Star Quilt Block. Each piece must be cut accurately to ensure that the block aligns perfectly during the sewing process. A rotary cutter and a clear ruler will help achieve clean, straight cuts.
Next, you’ll begin piecing the individual triangles and diamonds together. Start by sewing smaller units of triangles into squares, then move on to assembling the squares into the larger quilt block. It’s important to press seams flat after each step, ensuring that your block remains smooth and free of puckers.
Once you’ve completed your first Hunter’s Star Quilt Block, the next step is to create multiple blocks that will eventually come together to form your quilt top. Play with color variations and fabric choices to create a unique look that reflects your personal style.
2. Tools and Materials You Need for the Hunter’s Star Quilt Block
Creating the Hunter’s Star Quilt Block by Michele Conrad requires a few essential tools and materials. Before you begin, make sure you have the following items on hand:
- Fabric: Choose two fabrics—one light and one dark—for the star contrast. The amount of fabric needed depends on the size of your quilt.
- Rotary Cutter and Mat: These are necessary for precise cutting of your fabric pieces.
- Ruler: A clear ruler will help you measure and cut the triangles and diamonds accurately.
- Thread: Use a neutral-colored thread that blends well with your fabric choices.
- Sewing Machine: A reliable machine with a straight stitch setting is essential for piecing the block.
- Iron and Ironing Board: Pressing seams as you go is crucial for ensuring smooth and accurate blocks.
Once you have gathered your materials, it’s time to begin cutting your fabric. Start by cutting strips of fabric, then subcut those strips into triangles and diamonds. Accurate cutting is key to a successful block, so take your time to ensure each piece is perfect.
You’ll also need to consider the size of your finished quilt. If you’re making a small project like a wall hanging, you’ll need fewer blocks than you would for a full-sized quilt. Plan accordingly to avoid running out of fabric midway through your project.
Using high-quality fabric will ensure that your quilt lasts for years to come. Opt for 100% cotton quilting fabric, which is durable and easy to work with. Avoid fabrics that are too stretchy or flimsy, as they can cause your block to warp or shift during assembly.
As you progress through the Hunter’s Star Quilt Block by Michele Conrad – Tutorial, you’ll appreciate the precision and attention to detail that this project requires. But don’t worry—with practice, you’ll become more confident in your abilities and be able to create stunning quilt blocks with ease.
3. Step-by-Step Guide to Assembling the Hunter’s Star Quilt Block
The construction of the Hunter’s Star Quilt Block by Michele Conrad is broken down into several steps to ensure accuracy and precision. Follow these instructions to create a perfect block every time:
Step 1: Cut Your Fabric Begin by cutting your light and dark fabrics into strips. From these strips, subcut triangles and diamonds according to the size of your block. Accurate cutting is crucial for ensuring your pieces fit together correctly.
Step 2: Piece the Triangles Sew two contrasting triangles together to form a square. Press the seam toward the darker fabric. Repeat this step for all the triangles in your block. This forms the building blocks of your star pattern.
Step 3: Assemble the Diamonds Once your triangles are pieced, sew the diamond shapes together. Use a consistent ¼-inch seam allowance for all your seams to ensure uniformity across the block.
Step 4: Join the Squares Now, sew your triangle squares and diamond shapes together. Lay out the pieces in the correct orientation to form the star pattern. Check your alignment before sewing to make sure everything is in the right place.
Step 5: Press and Trim After sewing the pieces together, press the seams flat. Use a square ruler to trim the block to the correct size, if necessary. This step ensures your block is square and will fit with other blocks when assembling your quilt top.
Step 6: Repeat Once you’ve mastered one block, repeat the process to create as many blocks as needed for your quilt. Experiment with different fabric combinations to add variety to your quilt.
4. Tips for Perfecting Your Hunter’s Star Quilt Block
Mastering the Hunter’s Star Quilt Block by Michele Conrad takes time and practice, but with these tips, you’ll be well on your way to creating a flawless quilt:
Tip 1: Start with Small Projects If you’re new to quilting or the Hunter’s Star pattern, consider starting with a smaller project like a pillow or table runner. This allows you to practice the technique without committing to a large quilt.
Tip 2: Use High-Quality Tools Invest in a good rotary cutter, mat, and ruler. Accurate cutting is essential for this quilt block, and high-quality tools will make the process much easier.
Tip 3: Chain Piecing Saves Time Chain piecing is a time-saving technique where you sew multiple pieces in a continuous chain without cutting the thread between each unit. This method speeds up the process and keeps your pieces organized.
Tip 4: Press Seams Properly Properly pressing seams as you go ensures your block stays flat and neat. Use a hot iron and press seams toward the darker fabric to prevent shadowing.
Tip 5: Experiment with Colors The Hunter’s Star Quilt Block looks stunning in a variety of color combinations. Don’t be afraid to play around with different fabric choices to create a unique and eye-catching quilt.
Tip 6: Stay Organized As you cut and piece your fabric, keep your workspace organized. This will help you avoid confusion and mistakes, especially when working with multiple blocks at once.
FAQ
Q1: What is the best fabric for the Hunter’s Star Quilt Block? A: 100% cotton quilting fabric is the best choice due to its durability and ease of use. The fabric should be of high quality to ensure your quilt lasts for many years.
Q2: Can beginners make the Hunter’s Star Quilt Block? A: Yes, beginners can make this block with careful attention to cutting and piecing. While it may look complex, the steps are manageable with practice.
Q3: How long does it take to make one block? A: The time varies depending on your skill level. Beginners may take longer as they familiarize themselves with the process, while experienced quilters can complete a block in about an hour.
Q4: What size should the Hunter’s Star Quilt Block be? A: The size of the block can vary depending on the project. Common sizes range from 8 inches to 12 inches, but you can adjust the size to suit your needs.
Q5: Do I need special tools to make this quilt block? A: Basic quilting tools such as a rotary cutter, mat, ruler, and sewing machine are essential. These tools will help you achieve the precision needed for this block.
Q6: How do I ensure my block is accurate? A: Accuracy in cutting and piecing is key. Take your time when cutting your fabric, use a consistent seam allowance, and press your seams as you go to ensure your block comes together perfectly.
Join our VIP broadcast list and gain access to exclusive patterns, all for free. As a VIP member, you’ll receive the best patterns daily, delivered directly to your device. ✨📱 It’s a unique opportunity to stay up-to-date with the latest trends and designs, curated just for you. Don’t miss out on enhancing your projects and discovering new inspirations with the best patterns every day! 🎨🔝
Conclusion
The Hunter’s Star Quilt Block by Michele Conrad – Tutorial offers a rewarding quilting experience that combines beauty and technique. By following this tutorial, you’ll be able to create stunning blocks that can be used in a variety of quilting projects. Whether you’re making a full-sized quilt or a smaller project, the Hunter’s Star Quilt Block is sure to impress.
PATTERN HERE
We hope this guide has provided the information you need to get started. If you have any questions, or if you’d like to share your thoughts or suggestions, please leave a comment below! We’d love to hear your feedback and see your finished quilts!

