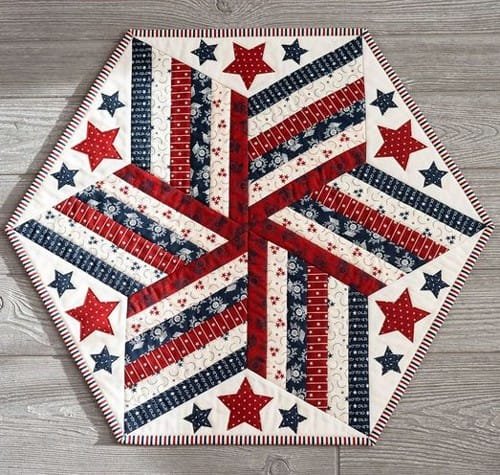
Creating beautiful home decor items can be a rewarding experience, and one fantastic project you can tackle is a table topper. In this article, we will explore how to use the 60º diamond ruler to make a table topper.
This versatile tool will help you achieve precise angles and clean lines, making your sewing and quilting projects much easier. Whether you are a seasoned quilter or just starting, this tutorial will guide you through the process step by step.
The 60º diamond ruler is an essential tool for anyone interested in quilting and sewing. It allows you to create stunning geometric designs with ease.
Understanding how to use this ruler correctly can enhance your quilting skills and improve the overall quality of your projects. You’ll be amazed at how quickly you can create intricate patterns once you master this technique.
In the following sections, we will cover the materials you need, the step-by-step process for using the ruler, and some tips and tricks to ensure your table topper turns out perfectly. Let’s get started on this exciting quilting journey!
1. Gather Your Materials
Before diving into the project, it’s essential to gather all the necessary materials. Here’s what you will need:
First, you will need fabric for your table topper. Choose colors and patterns that complement your home decor. A combination of light and dark fabrics can create a beautiful contrast, enhancing the overall appearance of your table topper.
Next, ensure you have a 60º diamond ruler. This ruler is specifically designed to help you cut accurate diamond shapes, which are key to creating your design. The markings on the ruler make it easy to measure and cut with precision.
You will also need a rotary cutter and a cutting mat. The rotary cutter allows for smooth and clean cuts, while the cutting mat protects your surfaces and provides a grid for accurate measurements.
Additionally, have some sewing thread and a sewing machine ready. Choose a thread that matches your fabric to ensure a seamless look in your finished product.
Lastly, keep a pair of scissors handy for any snipping you may need to do during the project. With all your materials gathered, you’re ready to start your table topper!
2. Understanding the 60º Diamond Ruler
The 60º diamond ruler is an innovative tool that simplifies the process of cutting diamond shapes. The design of this ruler features marked angles that guide you in achieving accurate cuts. Understanding how to utilize this ruler effectively is crucial for your project.
Begin by familiarizing yourself with the markings on the ruler. The 60º angle is the key feature that allows you to create the diamond shapes. Practice aligning the fabric edges with the ruler to ensure your cuts are straight and precise.
When cutting, place the ruler on your fabric, ensuring it is stable and won’t shift during the process. Use your rotary cutter to slice through the fabric, applying consistent pressure to achieve a clean edge. It’s important to cut slowly and steadily to avoid any mistakes.
Once you’ve mastered cutting with the 60º diamond ruler, you can experiment with different shapes and sizes. By adjusting the width of your fabric strips, you can create various diamond sizes, allowing for unique designs in your table topper.
Keep in mind that practice makes perfect. The more you use the ruler, the more comfortable you will become with it. Soon, you’ll be able to cut your fabric like a pro!
3. Cutting the Fabric
Now that you understand the 60º diamond ruler and have gathered your materials, it’s time to start cutting your fabric for the table topper. This step is crucial, as accurate cuts will greatly impact the final look of your project.
Begin by preparing your fabric. Iron it to remove any wrinkles, ensuring a smooth surface for cutting. Then, decide how many diamonds you want to create and the size of each diamond.
Using your ruler, measure and mark the fabric with a fabric marker or chalk. Be sure to follow the 60º angle marked on the ruler to maintain accuracy. Once you’ve made your marks, place the ruler along the line and cut carefully with your rotary cutter.
After cutting the diamonds, you may want to trim the edges to remove any excess fabric. This will give your diamonds a polished look and make sewing them together easier.
As you cut each piece, take your time to ensure precision. It’s better to go slow and steady than to rush and make mistakes. Once you’ve cut all your diamonds, lay them out to visualize your design before sewing them together.
4. Assembling the Table Topper
With your diamonds cut and ready, it’s time to assemble your table topper. This is where your design will come to life! Follow these steps to sew your diamonds together.
Start by laying out your diamond pieces in the desired pattern. Play around with the arrangement until you find a layout you love. This is an excellent opportunity to be creative and mix different fabrics for a unique look.
Once satisfied with your layout, it’s time to begin sewing. Take two diamond pieces and place them right sides together, aligning the edges. Pin them in place to prevent shifting while sewing. Use a quarter-inch seam allowance to join the pieces, ensuring you maintain consistency throughout.
Continue adding diamonds, sewing them together row by row. Press the seams open as you go to reduce bulk and ensure a flat finish. This will help your table topper lie flat on your table, giving it a professional appearance.
After you have sewn all the diamonds together, it’s time to add a backing. Choose a complementary fabric for the back of your table topper. Cut it to the same size as the front, then place the right sides together. Pin the edges and sew around, leaving a small opening for turning.
Once sewn, turn the topper right side out and press it flat. Close the opening by hand-stitching or sewing it with a machine. Finally, quilt the layers together if desired to add texture and stability.
FAQ
What is a 60º diamond ruler?
A 60º diamond ruler is a specialized quilting tool designed to cut precise diamond shapes. It features marked angles to guide users in achieving accurate cuts.
How do I choose the right fabric for my table topper?
Choose fabrics that complement your home decor and reflect your style. A mix of light and dark fabrics can create a beautiful contrast.
Can I use the 60º diamond ruler for other projects?
Yes! The 60º diamond ruler can be used for various quilting projects, such as wall hangings, pillow covers, and more.
What type of thread should I use for sewing my table topper?
Choose a sewing thread that matches your fabric color for a seamless appearance. Cotton thread is a popular choice for quilting.
How do I maintain my 60º diamond ruler?
To maintain your ruler, keep it clean and free from scratches. Store it flat in a safe place to prevent bending or warping.
What should I do if my seams are not straight?
If your seams are not straight, take your time to realign the fabric and resew. Practice will help you improve your sewing skills.
Join our VIP broadcast list and gain access to exclusive patterns, all for free. As a VIP member, you’ll receive the best patterns daily, delivered directly to your device. ✨📱 It’s a unique opportunity to stay up-to-date with the latest trends and designs, curated just for you. Don’t miss out on enhancing your projects and discovering new inspirations with the best patterns every day! 🎨🔝
Conclusion
In this tutorial, we explored how to use the 60º diamond ruler to make a table topper. We covered everything from gathering your materials to assembling your finished product. By mastering this technique, you can create beautiful and intricate designs for your home decor.
We hope this guide has inspired you to try your hand at using the 60º diamond ruler. Your feedback and suggestions are invaluable, so please leave a comment sharing your thoughts on this tutorial or any tips you have for others. Happy quilting!

