If you’ve ever wondered how to sew a DIY simple no-zipper denim crossbody bag from old jeans, you’re in the right place. This project is beginner-friendly, sustainable, and surprisingly stylish. Whether you’re looking for a casual weekend bag or a thoughtful handmade gift, reusing old denim is the perfect way to get started on a functional and fashionable creation.
Old jeans are often tossed away without realizing the valuable, sturdy fabric they contain. Instead of throwing them out, why not transform them into something useful? With just a few materials and some basic sewing skills, you can craft a unique, eco-conscious accessory. Plus, the no-zipper design makes this project even simpler, eliminating common frustrations that come with zipper installation.
In this tutorial, we’ll walk through every step of how to sew a DIY simple no-zipper denim crossbody bag from old jeans, using easy-to-understand instructions, essential tools, and some creativity. You’ll not only learn how to repurpose denim but also gain confidence in creating custom bags that reflect your personal style.
Choosing the Right Pair of Jeans
The first step in how to sew a DIY simple no-zipper denim crossbody bag from old jeans is selecting the perfect pair of denim. Not all jeans are created equal. You want sturdy fabric that can handle daily use without fraying or wearing down too quickly.
Lightly worn denim is ideal. Avoid fabric that has too many holes or is overly thin, as it may not hold up well once transformed into a bag. Medium to heavy-weight jeans work best for structure and durability.
Next, consider the wash or color. Do you want a bag that is light and casual or dark and sleek? This small decision can make a big difference in the final appearance of your bag, so choose with your personal taste in mind.
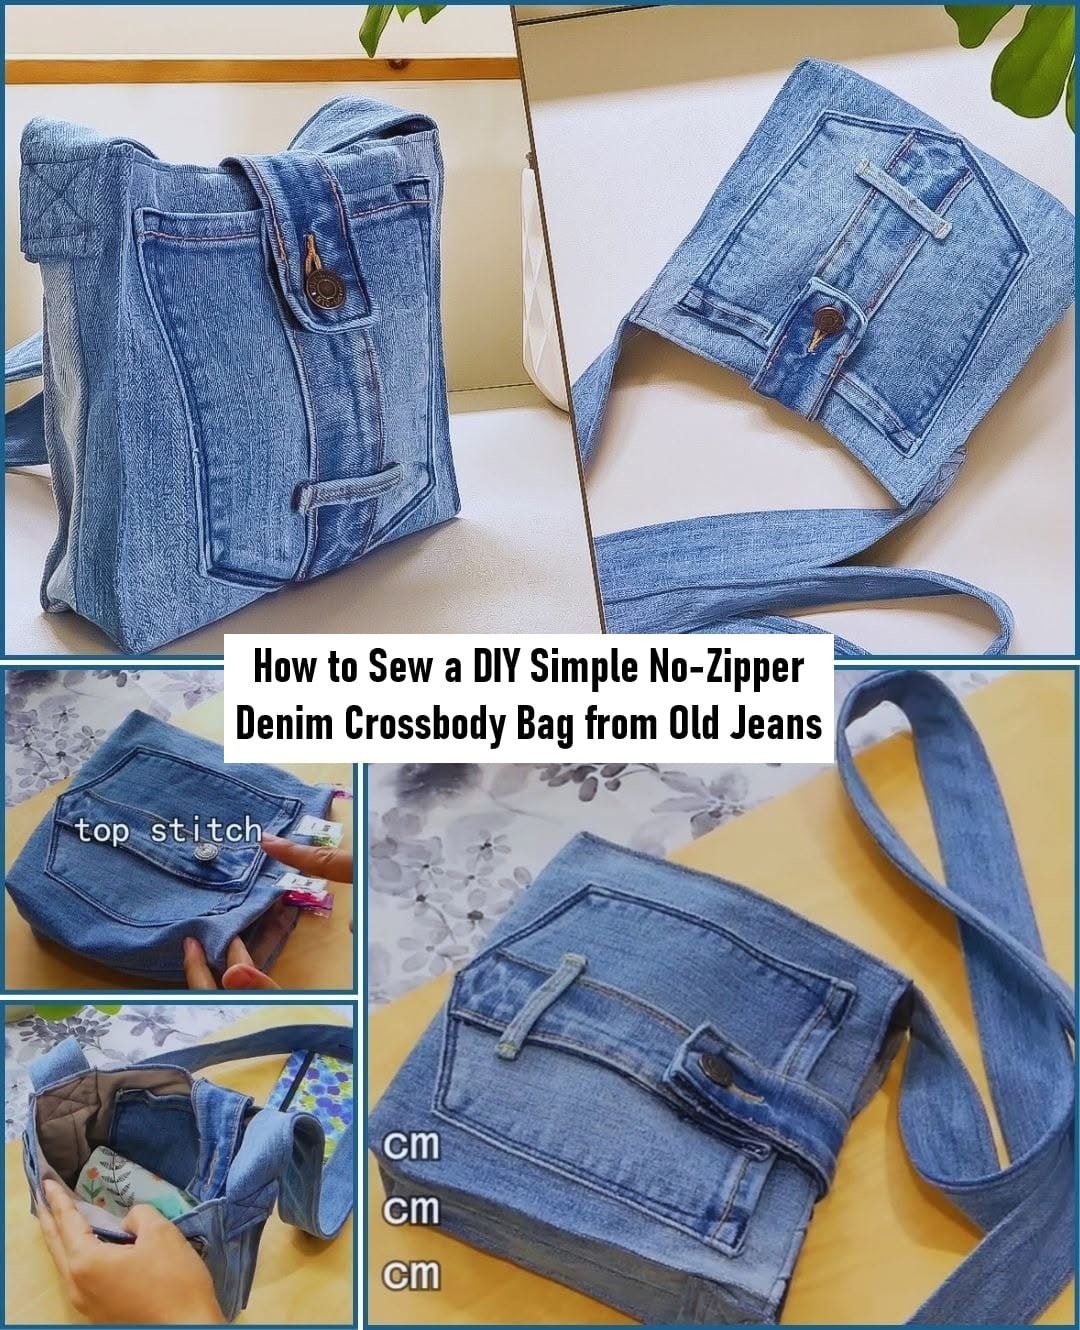
Pockets are another fun detail to keep! Many denim crossbody bags use the original back pockets for external storage or decoration. It’s a functional and stylish way to highlight the “jeans” aspect of your DIY bag.
Inspect the seams and waistband. Some people like incorporating belt loops or waistband sections into the strap design. Using these original details adds character and saves you time.
Lastly, wash and dry your jeans before starting. Even if they’re clean, old denim often has oils or dust that can affect stitching. A fresh wash ensures you’re working with fabric that’s easy to manage.
Cutting and Preparing Your Denim Pieces
Now that you’ve chosen your jeans, it’s time to start the transformation process. Knowing how to sew a DIY simple no-zipper denim crossbody bag from old jeans begins with careful cutting and planning. You’ll want to map out your pattern before diving in with scissors.
Lay the jeans flat on a table and cut off the legs. This area usually provides the most uninterrupted fabric, making it perfect for the body of the bag. Save the waistband and pockets for later use.
Decide on the dimensions of your crossbody bag. A good standard size is about 10 inches wide and 12 inches long. Cut two identical rectangles from the leg fabric to form the front and back panels of the bag.
Don’t forget to cut a strip for the strap. If you’re not using the waistband, cut a long strip around 2 to 3 inches wide. You can fold and sew it for extra strength and comfort.
If you want a lining (recommended for structure), you can use leftover cotton or even the inside of the jeans. Cut matching rectangles to line the inside of your bag.
Now is the time to embellish. Do you want to add one of the original pockets to the front of your bag? Sew it on now before the bag is fully assembled. You can even decorate it with patches or embroidery.
Iron all pieces before sewing. This step may seem small, but pressed seams and flat fabric help you sew clean, straight lines, which is crucial for a polished final result.
Sewing the Body of the Bag
Once your pieces are cut and prepped, you’re ready to start sewing. This is the most exciting part of how to sew a DIY simple no-zipper denim crossbody bag from old jeans, where your vision begins to take shape.
Place the two denim rectangles right sides together. Use sewing clips or pins to secure the edges before stitching. Leave the top open—this will be the opening of your bag.
Sew around the sides and bottom with a half-inch seam allowance. Reinforce the corners with backstitching for added durability, especially if you plan to carry heavier items in your bag.
Next, create a boxed bottom for your bag. Pinch each bottom corner to form a triangle, then sew across about 1.5 inches from the tip. This gives your bag a flat bottom so it can stand and hold shape.
Turn the bag right side out and admire your progress. Press the seams again for a crisp, professional look.
If you’re using a lining, sew it the same way as the denim shell but leave a small opening at the bottom so you can turn the whole bag inside out later. Insert the lining into the bag, right sides together, and sew around the top edge.
Pull the lining through the small opening, push it into place inside the bag, then hand-stitch or machine-stitch the opening closed. Your inner structure is now finished.
Adding the Strap and Final Touches
One of the final steps in how to sew a DIY simple no-zipper denim crossbody bag from old jeans is attaching the strap. This determines how comfortable and functional your bag will be, so take your time.
Measure your ideal strap length. Standard crossbody straps are around 40 to 50 inches long, but this can vary depending on your height and preference. Adjust as needed for the perfect fit.
If using the waistband, simply stitch each end to the side seams of the bag. Be sure to double or triple-stitch the connection points to prevent tearing with use.
If you made a strap from fabric, fold it lengthwise with the right sides together and sew along the edge. Turn it inside out, press, and topstitch along both sides for a strong, clean finish.
Attach the strap to your bag using reinforced stitching. You can position it on the outside or hide it between the lining and the outer shell if you prefer a more finished look.
Now check the bag’s functionality. Does it sit comfortably on your shoulder? Does it feel strong enough for daily use? Make any necessary adjustments before finishing.
Finally, consider closing the bag with a snap button, magnetic clasp, or simply leaving it open as intended. The no-zipper design keeps this project simple and accessible for beginners while still offering usability.
FAQ – Frequently Asked Questions
Can I make this bag without a sewing machine?
Yes, it’s possible, but sewing by hand will take more time and may not be as strong. If you choose to hand sew, use a strong needle and thick thread, and reinforce all seams carefully.
What size should the bag be?
A good average size is 10″ x 12″, but you can adjust it based on your needs. Some people prefer smaller crossbody bags, while others want more space for books or tablets.
Can I wash the bag after it’s finished?
Absolutely. Since it’s made of denim, you can machine wash it. Just be sure to use gentle cycles and let it air dry to maintain the structure and prevent fraying.
What’s the best way to cut the jeans for this project?
Cut the legs first for the largest flat sections. Avoid seams when possible unless you want to use them as design elements. Plan your cuts carefully to make the most of the fabric.
Do I need to line the bag?
While not required, a lining adds structure and longevity. It also covers up raw seams on the inside and makes your bag look more finished and polished.
How can I customize the bag further?
Add embroidery, decorative stitching, iron-on patches, or use fabric paint. You can also experiment with strap types like braided denim or rope handles for a unique look.
Conclusion
Now you know exactly how to sew a DIY simple no-zipper denim crossbody bag from old jeans—from choosing the perfect denim to cutting, sewing, lining, and customizing. This project is the perfect balance of creativity and sustainability, allowing you to reuse materials and express your style.
Whether you’re making it for yourself or as a gift, a handmade denim crossbody bag has timeless appeal. It’s budget-friendly, fun to make, and doesn’t require complex materials or advanced sewing skills.
We hope this tutorial has been helpful and inspiring. If you tried this project, feel free to leave your honest opinion and suggestions below. We’d love to hear how your bag turned out and what creative touches you added.

