How to Make a Pyramid Pouch Pattern is a popular sewing topic among DIY lovers who enjoy creating practical and stylish handmade accessories. A Pyramid Pouch Pattern is a clever sewing design that transforms a simple rectangular piece of fabric and a zipper into a three-dimensional triangular pouch.
These pouches are perfect for storing small items such as makeup, coins, earbuds, craft tools, or travel essentials. Learning how to make a Pyramid Pouch Pattern is an excellent way to practice sewing skills while producing a functional and attractive item.
Many beginners are surprised by how easy it is to create a Pyramid Pouch Pattern. Even though the finished pouch looks like a complex geometric shape, the sewing process is quite straightforward.
With only a few materials—fabric, a zipper, and basic sewing tools—you can complete this project in a short amount of time. Because of its simplicity, the Pyramid Pouch Pattern has become a favorite beginner sewing project in sewing classes and DIY communities.
Another reason people love learning how to make a Pyramid Pouch Pattern is the opportunity for creativity. You can experiment with different fabrics, colors, textures, and zipper styles to create unique pouches for gifts, personal use, or even small handmade businesses. In this detailed guide, you will learn the materials needed, essential techniques, step-by-step instructions, and helpful tips to create your own Pyramid Pouch Pattern successfully.
Materials Needed for a Pyramid Pouch Pattern
Before starting your project, gathering the right materials will make the process of learning how to make a Pyramid Pouch Pattern much smoother. The good news is that this sewing project requires only a few basic supplies that most crafters already have at home.
The first and most important material is fabric. Cotton fabric is a great choice for beginners because it is easy to handle and sew. When making a Pyramid Pouch Pattern, you will usually need two pieces of fabric: one for the outer layer and another for the lining. Choosing contrasting colors or patterns can make your pouch look even more attractive.
A zipper is another essential element when learning how to make a Pyramid Pouch Pattern. A standard zipper between 7 and 9 inches long works well for most pouch sizes. The zipper allows the pouch to open and close easily, making it practical for storing small items securely.
Basic sewing tools are also required. These include a sewing machine, thread that matches your fabric, scissors or a rotary cutter, pins or fabric clips, and a ruler or measuring tape. These tools help ensure accuracy and neat finishing when creating your Pyramid Pouch Pattern.
Some people also like to use interfacing to give the pouch more structure. While this step is optional, interfacing can help the Pyramid Pouch Pattern maintain its triangular shape and feel more durable.
Finally, having an iron nearby is very helpful. Pressing your seams during the process of making a Pyramid Pouch Pattern can improve the final appearance and give your pouch a more professional finish.
Understanding the Structure of a Pyramid Pouch Pattern
Before you start sewing, it is helpful to understand how a Pyramid Pouch Pattern works. Unlike traditional flat pouches, this design uses a clever folding and stitching method to create a three-dimensional shape.
The structure of a Pyramid Pouch Pattern begins with a rectangular fabric piece that includes a zipper along one side. Once the zipper is attached and the fabric edges are sewn together, the pouch is manipulated in a specific way to form the triangular pyramid shape.
One interesting aspect of how to make a Pyramid Pouch Pattern is that the shape forms naturally when the pouch corners are aligned differently during the final stitching steps. This technique transforms the flat fabric piece into a unique geometric pouch.
The zipper placement is also important. When correctly installed, the zipper runs from one corner of the pyramid to another. This allows the pouch to open widely while maintaining its distinctive triangular design.
Another advantage of the Pyramid Pouch Pattern structure is its stability. Because the base forms a triangle, the pouch can stand upright on a flat surface. This makes it ideal for holding small objects on a desk, vanity table, or sewing station.
Understanding this structure before sewing helps you visualize the final product and makes the steps of how to make a Pyramid Pouch Pattern easier to follow.
Step-by-Step Guide on How to Make a Pyramid Pouch Pattern
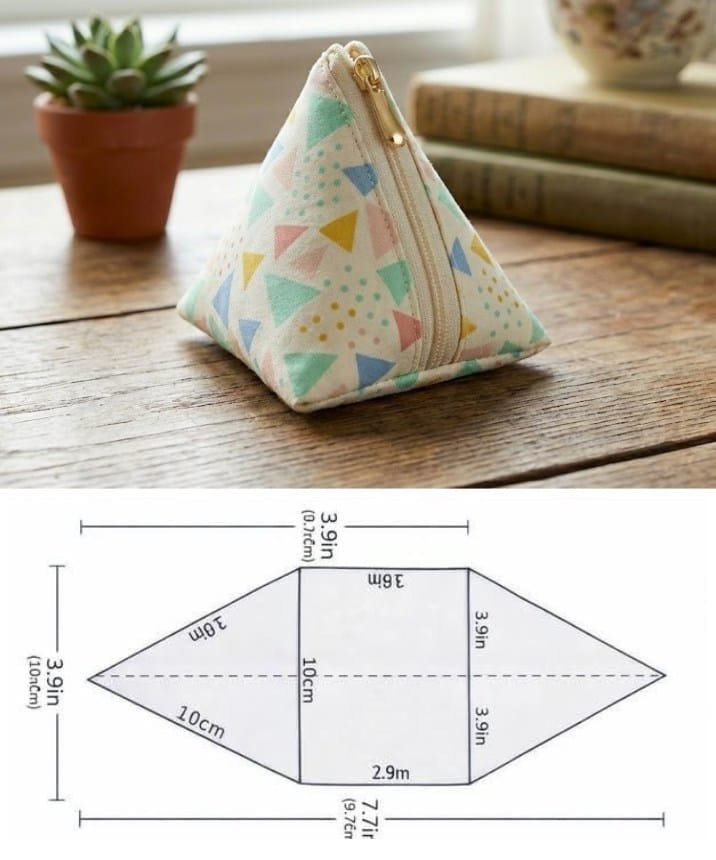
The first step in how to make a Pyramid Pouch Pattern is cutting your fabric. Typically, you will cut two rectangles of outer fabric and two rectangles of lining fabric. A common size is about 10 inches by 6 inches, but you can adjust this depending on how large you want your pouch to be.
Next, attach the zipper to the outer fabric. Place one piece of outer fabric right side up, then position the zipper face down along the top edge. Place the lining fabric on top, creating a fabric-zipper sandwich. Sew along the edge using a zipper foot on your sewing machine.
After sewing the first side, repeat the process for the other side of the zipper using the remaining fabric pieces. When finished, you should have the zipper neatly placed between the outer fabric and lining layers.
Press the fabric with an iron to create clean edges. This step improves the overall look of your Pyramid Pouch Pattern and helps keep the zipper aligned.
Now sew the sides of the pouch. Align the outer fabrics together and the lining fabrics together, leaving a small opening in the lining for turning the pouch right side out later.
The final shaping step is what creates the Pyramid Pouch Pattern. Adjust the pouch so that the zipper sits in the center and the seams align in a triangular formation. Sew across the open edges to lock the pyramid shape into place.
Once everything is stitched, turn the pouch right side out through the lining opening. Sew the lining closed, push it inside the pouch, and your Pyramid Pouch Pattern is complete.
Creative Ideas for Customizing Your Pyramid Pouch
One of the most exciting parts of learning how to make a Pyramid Pouch Pattern is experimenting with different creative designs. Because the project is simple, you can easily customize it to match your personal style.
Using patterned fabrics is a great way to make your Pyramid Pouch Pattern stand out. Floral prints, geometric designs, or seasonal fabrics can give the pouch a unique look.
You can also experiment with different zipper colors. A bright or contrasting zipper can add a stylish accent to your Pyramid Pouch Pattern, making it more visually interesting.
Another creative idea is adding small decorative elements such as tassels, charms, or fabric tags. These details can make your Pyramid Pouch Pattern look more personalized and professional.
If you want a sturdier pouch, consider adding fusible interfacing or lightweight batting. This helps the Pyramid Pouch Pattern maintain its shape and gives it a slightly padded feel.
Some crafters also enjoy making sets of pyramid pouches in different sizes. Smaller versions are perfect for coins or earbuds, while larger versions can hold makeup or sewing supplies.
By experimenting with these ideas, you can turn a basic Pyramid Pouch Pattern into a stylish handmade accessory that reflects your creativity.
FAQ About Pyramid Pouch Pattern
Is a Pyramid Pouch Pattern suitable for beginners?
Yes, the Pyramid Pouch Pattern is considered a beginner-friendly sewing project. The steps are simple, and it helps beginners practice sewing straight seams and installing a zipper.
What size zipper should I use for a Pyramid Pouch Pattern?
Most people use a zipper between 7 and 9 inches when learning how to make a Pyramid Pouch Pattern, but the size can vary depending on your fabric dimensions.
Can I sew a Pyramid Pouch Pattern without a sewing machine?
While it is possible to sew a Pyramid Pouch Pattern by hand, using a sewing machine will make the process faster and produce stronger seams.
What fabrics work best for a Pyramid Pouch Pattern?
Cotton fabric is one of the best choices for beginners learning how to make a Pyramid Pouch Pattern, but canvas, linen, and lightweight denim can also work well.
How long does it take to make a Pyramid Pouch Pattern?
Once you understand the steps, making a Pyramid Pouch Pattern usually takes between 30 minutes and one hour.
Can I sell handmade pyramid pouches?
Yes, many crafters create and sell handmade items using a Pyramid Pouch Pattern, especially at craft markets or as part of small handmade businesses.
Conclusion
Learning how to make a Pyramid Pouch Pattern is a fun and practical sewing project that combines creativity with useful sewing skills. Throughout this guide, we explored the materials needed, the structure of the pouch, and the step-by-step method for creating a beautiful triangular pouch with a zipper.
The Pyramid Pouch Pattern is perfect for beginners because it requires only basic sewing techniques while producing a unique and functional result. With different fabrics, colors, and decorative ideas, you can easily customize the pouch to match your personal style or create thoughtful handmade gifts.
VIDEO TUTORIAL
By practicing the techniques explained in this article, you can quickly master how to make a Pyramid Pouch Pattern and even expand the idea into larger or more decorative sewing projects. If you enjoyed this guide, consider sharing your honest opinion and suggestions.

