Creating festive decorations with a personal touch is one of the joys of the holiday season. One popular project is learning how to make a Prairie Point Christmas Tree quilt – TUTORIAL style.
This delightful quilt pattern brings charm and creativity to your holiday decor, while also serving as an excellent way to use leftover fabric scraps.
The Prairie Point technique adds dimension and texture to quilts, making it perfect for holiday-themed projects.
Whether you’re an experienced quilter or just starting, this guide will walk you through the steps to craft your own Prairie Point Christmas Tree quilt. With clear instructions and practical tips, you’ll have a stunning piece ready to display or gift this season.
This tutorial will break down the process into manageable sections, ensuring that every part of the Prairie Point Christmas Tree quilt tutorial is easy to follow.
By the end of this article, you’ll not only know how to complete the quilt but also understand how to adapt the technique to other projects. Let’s dive in!
1. Gathering Materials and Preparing Your Workspace
Before starting your Prairie Point Christmas Tree quilt, it’s essential to gather the right materials and prepare your sewing area for a smooth experience.
- Essential Materials
You’ll need basic quilting supplies such as fabric (in Christmas-themed colors), thread, a rotary cutter, quilting rulers, and a sewing machine. Having batting and backing fabric on hand is also crucial for completing the quilt. For the Prairie Points, choose contrasting colors to enhance the three-dimensional effect. - Selecting Fabrics
When choosing fabric, focus on reds, greens, whites, or metallics to capture the holiday spirit. You can also include patterns like snowflakes or holly for added charm. Scraps from previous projects work wonderfully for Prairie Points. - Preparing the Fabric
Wash and iron all fabrics before cutting to ensure they’re clean and wrinkle-free. This step prevents distortion during sewing and ensures a professional finish. - Setting Up Your Workspace
Make sure your sewing area is well-lit and organized. Lay out all materials within reach to minimize interruptions. Use a large cutting mat to simplify the cutting process. - Creating a Design Plan
Sketch your quilt design before starting. Visualizing the layout will help you decide on fabric placement and the number of Prairie Points required. - Cutting Fabric Pieces
Cut your quilt base and Prairie Point triangles according to your design plan. Precision is key at this stage, as it impacts the final look of your quilt.
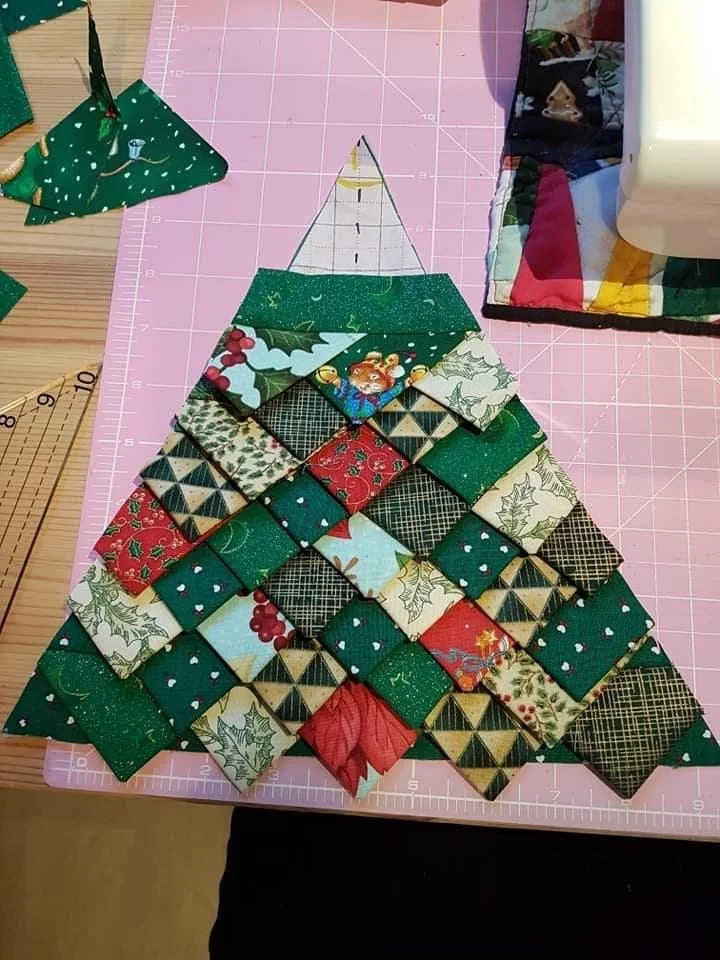
2. Crafting the Prairie Points
Prairie Points are the defining feature of this quilt. This section explains how to create them step by step.
- What Are Prairie Points?
Prairie Points are folded fabric triangles used to add texture and dimension to quilts. They are often sewn along edges or in specific patterns for decorative effect. - Cutting the Triangles
Cut squares of fabric, then fold each square diagonally to form a triangle. Press the folds with an iron for crisp edges. Repeat this process for all Prairie Points. - Choosing the Right Size
The size of the Prairie Points depends on your quilt’s overall dimensions. For a standard Christmas tree quilt, 3-inch squares folded into 1.5-inch triangles work well. - Arranging the Points
Lay out your Prairie Points on the quilt base to determine placement. Overlapping them slightly creates a layered effect, resembling tree branches. - Securing the Prairie Points
Pin the Prairie Points onto the quilt base to keep them in place during sewing. Use matching thread to ensure the stitches blend seamlessly. - Sewing the Points
Attach the Prairie Points using a straight stitch along their base. Take your time to maintain even spacing and alignment.
3. Assembling the Quilt
Now that your Prairie Points are prepared, it’s time to assemble the Prairie Point Christmas Tree quilt.
- Building the Tree
Start at the bottom of the quilt base, sewing rows of Prairie Points upward to form the tree shape. Each row should slightly overlap the one below it. - Adding Tree Decorations
Enhance the design by sewing buttons, beads, or small fabric ornaments onto the tree. This adds personality and festive flair. - Creating the Trunk
Use a solid brown fabric to create the tree trunk. Sew it beneath the lowest row of Prairie Points for a realistic look. - Assembling the Layers
Sandwich the quilt top, batting, and backing fabric together. Pin the layers in place to prevent shifting during quilting. - Quilting the Design
Use free-motion quilting or straight-line stitching to secure the layers. Focus on areas around the Prairie Points to maintain their structure. - Binding the Edges
Finish the quilt by attaching binding along the edges. This gives the quilt a polished and durable finish.
4. Finishing Touches and Displaying Your Quilt
Once the main quilt is complete, it’s time to add finishing touches and decide how to display it.
- Inspecting for Loose Threads
Examine the quilt for loose threads or uneven stitches. Trim or redo these areas as needed for a flawless finish. - Adding a Hanging Sleeve
If you plan to display the quilt on a wall, sew a hanging sleeve onto the back. This allows you to insert a rod or dowel for easy hanging. - Labeling Your Quilt
Consider adding a fabric label with your name, the date, and the quilt’s title. This personal touch is especially meaningful for gift-giving. - Storing the Quilt
When not in use, store the quilt in a cool, dry place. Avoid direct sunlight to prevent fading. - Using as a Table Runner
This quilt doubles as a festive table runner. Its compact size and decorative elements make it perfect for holiday gatherings. - Sharing Your Creation
Share photos of your quilt on social media or quilting forums. Your work might inspire others to try their hand at the Prairie Point Christmas Tree quilt tutorial.
FAQ
1. What is the Prairie Point technique?
Prairie Points are folded fabric triangles that add texture and dimension to quilts. They are commonly used in decorative borders and designs.
2. How do I choose fabrics for a Christmas-themed quilt?
Opt for festive colors like red, green, and white. Patterns with holiday motifs such as snowflakes, holly, or candy canes are also great choices.
3. Can beginners make a Prairie Point Christmas Tree quilt?
Yes! This project is beginner-friendly with its simple folding and sewing techniques. Take your time and follow the steps carefully.
4. What size should the Prairie Points be?
The size depends on your design. For most projects, 3-inch squares folded into 1.5-inch triangles work well.
5. How do I care for a quilt with Prairie Points?
Wash the quilt gently on a delicate cycle and air dry to maintain the structure of the Prairie Points.
6. Can I customize the tree design?
Absolutely! Add embellishments, change the fabric colors, or modify the size to suit your preferences.
Join our VIP broadcast list and gain access to exclusive patterns, all for free. As a VIP member, you’ll receive the best patterns daily, delivered directly to your device. ✨📱 It’s a unique opportunity to stay up-to-date with the latest trends and designs, curated just for you. Don’t miss out on enhancing your projects and discovering new inspirations with the best patterns every day! 🎨🔝
Conclusion
By following this guide on how to make a Prairie Point Christmas Tree quilt – TUTORIAL, you’ve learned how to create a festive and dimensional quilt that will brighten any holiday decor. From preparing materials to finishing touches, each step ensures a successful project.
We’d love to hear your thoughts! Share your experiences, suggestions, or feedback in the comments. Your input helps us and inspires fellow quilters. Happy quilting!

