How to make a Fabric Chicken Egg Holders Pattern is a delightful sewing project that combines functionality with charming farmhouse style. Learning How to make a Fabric Chicken Egg Holders Pattern allows you to create decorative yet practical kitchen accessories that safely store fresh eggs while adding a handmade touch to your space.
These fabric chicken egg holders are perfect for spring décor, Easter celebrations, farmhouse kitchens, or thoughtful handmade gifts. With careful fabric selection and structured sewing techniques, you can craft a durable and reusable egg holder that is both adorable and reliable.
Understanding How to make a Fabric Chicken Egg Holders Pattern begins with recognizing the balance between structure and softness. The design must be sturdy enough to cradle an egg securely while maintaining a decorative chicken shape.
This requires proper interfacing, accurate seam allowances, and thoughtful shaping. Even beginner sewists can complete this project successfully with patience, precise cutting, and steady stitching. The result is a charming fabric chicken that holds an egg snugly inside its body.
One of the most appealing aspects of the Fabric Chicken Egg Holders Pattern is its versatility. You can customize colors, prints, and embellishments to match seasonal themes or kitchen décor. Floral cotton prints, gingham, polka dots, or neutral farmhouse tones all work beautifully. Throughout this guide, you will learn about materials, cutting techniques, assembly steps, shaping details, and finishing touches to ensure your chicken egg holder looks polished and professional.
Choosing Materials and Preparing the Pattern
Selecting the right materials is essential when learning How to make a Fabric Chicken Egg Holders Pattern. Quilting cotton is highly recommended because it is easy to sew, presses well, and provides enough structure for small decorative items. Choose coordinating fabrics for the chicken body, wings, comb, and beak to create contrast and visual interest.
In addition to fabric, lightweight fusible interfacing is necessary to reinforce the body. Interfacing adds stability and helps the chicken maintain its shape while holding an egg. Polyester stuffing can be used lightly in the tail or wings for dimension, but avoid overstuffing the body since the egg needs space to sit securely.
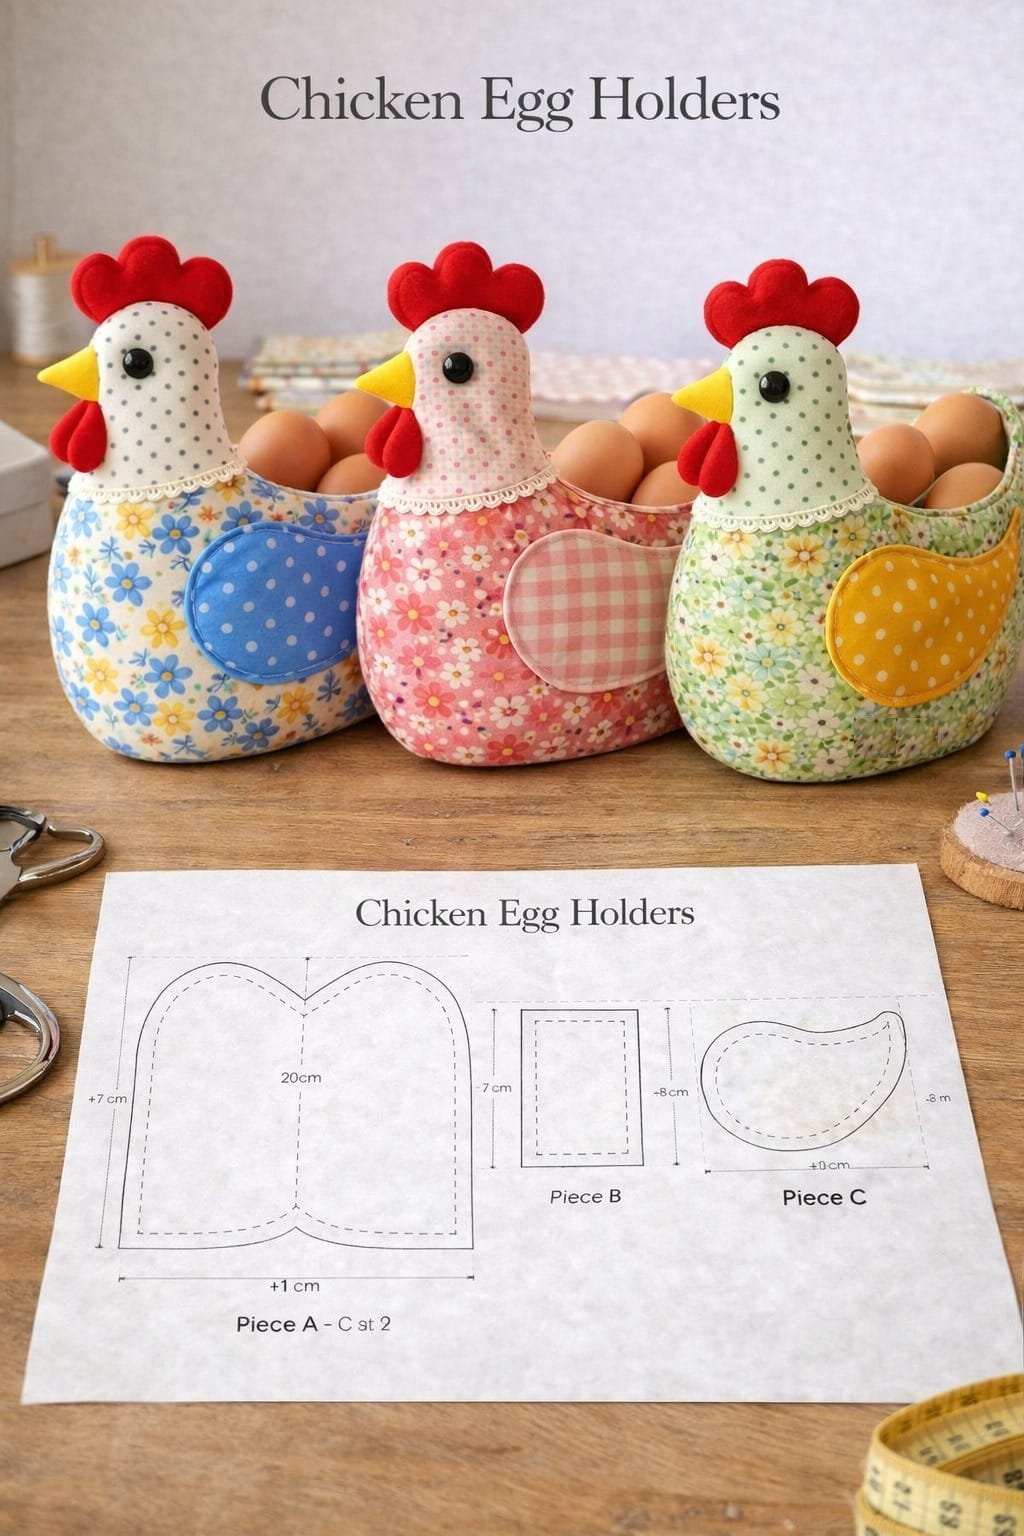
You will also need sharp fabric scissors or a rotary cutter, pins or clips, matching thread, a sewing machine, and a marking tool. A printed pattern template ensures symmetrical cutting. If you do not have a pre-made template, draw a simple chicken silhouette with a rounded base and small upright head.
Before cutting, wash and press your fabric to eliminate wrinkles and shrinkage. Accurate pressing ensures clean edges and better seam alignment. Preparation may seem simple, but it significantly improves the overall finish of your sewing project.
Cutting and Constructing the Chicken Body
Begin constructing the Fabric Chicken Egg Holders Pattern by cutting two identical body pieces from your main fabric. Cut additional smaller pieces for wings, comb, and beak. Apply interfacing to the wrong side of the body fabric before sewing to reinforce structure.
Place the two body pieces right sides together and pin around the edges. Leave an opening at the bottom large enough to insert the egg and turn the fabric right side out. Sew using a consistent ¼ inch seam allowance, pivoting carefully around curves to maintain smooth lines.
After stitching, clip small notches along curved edges without cutting through the seam. This helps the fabric lie flat when turned. Carefully turn the chicken right side out and press gently to shape the curves.
Create a flat circular or oval base if additional stability is needed. Some versions of the How to make a Fabric Chicken Egg Holders Pattern include a separate bottom piece sewn in place to create a defined cavity for the egg.
Adding Wings, Comb, and Decorative Details
The small details bring personality to your Fabric Chicken Egg Holders Pattern. Sew wings separately, turn them right side out, and lightly stuff if desired. Attach them securely to the body using reinforced stitching to prevent loosening over time.
For the comb and beak, use contrasting fabric. These pieces can be sewn into the top seam or attached afterward with tight stitching. Keep these elements flat and compact to maintain a balanced design.
Eyes can be embroidered with black thread or created using small fabric circles. Avoid plastic embellishments if the holder will be used frequently, as flat stitching is more durable and washable.
Take time aligning all decorative elements symmetrically. Proper placement ensures the chicken looks balanced and polished. Even small misalignments can affect the overall appearance.
Final Shaping and Finishing Techniques
Once all components are attached, test the egg placement. Insert a standard chicken egg gently to ensure it fits securely. The opening should cradle the egg without squeezing too tightly.
If the base feels unstable, add a small circle of interfacing or an extra fabric layer inside for reinforcement. Press the entire piece carefully, avoiding excessive heat if synthetic interfacing is used.
Topstitching around the bottom edge can improve durability and give a professional finish. This extra step strengthens seams and adds a decorative touch to the How to make a Fabric Chicken Egg Holders Pattern.
Finally, trim loose threads and inspect all seams. Quality finishing ensures your handmade project lasts through regular use and seasonal displays.
FAQ
What type of fabric works best for a Fabric Chicken Egg Holders Pattern?
Quilting cotton is ideal because it is sturdy, easy to sew, and holds shape well when combined with interfacing.
Do I need interfacing for this project?
Yes, interfacing provides structure and helps the chicken maintain its shape while holding an egg securely.
Can beginners learn How to make a Fabric Chicken Egg Holders Pattern?
Absolutely. The pattern uses basic sewing techniques such as straight stitching and simple shaping, making it beginner-friendly.
How do I ensure the egg fits properly?
Measure a standard egg before sewing and adjust the pattern size if necessary to create a snug but gentle fit.
Can I wash the finished egg holder?
Yes, if made with cotton fabric and secure stitching, it can be gently hand washed and air dried.
Conclusion
Learning How to make a Fabric Chicken Egg Holders Pattern is a rewarding sewing experience that combines creativity with practical function. From selecting fabric and reinforcing the body to assembling decorative details and shaping the base, each step builds your sewing confidence. These charming fabric chickens add warmth and personality to any kitchen while offering a reusable way to display or store eggs. If this guide helped you, please share your honest opinion and suggestions. Your feedback supports continued improvement and inspires more creative sewing projects.
Another benefit of mastering How to make a Fabric Chicken Egg Holders Pattern is the opportunity to create coordinated kitchen décor. You can sew matching placemats, napkins, or fabric baskets using the same prints to build a cohesive handmade collection. Small projects like this are perfect for using fabric scraps efficiently while practicing precision sewing techniques that improve overall craftsmanship.
Additionally, the Fabric Chicken Egg Holders Pattern makes a thoughtful handmade gift for friends, family, or craft fairs.
VIDEO TUTORIAL
Because it is both decorative and functional, it appeals to a wide range of people who appreciate farmhouse charm. Personalizing colors and patterns allows you to tailor each piece to different tastes, making every finished holder unique and special.

