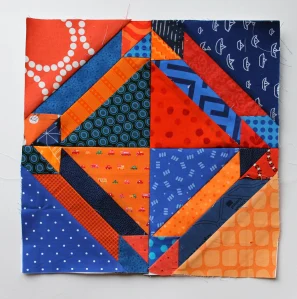
The Gretchen block is a traditional patchwork block that stands out for its beauty and simplicity. With a design that combines soft curves and straight lines, this block offers a unique look, making it an excellent choice for quilts, pillows, and other creative sewing projects.
In this Gretchen block tutorial, you’ll learn how to create this block in a detailed, step-by-step guide, even if you’re new to the art of patchwork.
Creating a Gretchen block requires precision in both cutting and sewing, but the final result is well worth the effort. This tutorial is written to be clear, accessible, and optimized for SEO, ensuring that you can find the information easily and quickly.
Additionally, the use of key terms and keywords will help boost your learning and execution of this delightful project.
In this article, we’ll explore each step of creating the Gretchen block, from selecting fabrics to the final assembly. We will cover all aspects to ensure your success in creating this block. Below, we’ve broken down each part of the process to make it easy to follow along.
1. Choosing Fabrics for the Gretchen Block
Selecting the right fabrics is one of the most important parts when starting any patchwork project, and the Gretchen block is no exception.
- Color Contrast: The secret to an impressive Gretchen block lies in the color contrast between fabrics. Choose fabrics that complement each other but also create visual contrast. This helps to highlight the block’s unique pattern.
- Prints and Patterns: Small prints work best for this block, as they won’t compete with the intricate design of the Gretchen block. Avoid large prints, as they can obscure the block’s shape.
- Fabric Types: 100% cotton fabrics are the best choice for the Gretchen block because they are easy to cut, sew, and are durable. Ensure that the fabrics you choose are of high quality to guarantee the longevity of your block.
- Combining Textures: Besides considering color, think about mixing different fabric textures. This can add depth and visual interest to your Gretchen block, making it even more special.
- Fabric Quantity: For a medium-sized block, you’ll typically need about a ¼ yard of two contrasting fabrics. If you’re planning on making a quilt, calculate the total fabric required based on the size of your quilt and the number of blocks.
- Pre-washing Fabrics: Don’t forget to pre-wash your fabrics before cutting and sewing. This will prevent any shrinkage after your Gretchen block has been assembled.
2. Cutting Fabrics for the Gretchen Block
Precise cutting of fabrics is essential to ensure your Gretchen block is aligned correctly and has a professional finish.
- Cutting Tools: Ensure you’re using sharp and appropriate cutting tools, like a rotary cutter, patchwork ruler, and cutting mat. These tools will ensure your cuts are precise and straight.
- Exact Measurements: Each piece of the Gretchen block needs to be cut to the exact measurement. Measure and cut carefully to avoid alignment problems when sewing.
- Batch Cutting: If you’re making multiple Gretchen blocks, a helpful tip is to cut all the fabric pieces at once, in batches. This saves time and ensures uniformity across all blocks.
- Organizing the Pieces: Arrange your cut fabric pieces according to the block pattern. Keeping everything organized will make assembly easier and help prevent mistakes during sewing.
- Handling Stretchy Fabrics: Some parts of the Gretchen block involve cutting fabric on a bias, which can cause the fabric to stretch. Handle these pieces with care to avoid distortion.
- Double-check Before Cutting: Before you start cutting, double-check your measurements to ensure accuracy. A small cutting error can compromise the entire project.
3. Assembling the Gretchen Block
Now that your fabrics are cut, it’s time to start assembling the Gretchen block. The assembly process requires attention to detail to ensure the block turns out perfect.
- Laying Out the Pieces: Start by laying out your fabric pieces according to the Gretchen block design. Make sure all the pieces are in the correct place before you begin sewing.
- Sewing the Curves: One of the standout features of the Gretchen block is its curves. To sew curves with precision, carefully align the fabric edges and sew slowly. Using plenty of pins can help keep the fabric in place.
- Aligning Seams: It’s crucial that the seams of the Gretchen block are perfectly aligned. This will ensure the block maintains its shape and the design is clean and defined.
- Pressing Seams: After sewing each section, press the seams open or to the side, depending on your preference. This will help keep the block flat and make it easier to sew the next sections.
- Check the Size: After assembling the block, measure it to ensure it’s the correct size. If necessary, adjust the seams to fix any discrepancies.
- Repeat the Process: If you’re making multiple Gretchen blocks for a quilt or larger project, repeat the assembly process for each block, ensuring all are uniform and aligned.
4. Finishing the Gretchen Block
Now that your Gretchen block is assembled, it’s time to add the finishing touches and prepare it for use in your patchwork project.
- Trimming the Block: After assembly, you may need to trim the edges of the block to ensure it’s perfectly square. Use a ruler and rotary cutter to do this with precision.
- Joining the Blocks: If you’re making a quilt with multiple Gretchen blocks, start joining the blocks together. Be sure to align the seams and ensure the blocks are all the same size.
- Adding Borders: Depending on your project, you might want to add borders around your Gretchen block. This can help highlight the block’s design and create a beautiful frame for your work.
- Choosing Batting and Backing: To complete your project, choose appropriate batting and backing. This will add structure and comfort to your piece, making it more durable.
- Quilting: Quilting is an optional step, but it can add a special touch to your project. You can opt for hand quilting or machine quilting, depending on your skill and preference.
- Binding the Edges: Finally, add binding around the edges of your piece to give it a clean, professional finish. Binding also helps protect the edges from wear and tear.
FAQ: Frequently Asked Questions
1. What is a Gretchen block?
A Gretchen block is a patchwork block that combines soft curves and straight lines, creating a unique and elegant design. It’s ideal for quilts, pillows, and other creative sewing projects.
2. Can beginners make a Gretchen block?
Yes! Although the Gretchen block involves some advanced techniques, like sewing curves, beginners can successfully make it with practice and patience.
3. What fabrics work best for the Gretchen block?
100% cotton fabrics are ideal for the Gretchen block. They are easy to cut, sew, and come in a wide variety of colors and patterns.
4. What is the ideal size of a Gretchen block?
The size of a Gretchen block can vary, but it’s typically made around 12 to 15 inches. The final size depends on the project you’re creating.
5. How do you sew curves in the Gretchen block?
Sewing curves requires precision and patience. Use plenty of pins to align the fabric edges, and sew slowly to keep the fabric in place and avoid distortion.
6. Can I combine other patterns with the Gretchen block?
Yes! The Gretchen block can be combined with other patchwork blocks to create interesting and varied projects. Experiment with different combinations to see what works best for your design.
Join our VIP broadcast list and gain access to exclusive patterns, all for free. As a VIP member, you’ll receive the best patterns daily, delivered directly to your device. ✨📱 It’s a unique opportunity to stay up-to-date with the latest trends and designs, curated just for you. Don’t miss out on enhancing your projects and discovering new inspirations with the best patterns every day! 🎨🔝
Conclusion
The Gretchen block is a charming choice for any patchwork project. Its unique combination of curves and straight lines offers a sophisticated and interesting look. We hope this Gretchen block tutorial has provided all the information and tips you need to successfully create your own blocks.
Thank you for following this tutorial to the end. If you have any questions, suggestions, or would like to share your experience, please leave a comment below. Your feedback is very important to us!

