The Folded Corners Quilt Block is an exciting and versatile design that brings dimension and character to your quilting projects.
Whether you’re a beginner or an experienced quilter, mastering this technique opens up countless creative possibilities.
In this Folded Corners Quilt Block – Free Tutorial, we will guide you step by step through the process, ensuring that your blocks are perfectly shaped and aligned. This block can be used in various quilt layouts, from modern to traditional designs, adding a dynamic look to any quilt.
Using the Folded Corners Quilt Block method allows for sharp, clean angles and smooth transitions between fabric pieces. This technique is simple but impactful, and it’s a great way to use fabric scraps or feature stunning prints in your quilting projects.
Throughout this tutorial, we will not only focus on the technical aspects but also offer tips and tricks to enhance your quilting experience.
By following this Folded Corners Quilt Block – Free Tutorial, you’ll learn how to create precise corners, align fabric pieces effortlessly, and add a professional finish to your quilts. Let’s get started on this quilting adventure and explore the magic of folded corners!
1. What is the Folded Corners Quilt Block?
The Folded Corners Quilt Block is a popular block technique that allows quilters to create diagonal seams without cutting triangles separately. This method simplifies piecing and results in cleaner, sharper corners.
- Definition and Basics: The Folded Corners Quilt Block is created by folding a square of fabric and stitching it onto the corner of a larger square or rectangle. Once sewn in place, the excess fabric is trimmed away, leaving a perfect diagonal seam. This technique is often used in star blocks, flying geese units, and other quilt designs that require angles.
- Why Use This Technique? The folded corner method eliminates the need for tricky bias cuts and precise triangle matching, making it an accessible choice for beginners. Plus, it results in less fabric waste compared to traditional methods.
- Types of Projects: This block is perfect for quilts, but it can also be used in smaller projects like table runners, pillowcases, or bags. The versatility of the Folded Corners Quilt Block makes it a favorite among quilters of all skill levels.
- Fabric Choices: You can experiment with different fabrics for a unique look. Solid fabrics emphasize the sharp angles, while prints can create a more playful or intricate appearance. Choosing contrasting fabrics will make the diagonal lines stand out even more.
- Measuring and Cutting: To get started, you’ll need to measure and cut your squares accurately. The key to perfect folded corners is precision, so make sure your pieces are square and your seam allowances are consistent.
- Practical Use: In addition to quilt blocks, this method can also be used in quilt borders or sashing, giving your projects a cohesive and polished look.
2. Step-by-Step Guide to Creating a Folded Corners Quilt Block
Now that we understand the basics, let’s walk through the step-by-step process of making your own Folded Corners Quilt Block. Following these steps carefully will ensure a successful project with beautifully crisp corners.
- Step 1: Gather Materials: You’ll need fabric squares for the main block, smaller fabric squares for the folded corners, a rotary cutter, ruler, and sewing machine. Be sure to choose fabrics that complement each other for a visually appealing block.
- Step 2: Marking the Fabric: Take your smaller squares and mark a diagonal line from one corner to the opposite corner using a fabric pencil or erasable pen. This line will act as your sewing guide.
- Step 3: Placing the Squares: Position one of the smaller squares on the corner of the larger square, right sides together. Align the edges of the squares so that the marked line runs diagonally across the corner.
- Step 4: Sewing the Folded Corner: Sew along the marked diagonal line. Make sure to keep your stitching straight for a neat and professional finish. Backstitch at the beginning and end of the seam to secure it in place.
- Step 5: Trimming and Pressing: After sewing, trim away the excess fabric, leaving a 1/4-inch seam allowance. Open up the smaller square and press it to form a perfect folded corner. Repeat for each corner of the block as needed.
- Step 6: Assembling Multiple Blocks: If you’re making multiple Folded Corners Quilt Blocks, ensure consistency by measuring your seam allowances and pressing each block flat before joining them together. You can arrange the blocks in various configurations for different designs.
3. Common Mistakes to Avoid When Making Folded Corners Quilt Blocks
Even though the Folded Corners Quilt Block technique is straightforward, there are some common mistakes that can affect the final look of your project. By being aware of these pitfalls, you can avoid them and produce high-quality blocks.
- Inaccurate Cutting: Precision is key when cutting your fabric squares. If your pieces are not perfectly square, the folded corners may not align properly, leading to uneven seams and distorted blocks.
- Skipping the Marking Step: Some quilters try to skip marking the diagonal line, but this often results in crooked seams. Always take the time to mark your fabric before sewing.
- Sewing Too Close to the Edge: If you sew too close to the edge of the smaller square, the fabric may pull or pucker when pressed open. Make sure to sew exactly on the marked line for clean, flat seams.
- Not Trimming Excess Fabric: Failing to trim the excess fabric after sewing the diagonal line can make your block bulky and difficult to piece together. Always trim to a 1/4-inch seam allowance.
- Incorrect Pressing: Pressing the fabric after each step is essential to ensure smooth seams and accurate blocks. Avoid using too much heat or pressing too aggressively, as this can stretch or warp the fabric.
- Inconsistent Seam Allowances: Maintaining a consistent 1/4-inch seam allowance throughout the project will ensure that your blocks fit together perfectly when assembling your quilt top.
4. Creative Ways to Use Folded Corners Quilt Blocks in Your Projects
The Folded Corners Quilt Block can be used in countless creative ways. Once you’ve mastered the technique, you can incorporate it into various quilting projects to add a dynamic element.
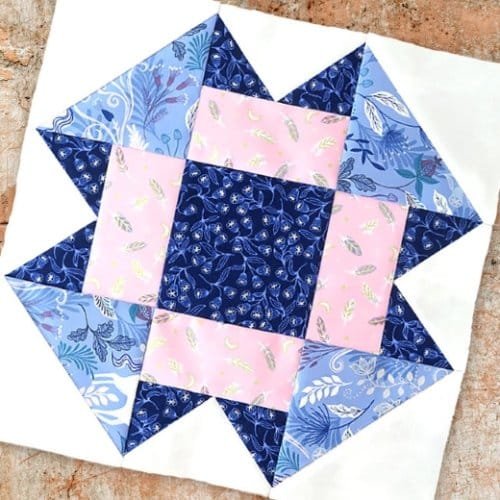
- Star Blocks: One of the most popular uses for folded corners is in star quilt blocks. The sharp angles created by the folded corners make the points of the stars clean and precise, giving your quilt a polished look.
- Flying Geese Units: This technique is also commonly used in flying geese blocks, which are a fundamental component in many quilt patterns. Using the folded corner method makes flying geese units easy to construct.
- Borders and Sashing: You can use Folded Corners Quilt Blocks as decorative elements in the borders or sashing of your quilt. This adds visual interest and breaks up large areas of plain fabric.
- Table Runners: For smaller projects like table runners or placemats, folded corners can be used to create intricate designs that look complex but are relatively simple to execute.
- Pillows and Home Decor: Quilted pillows are another great way to use folded corners. The technique adds dimension and texture, making your home decor items stand out.
- Scrappy Quilts: Folded corners are perfect for scrappy quilts because you can mix and match various fabrics to create a unique, colorful look. The diagonal seams add a playful and unexpected touch.
FAQ About Folded Corners Quilt Block – Free Tutorial
Q: What size squares should I use for folded corners?
A: The size of the squares depends on the size of your quilt block. Typically, the smaller squares should be about half the size of the larger square, but you can adjust this based on your pattern.
Q: Can I make folded corners without marking the fabric?
A: While it’s possible, marking the diagonal line ensures that your seams are straight and accurate, so it’s highly recommended, especially for beginners.
Q: Why are my corners not lining up perfectly?
A: This could be due to inaccurate cutting or inconsistent seam allowances. Double-check your measurements and make sure your seam allowance is a consistent 1/4 inch.
Q: Can I use this technique for other shapes?
A: Yes, the folded corner technique can be applied to various shapes, including rectangles and triangles, to create interesting angles and designs.
Q: What type of fabric works best for folded corners?
A: Cotton quilting fabric is ideal for this technique because it’s easy to cut, sew, and press. However, you can experiment with other fabrics like linen or flannel for different effects.
Q: How do I prevent my fabric from shifting while sewing?
A: Using pins or a fabric glue pen can help hold the fabric in place while you sew along the diagonal line.
Join our VIP broadcast list and gain access to exclusive patterns, all for free. As a VIP member, you’ll receive the best patterns daily, delivered directly to your device. ✨📱 It’s a unique opportunity to stay up-to-date with the latest trends and designs, curated just for you. Don’t miss out on enhancing your projects and discovering new inspirations with the best patterns every day! 🎨🔝
Conclusion
This Folded Corners Quilt Block – Free Tutorial is an excellent way to add dimension and style to your quilting projects. By following the step-by-step instructions, you’ll be able to create perfect blocks with sharp, clean corners every time. Whether you’re working on a large quilt or a small home decor project, the folded corners technique is versatile and easy to master.
We hope this tutorial has helped you understand the process and inspired you to try the Folded Corners Quilt Block in your own quilting. Feel free to leave a comment with your thoughts, feedback, or suggestions for future tutorials. Happy quilting!

