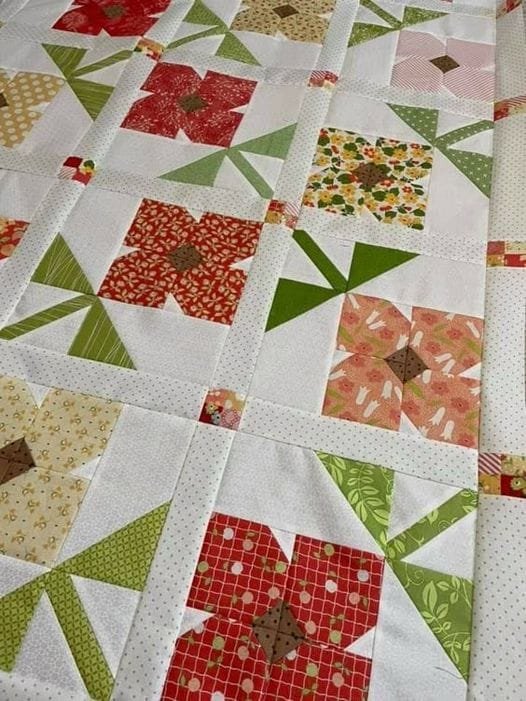
Flower Quilt Blocks – Quilting Pattern is a beautiful way to bring nature into your quilting projects. These patterns allow you to create intricate floral designs that add a touch of elegance and charm to any quilt.
Whether you’re a beginner or an experienced quilter, Flower Quilt Blocks are a perfect way to experiment with color, design, and fabric.
In this tutorial, we’ll explore how to make different Flower Quilt Blocks, offering you both traditional and modern approaches.
You’ll learn step-by-step how to create stunning floral quilt blocks that can be incorporated into larger quilts, wall hangings, or even as standalone pieces. The beauty of these patterns lies in their versatility, as they can be customized to suit your taste and project size.
By the end of this article, you will have a comprehensive understanding of how to create Flower Quilt Blocks and how to use them effectively in your quilting projects. Additionally, you’ll find answers to frequently asked questions, ensuring that you have all the information you need to start your Flower Quilt Blocks – Quilting Pattern journey.
1. Choosing the Right Fabrics for Your Flower Quilt Blocks
The first step in creating a beautiful Flower Quilt Blocks – Quilting Pattern is selecting the right fabrics. The choice of fabric can significantly impact the final look of your quilt, so it’s essential to take the time to pick fabrics that will enhance the floral design.
1.1 Color Harmony
When working with Flower Quilt Blocks, choosing colors that harmonize well is key. Think about nature-inspired colors, such as shades of green, yellow, pink, and blue, which work well for flowers. You can either go for realistic color schemes or experiment with vibrant and bold colors to make the flowers stand out.
1.2 Patterned vs. Solid Fabrics
Another consideration is whether to use patterned or solid fabrics. Solid fabrics often help highlight the intricate design of the flowers, while small floral or geometric patterns can add depth and texture. Combining the two can create an eye-catching contrast in your Flower Quilt Blocks.
1.3 Fabric Weight and Type
The fabric weight and type you choose also affect the outcome. Cotton fabric is a popular choice for quilting because it’s easy to work with and provides structure. However, lightweight fabrics like linen can add softness, while heavier fabrics like wool or flannel can give your quilt a cozy feel.
1.4 Matching or Contrasting Backgrounds
Consider the background fabric for your Flower Quilt Blocks. A neutral background, such as white or cream, allows the flower designs to pop. Alternatively, a contrasting background, such as dark blue or black, can create a dramatic effect.
1.5 Pre-washing Fabrics
Always pre-wash your fabrics before starting your quilt. This step prevents shrinkage and color bleeding after the quilt is completed. By pre-washing, you ensure that your Flower Quilt Blocks will maintain their shape and colors.
1.6 Organizing Your Fabric Pieces
Once you’ve selected your fabrics, organize them by color and size. This step makes it easier to piece your quilt blocks together and helps avoid mistakes during the cutting and sewing process.
2. Cutting and Preparing Your Fabric Pieces
Accurate cutting and preparation are essential when creating Flower Quilt Blocks. Precise measurements ensure that your blocks will fit together seamlessly and that your flower designs will look crisp and professional.
2.1 Using a Rotary Cutter and Mat
A rotary cutter, cutting mat, and quilting ruler are essential tools for cutting fabric with precision. Always make sure your rotary cutter blade is sharp to achieve clean cuts, and use a self-healing cutting mat to protect your work surface.
2.2 Measuring Your Fabric Pieces
Before cutting, measure your fabric carefully. Flower Quilt Blocks often require a mix of squares, rectangles, and triangles to form the petals and leaves of the flowers. Follow the pattern’s instructions to determine the correct measurements for each piece.
2.3 Marking Sewing Lines
For some intricate Flower Quilt Blocks, you may need to mark sewing lines on the back of your fabric pieces. Use a water-soluble fabric pen to mark diagonal lines on squares or triangles, which will guide you as you sew the pieces together.
2.4 Cutting Multiple Pieces at Once
If your pattern requires several pieces of the same size, stack multiple layers of fabric and cut them together. This technique saves time and ensures that all your pieces are uniform in size.
2.5 Keeping Your Pieces Organized
As you cut your fabric, place each piece in a designated spot to avoid confusion. You can use small bins or trays to keep the pieces for each flower organized by block. This step is especially useful if you’re working on multiple Flower Quilt Blocks at once.
2.6 Checking for Accuracy
After cutting your pieces, double-check the sizes before moving on to the next step. Accurate measurements are critical in ensuring that your flower blocks will come together seamlessly when it’s time to sew.
3. Assembling the Flower Quilt Blocks
Once your fabric pieces are cut and prepared, it’s time to assemble the Flower Quilt Blocks. This step requires attention to detail, but with patience, you can create stunning quilt blocks that highlight the beauty of floral designs.
3.1 Laying Out the Design
Before sewing, lay out your fabric pieces in the pattern’s design. This layout gives you a visual guide and allows you to make any adjustments before committing to sewing. Arrange the petals, leaves, and background pieces in their correct positions.
3.2 Sewing the Petals and Leaves
Begin by sewing the petals and leaves together. Use a quarter-inch seam allowance, which is standard for quilting. Press each seam as you go to ensure a flat, professional finish. Ironing seams open can help reduce bulk, especially when working with multiple layers.
3.3 Joining Rows or Sections
Many Flower Quilt Blocks are assembled by sewing smaller sections together, such as rows or columns. Sew each row, then join the rows together to complete the flower design. Be mindful of aligning your seams for a neat, cohesive look.
3.4 Adding the Background Fabric
Once the flower is complete, sew the background fabric pieces to frame the flower. The background helps the flower design stand out and completes the block.
3.5 Pressing the Completed Block
After sewing, press the entire block to set the seams. Pressing from the back helps avoid creating shiny marks on the fabric, and it ensures the block lays flat when added to the quilt.
3.6 Trimming the Block
Finally, trim the edges of the block to ensure it’s the correct size. A quilting ruler helps ensure that your block is square and ready to be sewn into the larger quilt.
4. Incorporating Flower Quilt Blocks into a Quilt
Once you’ve completed your Flower Quilt Blocks, the next step is incorporating them into a full quilt. This process allows you to showcase your beautiful floral designs while also creating a cohesive quilt.
4.1 Planning Your Quilt Layout
Before sewing your blocks together, plan the layout of your quilt. You can arrange the Flower Quilt Blocks in a grid pattern or experiment with alternating blocks of solid fabric for variety.
4.2 Adding Sashing Between Blocks
For a more structured look, add sashing between the Flower Quilt Blocks. Sashing is strips of fabric that separate the blocks and can help highlight each flower. Choose a complementary color for the sashing to tie the quilt together.
4.3 Joining the Blocks Together
Sew the blocks together row by row, taking care to match the seams at each intersection. Press each seam as you go, ensuring that the quilt top stays flat.
4.4 Borders and Binding
Consider adding borders to your quilt to frame the Flower Quilt Blocks. Borders can be solid or patterned fabric and provide a finishing touch to your quilt. After sewing the borders, add binding to complete the quilt’s edges.
4.5 Quilting the Layers
Once the quilt top is complete, it’s time to quilt the layers together. You can follow the lines of the Flower Quilt Blocks for a clean look or add free-motion quilting for extra texture and dimension.
4.6 Finishing Touches
After quilting, trim any excess fabric and binding, then give your finished quilt one final press. Your Flower Quilt Blocks – Quilting Pattern quilt is now ready to be displayed or gifted.
FAQ
Q: Are Flower Quilt Blocks suitable for beginners?
A: Yes, Flower Quilt Blocks – Quilting Pattern is beginner-friendly. Many patterns are simple to follow, and the blocks can be as detailed or as basic as you like.
Q: What type of fabric should I use?
A: Cotton is the most common fabric for quilting due to its durability and ease of use. However, you can experiment with other fabrics like linen or flannel for different textures.
Q: How do I ensure my blocks are the same size?
A: Using a quilting ruler and cutting mat helps ensure your fabric pieces are cut accurately. Double-check measurements before sewing and trim your blocks after assembly if needed.
Q: Can I hand-sew Flower Quilt Blocks?
A: Yes, while machine sewing is faster, you can hand-sew Flower Quilt Blocks if you prefer. Just ensure that your stitches are even and secure.
Q: How many blocks do I need for a full quilt?
A: The number of blocks you need depends on the size of the quilt. For example, a lap quilt may require 12 blocks, while a bedspread might need 30 or more.
Q: Can I customize the flower designs?
A: Absolutely! You can adjust the colors, fabrics, and block size to create a unique Flower Quilt Blocks – Quilting Pattern that reflects your style.
Join our VIP broadcast list and gain access to exclusive patterns, all for free. As a VIP member, you’ll receive the best patterns daily, delivered directly to your device. ✨📱 It’s a unique opportunity to stay up-to-date with the latest trends and designs, curated just for you. Don’t miss out on enhancing your projects and discovering new inspirations with the best patterns every day! 🎨🔝
Conclusion
In this guide, we’ve explored the world of Flower Quilt Blocks – Quilting Pattern, from selecting fabrics to assembling your blocks and incorporating them into a quilt. By following these steps, you can create beautiful floral designs that bring life and elegance to any quilt project.
We hope you found this tutorial helpful and inspiring. Please feel free to leave your thoughts, suggestions, and any feedback in the comments below. Happy quilting!

