Welcome to our detailed tutorial on the Flea Market Flowers Quilt. In this guide, we’ll take you through the steps to create a beautiful quilt inspired by the charm and whimsy of a flea market.
The Flea Market Flowers Quilt is perfect for quilters of all skill levels, and its vibrant floral patterns will add a splash of color to any space. Throughout this tutorial, we’ll explore the materials needed, step-by-step instructions, and helpful tips to ensure your quilting journey is a success.
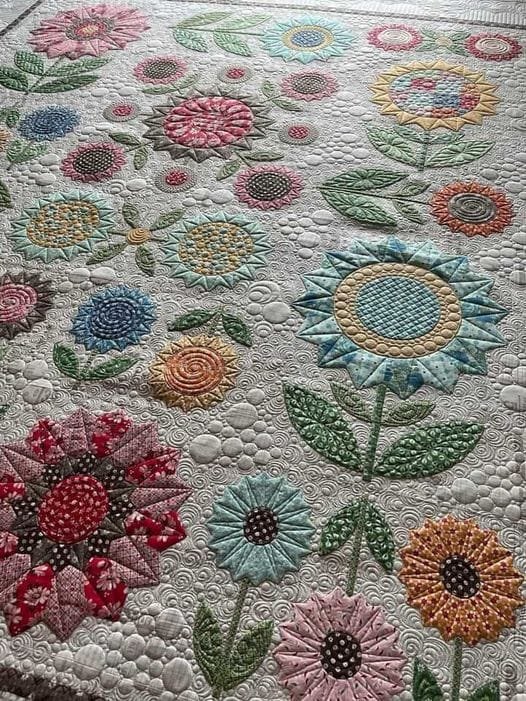
This quilt design is not only visually appealing but also a fantastic way to use your fabric scraps and leftover materials. The flower motifs are reminiscent of a bustling flea market, where you can find an array of unique and colorful items. By using various fabrics, you can create a stunning quilt that reflects your personal style and creativity.
In addition to being a fun project, quilting has numerous benefits. It can be a relaxing hobby that allows for self-expression and creativity, and it provides an opportunity to create handmade gifts for friends and family.
With this Flea Market Flowers Quilt tutorial, you’ll gain valuable skills and create a beautiful piece that you can cherish for years to come.
1. Gathering Your Materials
Before diving into the quilting process, it’s essential to gather all the materials you’ll need to create your Flea Market Flowers Quilt. Here’s a comprehensive list to get you started:
- Fabric: Choose a variety of fabrics in different colors and patterns for your flowers. Cotton fabric works best for quilting as it’s durable and easy to sew. Consider selecting florals, solids, and coordinating prints to create a cohesive look.
- Batting: This is the insulating layer that goes between the quilt top and backing. Cotton or polyester batting is commonly used. Ensure it’s the right thickness for your desired quilt feel.
- Backing Fabric: For the back of your quilt, choose a fabric that complements your floral patterns. It can be a solid color or a print that ties in the overall design.
- Quilting Ruler: A clear quilting ruler will help you measure and cut your fabric accurately. Make sure it has both inches and centimeters marked for versatility.
- Rotary Cutter and Mat: These tools make cutting fabric much easier and more precise than using scissors. Invest in a good quality rotary cutter and a self-healing cutting mat.
- Sewing Machine: While hand sewing is an option, a sewing machine will speed up the process and provide more consistent stitching. Ensure it’s in good working order before you begin.
- Thread: Choose a thread that matches your fabric for piecing and quilting. A cotton thread in a neutral color is often a safe bet.
2. Designing Your Quilt Layout
Now that you have your materials ready, it’s time to design the layout of your Flea Market Flowers Quilt. This step is crucial as it sets the tone for your quilt.
- Choose Your Flower Patterns: Select flower patterns that you would like to incorporate. You can find templates online, or you can create your own designs. Consider a mix of sizes and shapes for visual interest.
- Plan Your Layout: Use graph paper or quilt design software to sketch out your quilt layout. Arrange your flower blocks in a way that feels balanced. Remember to include space for borders if desired.
- Color Placement: Think about how the colors will interact with each other. Place contrasting colors next to one another to create a vibrant, eye-catching effect.
- Add Sashing and Borders: Consider adding sashing (the strips between your blocks) to tie the quilt together. Borders can add a finished look to your quilt and frame the flower designs nicely.
- Finalize Your Design: Once you’re happy with your layout, take a photo for reference. This will help you remember your design as you begin cutting and sewing.
- Prepare Your Fabric: Prewash your fabric to prevent shrinking later. Iron your fabric to remove any wrinkles, ensuring clean, accurate cuts.
3. Cutting and Piecing Your Quilt
With your design finalized, it’s time to cut and piece your Flea Market Flowers Quilt. This process is where your vision starts to come to life.
- Cut the Fabric: Using your rotary cutter and ruler, carefully cut your fabric according to the measurements from your design. Cut the flower petals, centers, sashing, and backing fabric.
- Assemble the Flower Blocks: Start by piecing the petals of your flower blocks together. Use a quarter-inch seam allowance for all your stitching to ensure a perfect fit.
- Add Flower Centers: Once the petals are sewn together, attach the flower centers. This step brings your flower blocks to life and adds character to your quilt.
- Sew the Blocks Together: After completing all your flower blocks, it’s time to sew them together according to your layout. Use sashing strips between the blocks for added dimension and organization.
- Create Rows: Once the blocks are pieced together, sew them into rows. Make sure to line up your seams for a clean finish.
- Press Your Seams: After piecing the quilt top, press your seams open or to one side, depending on your preference. This will help reduce bulk and create a flat quilt top.
4. Quilting and Finishing Touches
Now comes the most rewarding part—quilting your Flea Market Flowers Quilt and adding those finishing touches.
- Layer the Quilt: Lay out your backing fabric, right side down, followed by the batting, and finally, place your quilt top right side up. Smooth out any wrinkles and pin the layers together.
- Baste the Quilt: Use safety pins or basting spray to hold the layers in place. This step is crucial to prevent shifting during quilting.
- Quilting Options: Choose your quilting method—hand quilting or machine quilting. You can quilt in the ditch (along the seams) or create your own quilting patterns to enhance the flower designs.
- Trim the Edges: After quilting, trim any excess batting and backing fabric for a clean edge.
- Attach the Binding: Cut strips of fabric for the binding. Fold and press them, then attach them to the edges of your quilt, mitering the corners for a polished look.
- Final Press: Give your quilt a final press to smooth out any creases and showcase your beautiful work.
FAQ
Q: What is a Flea Market Flowers Quilt?
A: The Flea Market Flowers Quilt is a quilt design featuring floral patterns inspired by the charm and variety of a flea market. It often incorporates various fabric colors and styles for a vibrant effect.
Q: What skills do I need to make this quilt?
A: Basic sewing and quilting skills are recommended, including knowledge of cutting fabric, sewing seams, and quilting techniques. This tutorial is designed for all skill levels.
Q: Can I use different fabrics besides cotton?
A: While cotton is the most common fabric for quilting, you can experiment with other fabrics, but be mindful of their properties and how they may affect the overall quilt.
Q: How long does it take to complete a Flea Market Flowers Quilt?
A: The time it takes to complete the quilt varies based on your experience and the complexity of your design. Expect to spend several hours to a few days on the entire project.
Q: How do I care for my finished quilt?
A: To care for your quilt, wash it on a gentle cycle with cold water and tumble dry on low. Avoid using bleach to maintain the fabric’s colors.
Q: Can I personalize my Flea Market Flowers Quilt?
A: Absolutely! You can customize your quilt by choosing different fabrics, adding embroidery, or incorporating personal elements to make it uniquely yours.
Join our VIP broadcast list and gain access to exclusive patterns, all for free. As a VIP member, you’ll receive the best patterns daily, delivered directly to your device. ✨📱 It’s a unique opportunity to stay up-to-date with the latest trends and designs, curated just for you. Don’t miss out on enhancing your projects and discovering new inspirations with the best patterns every day! 🎨🔝
Conclusion
In this comprehensive tutorial on the Flea Market Flowers Quilt, we’ve covered everything from gathering materials to finishing touches. By following these steps, you can create a stunning quilt that showcases your creativity and love for floral designs. Remember to enjoy the process and let your imagination guide you.
We hope this guide inspires you to embark on your quilting journey. Please leave your honest feedback and any suggestions in the comments below! Happy quilting!

