Creating an eye-catching quilt can be a fulfilling project for any sewing enthusiast. If you’re looking for a design that combines complexity with stunning visual appeal, the Exploding Star Quilt Block Tutorial & Pattern is just what you need.
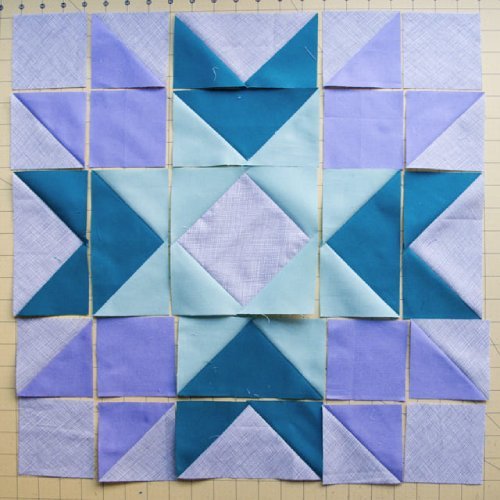
This quilt block features a dynamic star design that appears to burst with energy and movement, making it a perfect centerpiece for any quilt. In this article, we will guide you step-by-step through the process of creating your very own Exploding Star Quilt Block.
The beauty of the Exploding Star Quilt Block lies in its versatility. It can be used in various quilting projects, from bedspreads to wall hangings.
This block is not only visually striking but also provides an excellent opportunity for quilters to practice essential techniques, such as piecing, cutting, and pressing.
By the end of this tutorial, you will have a thorough understanding of how to create this block, including tips for color selection, fabric cutting, and assembly.
In this tutorial, we will cover everything you need to know, from gathering materials to finishing touches. We will also explore some frequently asked questions to address any concerns you may have. Let’s dive into the details of the Exploding Star Quilt Block Tutorial & Pattern!
1. Materials Needed for the Exploding Star Quilt Block
Before you start with the Exploding Star Quilt Block Tutorial & Pattern, it’s essential to gather all the materials you’ll need. Having everything ready will make your quilting experience much more enjoyable and efficient.
- Fabric: Choose a variety of fabrics to create contrast in your star block. Ideally, you should select three different fabrics: one for the background (light color), one for the star points (medium color), and one for the center (dark color). For example, you could use a soft cream for the background, a vibrant blue for the star points, and a deep navy for the center.
- Rotary Cutter and Cutting Mat: A rotary cutter will allow you to cut your fabric pieces accurately. Make sure to use a self-healing cutting mat to protect your work surface.
- Quilting Ruler: A quilting ruler with grid markings will help you measure and cut your fabric pieces precisely. This is crucial for achieving clean edges and proper alignment.
- Sewing Machine: A sewing machine with a straight stitch is sufficient for piecing the blocks. Ensure that you have a good quality needle, ideally a size 80/12, to prevent fabric snagging.
- Thread: Use high-quality cotton thread in a color that complements your fabric selection. A neutral color is a safe bet for most projects, but feel free to match the thread to your star fabric if desired.
- Iron and Ironing Board: Pressing your seams as you go is vital for achieving a flat, polished look. A reliable iron will help you set your seams and prevent distortion.
- Pins or Clips: These will help hold your fabric pieces together while sewing, ensuring that they don’t shift out of alignment.
Gathering these materials before you start will help streamline the quilting process and ensure a successful project.
2. Cutting Your Fabric for the Exploding Star Block
Once you have your materials gathered, it’s time to start cutting your fabric. Accurate cutting is critical in quilting, especially for the Exploding Star Quilt Block.
- Cutting Squares: Begin by cutting your fabric into squares. For a 12-inch finished block, you will need to cut:
- 4 squares of the background fabric (light color) at 4.5 inches.
- 4 squares of the medium color fabric at 4.5 inches.
- 4 squares of the dark color fabric at 4.5 inches.
- Making Half-Square Triangles: To create half-square triangles, pair one background square with one medium color square. Draw a diagonal line from one corner to the opposite corner. Sew a ¼-inch seam on both sides of the line, then cut along the drawn line. This will yield two half-square triangles.
- Pressing Seams: After cutting, press the seams of the half-square triangles open. This helps to reduce bulk and ensures that your blocks lay flat when assembled.
- Cutting Flying Geese Units: The flying geese units are essential for the star points. To make these, you’ll need:
- 1 rectangle of dark fabric measuring 3.5 inches by 6.5 inches.
- 2 squares of the medium color fabric, each measuring 3.5 inches. Place one medium square on one corner of the rectangle, sew along the diagonal, and trim the excess fabric. Repeat this on the opposite side to create one flying geese unit.
- Repeat for Additional Units: Continue cutting and sewing your half-square triangles and flying geese units until you have all the pieces needed for your Exploding Star Quilt Block.
- Organize Your Pieces: Once everything is cut and pressed, lay your pieces out in the intended pattern on your cutting mat. This will help you visualize how the block will come together and ensure you have all the necessary components.
With all your fabric pieces prepared, you’re now ready to assemble the Exploding Star Quilt Block!
3. Assembling the Exploding Star Quilt Block
Now that you have all your pieces cut and organized, it’s time to put everything together. Assembling the Exploding Star Quilt Block can be done in a series of straightforward steps.
- Sewing Half-Square Triangles Together: Begin by sewing your half-square triangles together. Take two half-square triangles (one from the light fabric and one from the medium fabric) and align them right sides together. Sew along the long edge, using a ¼-inch seam allowance. Press the seam open to reduce bulk.
- Creating the Star Points: Next, sew your flying geese units into the star shape. Place a flying geese unit in the center of your layout, then position the half-square triangles around it to form the star points. Pin or clip the pieces in place to prevent shifting while sewing.
- Joining Rows: Once you have your star points arranged, start piecing the block together in rows. First, sew the triangles in the top row, then the second row with the flying geese unit and center star. Continue until all rows are sewn together.
- Aligning Seams: Pay close attention to aligning seams as you join rows. This is essential for maintaining the integrity of the star points and ensuring that your finished block looks sharp and polished.
- Final Pressing: After all rows are joined, give the entire block a final press. This helps to flatten any seams and ensures that your Exploding Star Quilt Block looks professional.
- Squaring Up the Block: Once your block is complete, square it up to ensure that all edges are even. Use your quilting ruler to trim any excess fabric, making sure the block measures 12.5 inches before quilting.
Your Exploding Star Quilt Block is now fully assembled and ready for the next steps in your quilting journey!
4. Finishing and Using Your Exploding Star Quilt Block
Now that you have successfully created your Exploding Star Quilt Block, you may want to explore different ways to finish and incorporate it into larger quilting projects.
- Quilting Techniques: You can either quilt your block as a standalone piece or include it in a larger quilt. For quilting, consider using an echo quilting technique around the star points to accentuate the design. This adds texture and depth to your quilt.
- Adding Borders: If you want to frame your Exploding Star Quilt Block, consider adding a border. A solid color that complements the block can enhance its visual appeal and provide a clean finish.
- Creating a Quilt with Multiple Blocks: If you love the Exploding Star design, consider making multiple blocks to create a larger quilt. Play with different color combinations to create a stunning overall effect.
- Binding Your Quilt: Once your quilt is layered and quilted, finish it off with a binding. This gives your quilt a polished look and helps secure all the layers together. Choose a binding fabric that complements the overall design of your quilt.
- Display Ideas: An Exploding Star Quilt Block can also be used as a decorative wall hanging. Consider adding a hanging sleeve to the back, allowing you to showcase your handiwork in your home.
- Gift Ideas: If you’re looking for a unique gift, consider making a smaller version of the block to create a throw pillow or a table runner. These items can make wonderful presents for friends and family.
With these finishing touches, your Exploding Star Quilt Block will be ready to shine in your home or as a gift for someone special.
FAQ: Frequently Asked Questions About the Exploding Star Quilt Block
1. Is the Exploding Star Quilt Block suitable for beginners?
Yes, while the Exploding Star Quilt Block involves several techniques, it is manageable for beginners who are comfortable with basic piecing and sewing skills. The tutorial provides clear, step-by-step instructions to help you along the way.
2. How long does it take to complete an Exploding Star Quilt Block?
On average, creating a 12-inch Exploding Star Quilt Block can take about 2-4 hours, depending on your experience level and the time spent on cutting and pressing.
3. Can I use different fabric types for the Exploding Star Quilt Block?
Yes, you can use a variety of fabric types, such as cotton, batiks, or flannels. Just make sure they are compatible in weight and texture to ensure a cohesive look.
4. How do I ensure my points match up perfectly?
To ensure accurate points, take your time when cutting and sewing. Use a consistent seam allowance, and press seams open to reduce bulk. Pinning your pieces together before sewing can also help.
5. Can I customize the size of the Exploding Star Quilt Block?
Absolutely! You can adjust the dimensions of the pieces to create smaller or larger blocks. Just remember to maintain the same ratios between the different components.
6. Where can I find more patterns similar to the Exploding Star Quilt Block?
There are many quilting books, magazines, and websites dedicated to quilt block patterns. You can also explore online quilting communities for inspiration and resources.
Join our VIP broadcast list and gain access to exclusive patterns, all for free. As a VIP member, you’ll receive the best patterns daily, delivered directly to your device. ✨📱 It’s a unique opportunity to stay up-to-date with the latest trends and designs, curated just for you. Don’t miss out on enhancing your projects and discovering new inspirations with the best patterns every day! 🎨🔝
Conclusion
In this article, we explored the Exploding Star Quilt Block Tutorial & Pattern, guiding you through the process from gathering materials to finishing touches. We covered everything you need to know about cutting fabric, assembling the block, and ideas for incorporating it into your projects. With your newfound skills, you can create stunning quilts that are sure to impress.
We hope this tutorial has inspired you to embark on your quilting journey. Please leave a sincere opinion and any suggestions you may have, as your feedback is invaluable to the quilting community. Happy quilting!

