Welcome to the Dresden Plate – Quilt Tutorial, where we will dive into the enchanting world of quilting and explore the intricacies of creating the timeless Dresden Plate design.
This classic quilting pattern, known for its beautiful flower-like shape, allows quilters to express their creativity through fabric choices and color combinations.
Whether you are a seasoned quilter or just starting your quilting journey, this tutorial will guide you step by step in crafting your very own Dresden Plate quilt.
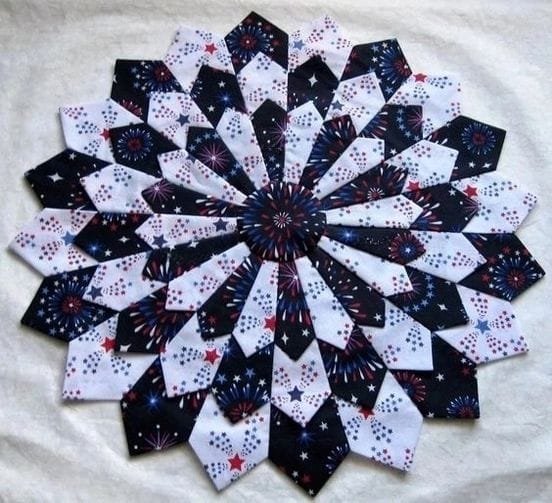
The Dresden Plate design is both charming and versatile, making it a favorite among quilters. It consists of numerous wedge-shaped pieces that come together to form a circular motif, reminiscent of blooming flowers.
This unique construction not only adds visual interest but also provides an opportunity for artistic expression. From selecting fabrics to finishing touches, this tutorial will cover all aspects of creating your quilt.
As we progress through the steps of this Dresden Plate – Quilt Tutorial, remember that quilting is not just about the final product; it’s also about the joy of creating and the stories that each quilt tells.
So, gather your materials, get comfortable, and let’s embark on this delightful quilting adventure together!
1. Materials Needed for the Dresden Plate Quilt
To begin your Dresden Plate – Quilt Tutorial, it’s essential to gather all the necessary materials for your quilting project. Having everything ready will help streamline your process and enhance your overall quilting experience.
First, you will need a selection of fabrics. For the Dresden Plate quilt, choose a variety of cotton fabrics that complement each other. Aim for at least six to eight different prints and colors. The combination of various fabrics will give your quilt depth and visual interest, making it a stunning centerpiece in any room.
Next, gather your quilting tools. You will need a rotary cutter, cutting mat, and a clear ruler for precise measurements. These tools are essential for cutting your fabric accurately, ensuring that each wedge fits together seamlessly. Additionally, a sewing machine is necessary for piecing your quilt together, so ensure it’s in good working order before you start.
Don’t forget about thread! Select a high-quality cotton thread that matches your fabric choices. A good thread not only enhances the durability of your quilt but also affects its overall appearance. Having the right color of thread can make your stitching blend in or stand out, depending on your desired look.
Templates for your Dresden Plate wedges are another crucial component. You can either purchase pre-made templates or create your own using sturdy cardboard or plastic. Accurate templates will ensure that your pieces are uniform, which is essential for achieving the classic look of the Dresden Plate design.
Lastly, consider your quilting accessories. You’ll need pins to hold your pieces in place, fabric scissors for trimming, and an iron for pressing seams. These tools will help you create a polished finish, making your quilt look professionally crafted. With all your materials collected, you’re ready to start your Dresden Plate quilt!
2. Cutting the Wedge Pieces
Now that you have your materials prepared, it’s time to cut the wedge pieces for your Dresden Plate – Quilt Tutorial. This step is crucial as it sets the foundation for your quilt’s design.
Begin by selecting the fabrics you want to use for your wedges. It’s a good idea to mix both light and dark fabrics to create contrast within your design. Lay out your fabric on a flat surface, ensuring it’s wrinkle-free for easier cutting.
Using your template, trace the wedge shape onto the fabric. Make sure to leave an extra seam allowance around each piece. This will ensure that you have enough fabric to sew the pieces together without any fraying or misalignment.
Next, carefully cut along the traced lines with your rotary cutter. Make sure to keep your cutting mat underneath to protect your surfaces. If you’re making multiple wedges, you can layer your fabric to cut several at once, saving time and ensuring consistency.
Once all your wedge pieces are cut, it’s essential to press them with an iron. This will help flatten the fabric and make the sewing process easier. Take care to press the seams open or to one side, depending on your preference.
After pressing, arrange your wedges in the order you want them to appear in your Dresden Plate design. This arrangement will guide you as you start piecing everything together. With your wedges prepared, you’re ready to move on to the exciting part—sewing!
3. Assembling the Dresden Plate
With your wedge pieces cut and pressed, it’s time to assemble the Dresden Plate. This is where your design truly starts to come to life, and you’ll see how the individual wedges come together to form a stunning circular pattern.
Begin by taking two wedges and placing them right sides together. Pin along the curved edge, ensuring that the edges align perfectly. This alignment is essential for achieving the classic look of the Dresden Plate.
Sew along the pinned edge using a quarter-inch seam allowance. Once sewn, press the seam open or to one side, depending on your preference. Repeat this process for all wedges until you have completed a full circle.
As you sew the wedges together, you may notice that the curved edges can be tricky. Don’t worry if they don’t match perfectly at first. Use your iron to help shape the seams and create a smoother curve.
Once all your wedges are sewn together, it’s time to create the center of your Dresden Plate. You can choose to use a contrasting fabric for the center or continue with one of your wedge fabrics. Cut a circle from your chosen fabric and sew it to the center of your assembled wedges.
Finally, once your Dresden Plate is fully assembled, press the entire piece one last time. This will ensure that all seams are flat and the design looks crisp. With your Dresden Plate completed, you are one step closer to creating your quilt!
4. Quilting and Finishing Your Dresden Plate Quilt
Now that your Dresden Plate is assembled, it’s time to quilt and finish your project. This stage adds texture and secures all the layers of your quilt together, bringing your hard work to fruition.
First, create a quilt sandwich by layering your Dresden Plate top, batting, and backing fabric. Make sure the backing fabric is larger than your quilt top to allow for trimming later. Smooth out any wrinkles to ensure a flat surface before basting.
Once layered, you can use safety pins or basting spray to hold everything in place. This step is crucial for preventing any shifting while you quilt. Take your time to ensure that all layers are securely held together.
Now, decide on a quilting design. You can choose to quilt in the ditch, follow the curves of the Dresden Plate, or even create a free-motion quilting design. If you’re new to quilting, starting with simple straight lines is a great way to build your confidence.
Begin quilting from the center of your Dresden Plate and work your way outwards. This method helps prevent shifting and ensures even tension throughout the quilt. As you quilt, take your time and enjoy the process, allowing your creativity to flow.
Once quilting is complete, trim any excess batting and backing fabric. Now, it’s time to add the binding. Cut your binding strips, sew them together, and attach them to the edges of your quilt. This final touch will frame your Dresden Plate beautifully.
FAQ
1. What is a Dresden Plate quilt?
The Dresden Plate quilt is a traditional quilting design featuring wedge-shaped pieces arranged in a circular pattern, resembling a flower.
2. What materials do I need for a Dresden Plate quilt?
You will need cotton fabrics, a rotary cutter, cutting mat, sewing machine, thread, templates for wedges, and basic quilting tools such as pins and an iron.
3. How do I cut the wedge pieces for the Dresden Plate?
Trace the wedge shape onto your fabric using a template, leaving a seam allowance, and then cut with a rotary cutter for precision.
4. Can I use different fabrics for my Dresden Plate quilt?
Yes! Mixing various fabrics adds depth and personality to your quilt, allowing for creative expression.
5. How do I quilt my finished Dresden Plate?
Layer your quilt top with batting and backing, baste it together, and then quilt using your preferred design, such as straight lines or free-motion quilting.
6. How should I care for my completed quilt?
Wash your quilt in cold water and tumble dry on low heat. Avoid bleach to prevent fading, and store it in a cool, dry place when not in use.
Join our VIP broadcast list and gain access to exclusive patterns, all for free. As a VIP member, you’ll receive the best patterns daily, delivered directly to your device. ✨📱 It’s a unique opportunity to stay up-to-date with the latest trends and designs, curated just for you. Don’t miss out on enhancing your projects and discovering new inspirations with the best patterns every day! 🎨🔝
Conclusion
In this Dresden Plate – Quilt Tutorial, we’ve journeyed through the delightful process of creating a beautiful quilt from start to finish. From gathering materials and cutting wedges to assembling the Dresden Plate and adding the final touches, each step contributes to a stunning final product.
We hope this tutorial has inspired you to embark on your own quilting adventure and create a Dresden Plate quilt that reflects your unique style. Your feedback is invaluable, so please share your thoughts and suggestions in the comments below. Happy quilting!

