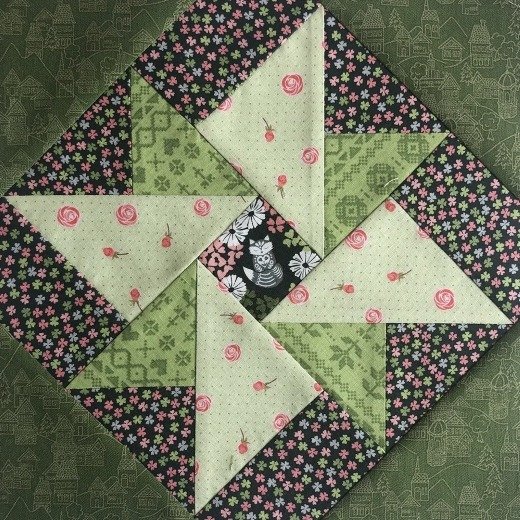
The Double Windmill Block – Free Pattern is a classic and versatile design in the world of quilting. Its intricate yet symmetrical appearance makes it a favorite among both beginners and experienced quilters.
This pattern provides an excellent opportunity to use various fabrics, allowing for creative freedom while still maintaining a cohesive design. Whether you’re looking to craft a quilt for yourself or as a gift, the Double Windmill Block will provide a striking and beautiful result.
In this tutorial, we’ll break down how to create this block step by step, ensuring you have all the information you need to craft your very own Double Windmill Block – Free Pattern. By following these instructions, you’ll be able to master this design in no time.
Moreover, we will address common challenges, helpful tips, and creative ideas to customize your block.
Now, let’s get started with the tools, techniques, and steps to create your very own Double Windmill Block.
1. Materials Needed for the Double Windmill Block
To create the Double Windmill Block – Free Pattern, it’s essential to have the right materials on hand. These tools and fabrics will make your quilting process smooth and enjoyable.
Fabrics: You’ll need two or more contrasting fabrics to highlight the windmill design. For instance, using both light and dark fabrics can make the pattern pop.
Cutting tools: A rotary cutter and cutting mat will allow for precise cuts. You’ll also need a quilting ruler to measure your fabric squares.
Sewing machine: A reliable sewing machine with a quarter-inch foot will help achieve consistent seam allowances.
Thread: Choose a color that blends well with your fabric. A neutral color is often a good option to avoid visible seams.
Pins or clips: These are essential for keeping your pieces in place as you sew.
Iron and ironing board: Pressing your seams flat is crucial for creating a clean and professional-looking block.
Having these materials on hand will ensure that your experience with the Double Windmill Block is stress-free and productive.
2. Step-by-Step Instructions for the Double Windmill Block
Now that you’ve gathered your materials, it’s time to dive into the process of creating the Double Windmill Block – Free Pattern. Follow these steps carefully to craft your block:
Step 1: Cutting the fabric. Start by cutting your fabric into squares. You’ll need four squares from your primary fabric and four from your secondary fabric.
Step 2: Creating half-square triangles. To form the windmill blades, you’ll need to create half-square triangles (HSTs). Place one square from each fabric together, draw a diagonal line, and sew a quarter-inch seam on either side of the line. Cut along the line and press the seams.
Step 3: Arranging the pieces. Lay out your half-square triangles in a windmill formation. Make sure the colors alternate to create the spinning windmill effect.
Step 4: Sewing the rows. Sew the squares together to form two rows, pressing the seams open as you go.
Step 5: Joining the rows. Sew the two rows together to complete the Double Windmill Block. Be sure to match the center seams for a neat finish.
Step 6: Pressing the final block. Once your block is complete, give it a final press to ensure all seams are flat and the block is square.
With these steps, you’ll have a beautifully crafted Double Windmill Block ready for your quilting project.
3. Tips for Perfecting the Double Windmill Block
Creating a Double Windmill Block – Free Pattern can be an enjoyable process, but achieving perfection takes some practice. Here are some tips to help you master this design:
Tip 1: Precision cutting. Accurate cutting is key to ensuring that all your pieces fit together seamlessly. Use a rotary cutter and a ruler to ensure straight, even cuts.
Tip 2: Consistent seam allowance. Maintaining a consistent quarter-inch seam allowance is crucial for your block to turn out the correct size. Use a sewing foot designed for this purpose.
Tip 3: Pressing seams. Always press your seams after sewing. This will help your block lie flat and make it easier to sew the rows together.
Tip 4: Chain piecing. If you’re making multiple blocks, chain piecing can save time. Sew one piece after another without cutting the thread between each, which speeds up the process.
Tip 5: Fabric choice. Choose fabrics that contrast well with each other. This contrast is what makes the windmill design stand out.
Tip 6: Squaring up your block. After sewing, square up your block to ensure it’s the correct size. This will help when joining it with other blocks in a quilt.
By following these tips, your Double Windmill Block will come out neat and precise, ready to be joined with others to form a beautiful quilt.
4. Creative Variations of the Double Windmill Block
The Double Windmill Block – Free Pattern is highly adaptable, making it perfect for experimenting with colors and fabrics. Here are some creative variations to try:
Variation 1: Scrappy windmill. Use a variety of fabric scraps to create a scrappy version of the Double Windmill Block. This adds texture and visual interest to your quilt.
Variation 2: Monochromatic palette. For a more subdued look, try using different shades of the same color. This creates a tonal windmill that’s perfect for modern quilts.
Variation 3: Bold prints. Don’t be afraid to use bold, large-scale prints for your block. The Double Windmill Block can handle dramatic patterns, especially if paired with a solid fabric.
Variation 4: Multiple windmills. Create a quilt that features multiple Double Windmill Blocks. Vary the colors of each block to make a dynamic, eye-catching design.
Variation 5: Sashing and borders. Add sashing between your blocks or a border around your quilt to frame the Double Windmill Blocks.
Variation 6: Playing with block size. Adjust the size of your squares to create larger or smaller Double Windmill Blocks, depending on your project.
These variations can give your quilt a personal touch, making it unique to your style and preferences.
FAQ: Common Questions About the Double Windmill Block
Q1: What is the best fabric to use for the Double Windmill Block?
A1: The best fabric for the Double Windmill Block – Free Pattern is quilting cotton. It’s durable, easy to work with, and comes in a wide range of colors and patterns.
Q2: How can I ensure my seams are straight?
A2: To achieve straight seams, use a quarter-inch sewing foot, and always pin or clip your pieces before sewing to prevent them from shifting.
Q3: Can I hand sew the Double Windmill Block?
A3: Yes, you can hand sew the block, though it may take longer. Use small, consistent stitches to ensure a strong seam.
Q4: How can I make my block larger or smaller?
A4: To change the size of your Double Windmill Block, simply adjust the size of your fabric squares. Larger squares will result in a larger block and vice versa.
Q5: What is chain piecing, and how can it help?
A5: Chain piecing is a technique where you sew multiple pieces together without cutting the thread in between. It speeds up the process and helps keep your pieces organized.
Q6: How do I prevent fabric from stretching while sewing?
A6: To avoid stretching your fabric, handle it gently and press rather than iron your seams. Using starch can also help stabilize your fabric.
Join our VIP broadcast list and gain access to exclusive patterns, all for free. As a VIP member, you’ll receive the best patterns daily, delivered directly to your device. ✨📱 It’s a unique opportunity to stay up-to-date with the latest trends and designs, curated just for you. Don’t miss out on enhancing your projects and discovering new inspirations with the best patterns every day! 🎨🔝
Conclusion
The Double Windmill Block – Free Pattern is a timeless and versatile quilting design that offers both beauty and functionality. Whether you’re new to quilting or have years of experience, this pattern allows for creative freedom and stunning results. With the step-by-step instructions, tips, and creative variations provided, you’re now well-equipped to create your very own Double Windmill Block.
We hope this guide has been helpful in your quilting journey! Feel free to leave your thoughts, suggestions, and any questions in the comments below. We’d love to hear your feedback on this tutorial and learn how your project turned out. Happy quilting!

