The Double Star Block – Free Quilt Pattern is an enchanting design that has captivated quilters for generations.
Combining simplicity with intricate beauty, this quilt block is a versatile choice for all skill levels. Whether you are a seasoned quilter or just starting your quilting journey, the Double Star Block offers endless opportunities for creativity.
One of the most exciting aspects of this pattern is its adaptability. It can be used to create anything from stunning bedspreads to charming wall hangings.
The Double Star Block is particularly favored for its layered star design, which adds depth and dimension to any quilt.
This tutorial will guide you step-by-step through creating your own Double Star Block, ensuring your final product is both beautiful and well-constructed.
In this article, we will break down the process into manageable steps. You will learn how to select the perfect fabrics, cut and piece your materials, and assemble the block with precision. Let’s dive into the magic of quilting and bring this timeless design to life.
1. Understanding the Double Star Block Design
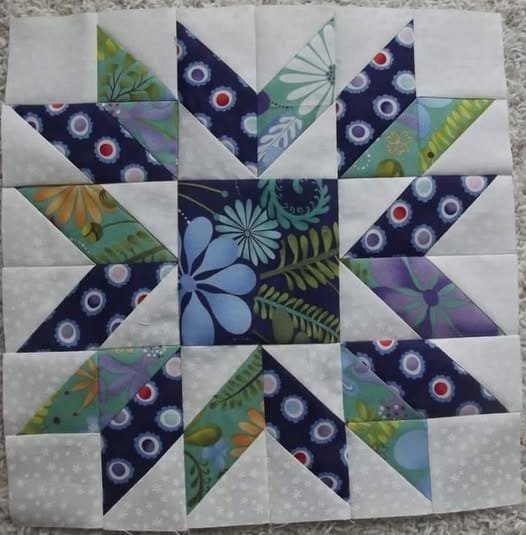
The Double Star Block features two nested stars, with a smaller star nestled inside a larger one. This design creates a striking visual effect that draws the eye and enhances any quilt project. To begin:
- Explore fabric combinations: Choose fabrics with contrasting colors or patterns to make each star distinct. For instance, pairing solid colors with prints can highlight the intricate details.
- Focus on symmetry: The success of this block lies in its symmetry, so careful cutting and accurate measurements are key.
- Plan your layout: Before cutting, sketch your design or use quilting software to visualize your block.
- Choose your materials wisely: High-quality cotton fabrics work best for precise cutting and durability.
- Consider size variations: The Double Star Block can be adapted to different sizes, depending on your project needs.
- Add personal touches: Incorporate unique details such as embroidered accents or decorative stitching to make your block one of a kind.
By understanding the design’s fundamentals, you set a solid foundation for a successful quilting experience.
2. Preparing Your Materials and Tools
Before diving into the construction of your Double Star Block – Free Quilt Pattern, gather the necessary supplies:
- Fabric selection: Choose at least three fabrics—one for the inner star, one for the outer star, and one for the background.
- Cutting tools: Use a rotary cutter, self-healing mat, and quilting rulers for precise cuts.
- Sewing machine: Ensure your sewing machine is in good working condition and equipped with a quilting foot.
- Thread: Match your thread color to your fabric or use a neutral shade for versatility.
- Ironing supplies: Pressing seams is crucial for accuracy, so have a reliable iron and ironing board ready.
- Pins or clips: These will help secure your fabric pieces during assembly.
Once you have all your tools and materials, organize your workspace to ensure smooth progress throughout the project.
3. Cutting and Piecing Your Fabric
Accurate cutting and piecing are essential to achieve a professional-looking Double Star Block. Follow these steps:
- Cut your fabric pieces: Use your quilting ruler and rotary cutter to cut squares, triangles, and rectangles according to the pattern dimensions.
- Mark your fabric: Use a fabric pencil or marker to indicate sewing lines, especially for intricate sections like triangles.
- Chain piecing: Sew multiple pieces in one continuous line to save time and ensure consistency.
- Press your seams: Press seams open or to one side as instructed by the pattern. This step helps reduce bulk and keeps your block flat.
- Check for accuracy: Measure your pieces after cutting and sewing to confirm they match the required dimensions.
- Assemble the inner star first: Construct the smaller star before moving on to the larger one, ensuring each component aligns perfectly.
Taking your time during this phase will pay off in the precision and beauty of your finished block.
4. Assembling and Finishing Your Double Star Block
Once all your pieces are prepared, it’s time to assemble the block. Here’s how:
- Lay out your pieces: Arrange all fabric pieces on a flat surface to confirm the design before sewing.
- Sew the inner star: Start by piecing the inner star’s sections, ensuring all points align.
- Construct the outer star: Repeat the process for the outer star, carefully aligning it with the inner star.
- Join the stars to the background: Attach the completed star unit to the background fabric, maintaining consistent seam allowances.
- Trim the block: Use your rotary cutter to trim any excess fabric, ensuring the block is square.
- Add finishing touches: Press the block one final time and admire your work.
- Incorporate into your project: Use your finished block in a quilt top, pillow cover, or other creative application.
With patience and attention to detail, your Double Star Block will shine as a centerpiece in any quilt.
FAQ
What size should I make my Double Star Block? The size of your block depends on your project. Common sizes range from 8 to 16 inches. Adjust your pattern dimensions accordingly.
What fabrics work best for the Double Star Block? Cotton fabrics are ideal due to their durability and ease of handling. Choose contrasting colors to enhance the star design.
Can beginners create the Double Star Block? Yes, this block is beginner-friendly with detailed instructions. Practice cutting and piecing basics before starting.
How do I ensure my points align perfectly? Use pins to secure fabric layers and sew slowly. Check alignment at each step.
What can I make with the Double Star Block? This versatile block is perfect for quilts, table runners, and wall hangings. Let your creativity guide you.
How do I maintain consistent seam allowances? Use a quilting foot with a seam guide and measure frequently to maintain consistency.
Join our VIP broadcast list and gain access to exclusive patterns, all for free. As a VIP member, you’ll receive the best patterns daily, delivered directly to your device. ✨📱 It’s a unique opportunity to stay up-to-date with the latest trends and designs, curated just for you. Don’t miss out on enhancing your projects and discovering new inspirations with the best patterns every day! 🎨🔝
Conclusion
Creating a Double Star Block – Free Quilt Pattern is a rewarding experience that combines precision and creativity. This tutorial has guided you through each step, from understanding the design to assembling and finishing your block. Whether you’re crafting a quilt or a smaller project, the Double Star Block adds elegance and charm.
We hope this tutorial has inspired you to try this timeless pattern. Share your thoughts, suggestions, and quilting experiences in the comments below. Your feedback helps us create even better content for the quilting community!

