The Diamonds on Parede Quilt Pattern is a captivating design that has become a favorite among quilting enthusiasts for its stunning geometry and timeless charm. Whether you’re a seasoned quilter or a beginner eager to experiment with bold, diamond-like layouts, this pattern offers an exciting opportunity to enhance your crafting repertoire. From wall hangings to full-sized quilts, the versatility and elegance of this design make it a must-have in any quilting collection.
What sets the Diamonds on Parede Quilt Pattern apart is its ability to blend traditional quilting techniques with modern aesthetics. The repeating diamond shapes arranged in a “parede” (Portuguese for “wall”) style evoke a sophisticated visual structure, turning any room into an artistic space. Its clean lines and precise symmetry create a balanced composition that pleases the eye and challenges your creative skills.
Crafting the Diamonds on Parede Quilt Pattern isn’t just about stitching fabric together—it’s about curating a visual experience. Each piece of fabric is a brushstroke in your larger masterpiece. As we dive into this pattern, you’ll learn how to choose the right colors, cut with precision, and sew with intention, creating a quilt that not only looks breathtaking but also tells your personal story.
Understanding the Diamonds on Parede Quilt Pattern
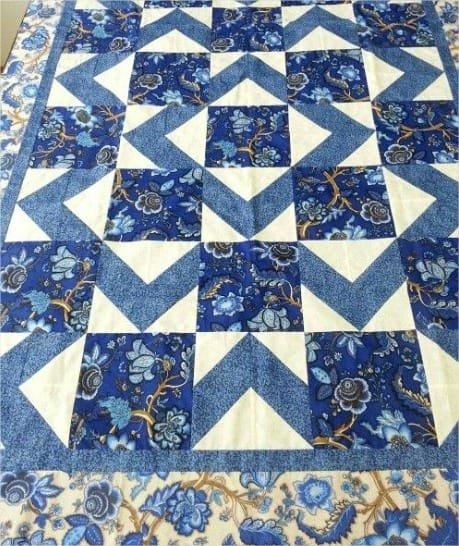
To truly master the Diamonds on Parede Quilt Pattern, it’s essential to understand the components that give it its signature look. The diamonds are typically formed by setting triangles and parallelograms together in a way that creates a three-dimensional illusion. This optical depth is what makes the pattern visually striking and popular among those looking to add a dynamic element to their quilt.
Choosing the right fabric is crucial for this pattern. Solids or lightly textured fabrics work best, as they allow the diamond shapes to stand out. Too much pattern or busy prints may distort the visual clarity of the diamonds. Consider working with a color palette that ranges from light to dark, emphasizing the contrast between adjacent shapes.
Another important aspect is block alignment. Because the Diamonds on Parede Quilt Pattern relies on consistent symmetry, even slight deviations can disrupt the entire layout. This is why accurate cutting and careful piecing are vital. Using rotary cutters, quilting rulers, and templates can help maintain precision throughout the project.
Quilters also often use foundation paper piecing to ensure that each diamond is perfectly aligned. This technique involves sewing fabric pieces onto a paper foundation, which is later removed. It provides structure during the sewing process and minimizes warping or distortion.
As you assemble your blocks, pay close attention to seam allowances. Consistency here will help ensure that your quilt lies flat and that the diamond shapes remain sharp and defined. A quarter-inch seam is the standard for most quilting projects, including this one.
Finally, don’t forget about the borders and finishing. A well-chosen border can frame the Diamonds on Parede Quilt Pattern beautifully, enhancing the visual impact without detracting from the central design. Quilting techniques like echo quilting or straight-line quilting can complement the geometric nature of the pattern.
How to Choose Colors and Layouts
Color selection plays a massive role in how the Diamonds on Parede Quilt Pattern is perceived. Since the pattern depends heavily on visual contrast, your color choices will determine how dimensional and vibrant the final piece looks. Start by selecting a base color, then add complementary shades that emphasize the angular nature of the diamonds.
For a modern feel, consider working with monochromatic schemes—different shades of one color arranged in a gradient. This technique enhances depth and creates a flowing visual experience. On the other hand, for a more traditional look, use bold primary colors with clear contrast between light and dark.
Warm tones like oranges, reds, and golds create a cozy and energetic feel, while cooler tones like blues, purples, and grays evoke calm and serenity. You can also play with seasonal palettes—earthy browns and greens for fall, icy blues and whites for winter, and so on.
The layout of your blocks also offers creative possibilities. You can alternate diamond orientations to create zigzagging effects or arrange them in concentric patterns for a kaleidoscope-like result. Each layout choice will give your Diamonds on Parede Quilt Pattern a unique character.
Digital mockups or sketching your layout beforehand can be incredibly helpful. There are software tools and mobile apps specifically designed for quilters that allow you to visualize your color and pattern combinations before cutting into your fabric.
Remember, while symmetry is central to this design, there’s room for experimentation. Incorporate accent blocks or negative space to break up repetition and highlight specific areas of your quilt. Let your intuition and personal taste guide the final look.
Tools and Techniques for Perfect Results
To bring your Diamonds on Parede Quilt Pattern to life with precision, having the right tools makes all the difference. Start with a quality rotary cutter and self-healing cutting mat—these will allow for accurate cuts and reduce hand fatigue. Quilting rulers are essential for measuring and maintaining consistent angles throughout your blocks.
Templates are especially useful for this pattern. Many quilters create or purchase acrylic templates shaped like diamonds or parallelograms. These guides help ensure consistency in every piece, which is critical for achieving the sharp angles and clean lines the pattern is known for.
Pressing tools also matter. A good iron and pressing mat will help you flatten seams and create a crisp, professional finish. Pressing seams open versus to the side can impact how the blocks align, so choose the method that best maintains the shape of your diamonds.
If you’re looking for ultimate precision, try using foundation paper piecing (FPP). This technique minimizes errors and is particularly useful when working with small or intricate diamond blocks. The paper gives structure during sewing and can be torn away after the blocks are completed.
Sewing machines with a quarter-inch foot and an extension table make assembly easier and more consistent. A walking foot can also help keep layers from shifting as you quilt. Stitch length is another element to keep an eye on—shorter stitches can improve accuracy during piecing.
Finally, don’t overlook thread selection. Choose a thread that complements your fabric without overpowering it. Neutral tones are generally safe, but sometimes a bold thread can accentuate the edges of your diamonds beautifully. Test on scrap fabric before committing to your final quilt.
Finishing Touches and Display Ideas
Once you’ve pieced and quilted your Diamonds on Parede Quilt Pattern, it’s time to think about how you’ll finish and display your masterpiece. The binding is the final touch and can be either a continuation of your quilt’s palette or a stark contrast that frames the entire design.
Labeling your quilt is a wonderful way to mark your creation with your name, date, and any special messages. Whether embroidered, printed, or handwritten on fabric, a label personalizes your quilt and makes it more meaningful.
If you plan to hang your quilt on a wall, consider adding a sleeve to the back during the binding stage. This will allow for easy display and help your Diamonds on Parede Quilt Pattern become a focal point of any room.
For bed-sized quilts, the pattern creates a luxurious, geometric statement. Pair it with matching pillows or shams to create a cohesive bedroom aesthetic. Smaller versions can serve as elegant table toppers or couch throws.
Gifting a quilt like this adds emotional value. Whether it’s for a wedding, anniversary, or milestone birthday, the pattern speaks of time, precision, and thoughtfulness. Including a custom message or color palette unique to the recipient enhances its personal value.
Over time, quilts like these often become heirlooms. With the Diamonds on Parede Quilt Pattern, you’re not just making a craft—you’re making a legacy. Proper storage, care, and occasional cleaning will ensure it remains vibrant and cherished for years to come.
FAQ: Diamonds on Parede Quilt Pattern
What size quilt is best for the Diamonds on Parede Quilt Pattern?
This pattern is adaptable to many sizes. It works well for wall hangings, lap quilts, and full bed-sized quilts. Just adjust the block size and number of repeats accordingly.
Is this a beginner-friendly quilt pattern?
The pattern can be challenging due to the precision required, but it’s not impossible for beginners. Using tools like templates or foundation paper piecing can help simplify the process.
Do I need special templates to create this quilt?
While not strictly necessary, templates help maintain consistency in shape and size, especially with the diamond angles. They can speed up cutting and reduce errors.
What fabrics work best with this pattern?
Solid or low-volume prints are ideal. Busy or overly colorful patterns may distract from the diamond shapes and reduce visual clarity.
How long does it take to complete this quilt?
Time varies based on size and experience. A small wall quilt might take a few days, while a large bed quilt could take several weeks, especially if quilted by hand.
Can I machine quilt the Diamonds on Parede design?
Absolutely. Machine quilting, especially straight-line quilting, complements the geometric structure of the design. A walking foot helps maintain even stitches.
Conclusion
The Diamonds on Parede Quilt Pattern is a brilliant choice for quilters looking to challenge themselves and create a visually dynamic piece. From choosing the right fabrics to mastering precise cuts and experimenting with color, this pattern invites creativity and rewards careful craftsmanship. It’s more than just sewing—it’s about composing an intricate and personal tapestry of color and geometry.
We’ve covered the basics of the Diamonds on Parede Quilt Pattern, including tools, techniques, layout tips, color guidance, and finishing ideas. Now it’s your turn to bring it to life. Whether you’re making it for your own home or as a heartfelt gift, this quilt will undoubtedly leave a lasting impression.

