If you’re looking to elevate your quilting skills, the Diamond in a Square block is a fantastic pattern to master. This tutorial will guide you through the steps to create this striking and versatile block.
The Diamond in a Square block is a perfect blend of simplicity and sophistication, making it a favorite in traditional and modern quilting. Whether you are a beginner or an experienced quilter, this block adds a dynamic element to any quilt design.
The Diamond in a Square block is known for its clean lines and geometric appeal. It consists of a central diamond shape, framed by triangles that create a square border.
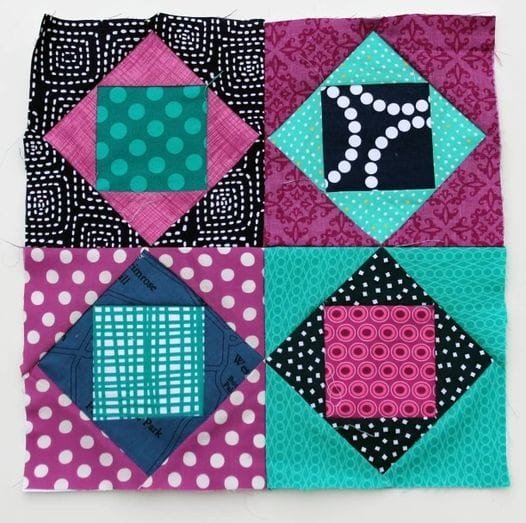
This block can be used on its own to create an entire quilt, or combined with other blocks for a more intricate design. It’s also highly customizable—you can play with colors, fabrics, and sizes to suit your project.
In this tutorial, we will walk you through the materials you’ll need, explain how to cut and assemble the pieces, and provide tips for achieving precise results.
This is a fantastic project for quilters looking to explore new patterns and push their creativity. Let’s dive into the steps for making your very own Diamond in a Square block!
1. Materials You Will Need for the Diamond in a Square Block
Before you start, gather all the materials necessary for your Diamond in a Square block – Tutorial. Having everything ready will make the process smoother and more enjoyable.
The first thing you’ll need is fabric. For the center diamond, choose a fabric that contrasts well with the background. This will make the diamond shape stand out and give your block more visual impact. For the outer triangles, pick a complementary fabric that frames the diamond without overshadowing it. You can use scraps, fat quarters, or yardage depending on the size of your block.
Next, make sure you have a rotary cutter, cutting mat, and ruler. Precision is key in quilting, and these tools will help ensure that your fabric pieces are cut accurately. A clear acrylic ruler with 45-degree markings is particularly useful when working with triangles.
You’ll also need a sewing machine, thread, and pins. Using a sewing machine with a quarter-inch foot will help you maintain consistent seam allowances, which is crucial for piecing this block. Pins will keep your fabric pieces aligned as you sew, reducing the risk of shifting.
Finally, keep a pressing iron and ironing board nearby. Pressing your seams as you go will ensure that your block lays flat and that the pieces fit together smoothly.
2. Cutting Your Fabric for the Diamond in a Square Block
Now that you have your materials ready, it’s time to start cutting the fabric for your Diamond in a Square block – Tutorial. Accurate cutting is essential to ensure that your pieces fit together perfectly and that your block turns out the right size.
First, cut a square for the center diamond. The size of this square will depend on how large you want your finished block to be. For a 6-inch block, for example, you might start with a 4-inch square. The key is to make sure that the square is perfectly cut so that it remains symmetrical once it is turned into a diamond.
Next, you’ll need to cut the outer triangles that will frame the diamond. These triangles will be created by cutting two larger squares on the diagonal. For a 6-inch block, you could cut two 5-inch squares, then slice them in half diagonally to form four triangles. These triangles will be sewn onto each side of the center diamond.
When cutting your fabric, make sure to use your rotary cutter and ruler for precision. Accurate measurements are key to ensuring that the pieces fit together seamlessly, and that your block comes out to the correct size.
If you are making multiple Diamond in a Square blocks, it can be helpful to cut all your fabric pieces at once. This will save time and ensure consistency across your blocks. Once all your fabric is cut, you’re ready to move on to assembling the block.
3. Assembling the Diamond in a Square Block
Now comes the exciting part—assembling your Diamond in a Square block! This is where the block starts to take shape, and the geometric design comes to life.
Start by placing the center square (your diamond) right side up on your work surface. Take one of your triangle pieces and align it with one side of the square, right sides together. Pin the triangle to the square, making sure the edges are aligned, and sew with a ¼-inch seam allowance.
After sewing the first triangle, press the seam toward the triangle. This will help the block lay flat as you continue adding pieces. Repeat this process with the opposite triangle, sewing it to the other side of the square and pressing the seam again.
Next, sew the remaining two triangles onto the block, aligning them with the edges of the diamond and sewing with a ¼-inch seam allowance. Again, press the seams toward the triangles to keep the block flat.
Once all four triangles are sewn onto the diamond, you’ll notice that the block is starting to look like a Diamond in a Square! At this point, you can trim the block to ensure it’s perfectly square, using your ruler and rotary cutter. This step is crucial for ensuring that the block fits with other blocks when assembling a quilt.
4. Tips for Precision and Customization
The Diamond in a Square block is a straightforward design, but there are a few tips and tricks that can help you achieve the best possible results and customize your block to suit your personal style.
One key to success is maintaining consistent seam allowances. Use a ¼-inch foot on your sewing machine to ensure that your seams are even throughout the block. This will prevent your block from becoming distorted or uneven.
Another important tip is to press your seams carefully. Pressing after each seam helps keep the fabric flat and makes it easier to align the pieces. Use a gentle pressing motion and avoid stretching the fabric, especially when working with bias edges (diagonal cuts).
When it comes to customization, the possibilities are endless! You can experiment with different color combinations to create a variety of effects. Try using bold, contrasting colors for a dramatic look, or stick with monochromatic tones for a more subtle, sophisticated design.
Additionally, you can play with the size of the block. The Diamond in a Square block can be made in any size, depending on the scale of your project. Whether you’re making a small wall hanging or a large bed quilt, this block can be adjusted to fit your needs.
Finally, consider combining the Diamond in a Square block with other blocks. This block pairs beautifully with log cabins, flying geese, or even simple patchwork squares. The geometric shapes in these blocks complement the diamond design, adding complexity and visual interest to your quilt.
FAQ
1. What is a Diamond in a Square block?
A Diamond in a Square block is a quilting block that features a central diamond shape framed by triangles, creating a square overall. It’s a popular design used in both traditional and modern quilts.
2. Can beginners make the Diamond in a Square block?
Yes! While precision is important, the Diamond in a Square block is simple enough for beginners to tackle. With careful cutting and sewing, even a novice quilter can create a beautiful block.
3. How do I choose fabrics for the Diamond in a Square block?
For the best visual effect, choose fabrics with high contrast for the center diamond and the outer triangles. You can use solids, prints, or a mix of both, depending on your quilt design.
4. What size should I make my Diamond in a Square block?
The size of the block depends on your project. You can make it as small as 4 inches or as large as 12 inches or more. Adjust the size of the center square and triangles accordingly.
5. How do I ensure my Diamond in a Square block is square?
After assembling the block, use a rotary cutter and ruler to trim the edges, ensuring that the block is perfectly square. Accurate cutting and consistent seam allowances will also help keep the block square.
6. Can I combine the Diamond in a Square block with other quilt blocks?
Yes! The Diamond in a Square block pairs well with a variety of other blocks, such as log cabin, flying geese, or simple squares. Combining blocks can add complexity and interest to your quilt design.
Join our VIP broadcast list and gain access to exclusive patterns, all for free. As a VIP member, you’ll receive the best patterns daily, delivered directly to your device. ✨📱 It’s a unique opportunity to stay up-to-date with the latest trends and designs, curated just for you. Don’t miss out on enhancing your projects and discovering new inspirations with the best patterns every day! 🎨🔝
Conclusion
The Diamond in a Square block is a versatile and elegant design that adds a dynamic element to any quilt. Whether you’re a beginner or an experienced quilter, this tutorial provides a clear, step-by-step guide to help you master this classic block. We hope you found this guide helpful and that you feel confident in creating your own Diamond in a Square block.
If you have any tips or suggestions, or if you’ve tried this pattern, please share your thoughts in the comments below! Happy quilting!

