The Cutest Fabric Bunnies Tutorial is a delightful sewing project designed to help you create soft, charming, and irresistibly adorable handmade bunnies. From selecting the right fabric to adding the final decorative touches, the Cutest Fabric Bunnies Tutorial guides you step by step through a process that is both enjoyable and beginner-friendly. Whether you are crafting for seasonal décor, thoughtful gifts, or simply for the joy of sewing, these fabric bunnies bring warmth and personality to any space.
Handmade plush decorations have a special appeal because they combine creativity with comfort. The Cutest Fabric Bunnies Tutorial focuses on achieving a balance between softness, structure, and expressive details. With careful cutting and stitching, you can create bunnies that look professionally made while still preserving their sweet handmade charm.
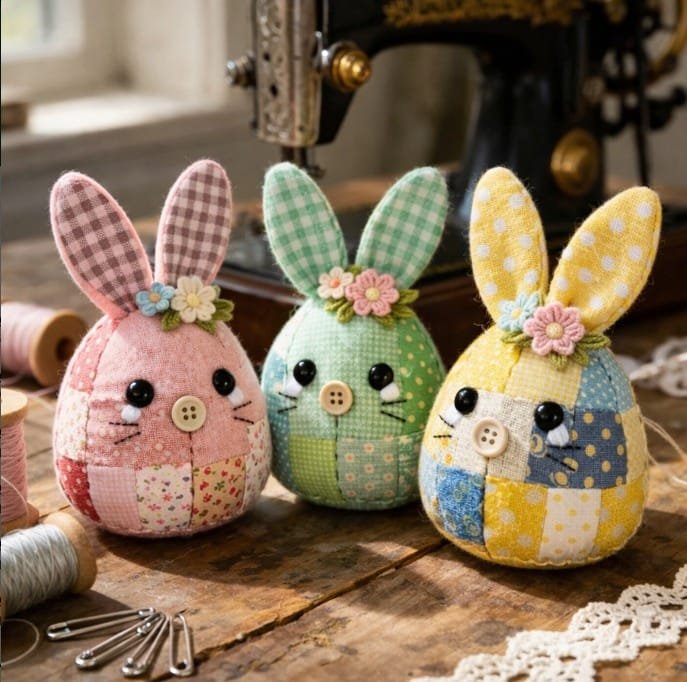
Another reason why the Cutest Fabric Bunnies Tutorial is so popular is its versatility. These fabric bunnies can be customized in size, color, and style to suit various occasions. From pastel spring decorations to neutral-toned nursery accents, this project adapts beautifully to different themes and preferences.
Choosing Fabrics and Materials
Selecting the right fabric is the first important step in the Cutest Fabric Bunnies Tutorial. Soft cotton fabrics are a popular choice because they are easy to sew and available in countless patterns. Linen and lightweight canvas also work well for a slightly more structured look.
For an ultra-soft finish, some crafters prefer fleece or minky fabric. These materials create plush bunnies that are perfect for cozy décor or gentle decorative accents. When using thicker fabrics, ensure your sewing needle is appropriate for the material.
High-quality polyester fiberfill is recommended for stuffing. Even distribution of stuffing helps maintain the bunny’s shape while keeping it soft and cuddly. Avoid overfilling, as it can distort seams and reduce the smooth appearance of the design.
Basic sewing tools are essential, including sharp fabric scissors, sewing pins, coordinating thread, and a sewing machine or hand-sewing needle. A fabric marker or chalk helps transfer the pattern accurately.
Small safety eyes or embroidered facial features can be used to personalize each bunny. Embroidery is often preferred for decorative pieces because it provides a softer and more seamless finish.
Optional decorative elements such as ribbons, bows, or fabric flowers can enhance the final look. These details add personality and elevate the charm of your finished bunny.
Cutting and Sewing the Bunny Shape
Begin the Cutest Fabric Bunnies Tutorial by printing or drawing a simple bunny template. The template typically includes a rounded body and long ears, creating the classic silhouette.
Fold your fabric with right sides facing each other before tracing the pattern. This ensures you cut two symmetrical pieces that align perfectly during sewing.
Pin the fabric layers securely to prevent shifting while cutting. Clean, precise edges make the sewing process smoother and improve the final result.
Sew along the traced outline, leaving a small opening at the bottom for turning and stuffing. Maintain a consistent seam allowance for even shaping.
After sewing, trim excess fabric around curves and carefully clip small notches along rounded areas. This reduces bulk and allows the bunny to turn smoothly without puckering.
Turn the fabric right side out through the opening and gently push out the ears and curves using a blunt tool. This step reveals the adorable shape that defines the Cutest Fabric Bunnies Tutorial.
Stuffing and Shaping for a Professional Finish
Careful stuffing is crucial for achieving a polished look. Add small amounts of fiberfill at a time, distributing it evenly throughout the bunny’s body.
Use a narrow tool to gently push stuffing into the ears first. Filling the ears lightly helps maintain flexibility while preserving shape.
Gradually fill the body, ensuring firmness without overstretching the seams. The goal is a smooth, rounded appearance that feels soft but structured.
Once satisfied with the shape, close the opening using a ladder stitch or invisible hand stitch. This technique keeps the seam discreet and professional.
Gently shape the bunny by smoothing the surface and adjusting stuffing as needed. Minor adjustments can make a noticeable difference in the overall appearance.
If desired, lightly press the bunny with a warm iron on low heat, ensuring the fabric is suitable for ironing. This step enhances smoothness and presentation.
Adding Facial Features and Decorative Details
The personality of your bunny comes to life through facial details. In the Cutest Fabric Bunnies Tutorial, embroidered eyes and noses create a sweet and timeless expression.
Use small, simple stitches to form eyes and whiskers. Minimalist designs often look more elegant and versatile across different décor styles.
Blush effects can be added with fabric-safe coloring techniques for a soft touch of warmth. Keep enhancements subtle to maintain a refined look.
Decorative bows or ribbon collars add charm and individuality. Choose colors that complement the fabric pattern without overpowering it.
Seasonal accessories such as tiny scarves or flower crowns can adapt the bunny for holidays or themed décor.
Keep embellishments securely attached, especially if the bunny will be handled frequently. Secure stitching ensures durability and longevity.
Frequently Asked Questions (FAQ)
Is the Cutest Fabric Bunnies Tutorial beginner-friendly?
Yes, this tutorial is suitable for beginners with basic sewing knowledge.
What fabric works best?
Cotton is ideal for easy handling, while fleece provides a softer plush finish.
Can I hand-sew the bunny?
Absolutely. Hand-sewing works well if you do not have access to a sewing machine.
How large should I make the bunny?
Sizes can vary depending on your template, typically ranging from small decorative pieces to larger plush accents.
Can I wash fabric bunnies?
Most cotton bunnies can be gently hand-washed. Always check fabric care instructions.
Can I sell finished bunnies?
If using your own template, you may sell finished pieces while respecting pattern copyrights if applicable.
Conclusion
Creating the Cutest Fabric Bunnies Tutorial is also a wonderful way to build meaningful memories with family and friends. Whether you are sewing alongside children, teaching a beginner how to handle fabric, or crafting gifts together during the holidays, these adorable fabric bunnies become symbols of shared creativity. The process itself can be just as rewarding as the finished result, encouraging patience, collaboration, and artistic expression in a relaxed and joyful atmosphere.
Another reason the Cutest Fabric Bunnies Tutorial continues to gain popularity is its incredible versatility. By simply adjusting fabric choices, ear lengths, embroidery details, or embellishments, you can create bunnies that match different seasons, celebrations, or nursery themes.
Ultimately, mastering the Cutest Fabric Bunnies Tutorial opens the door to endless creative possibilities. As your confidence grows, you can experiment with advanced sewing techniques, explore sustainable fabric options, or even develop your own signature variations. Each handmade bunny becomes more than just a decorative piece—it represents dedication, skill development, and the joy of crafting something with your own hands.
VIDEO TUTORIAL
The Cutest Fabric Bunnies Tutorial offers a joyful and creative sewing experience that results in charming handmade décor. By selecting quality fabrics, carefully shaping and stuffing, and adding thoughtful decorative details, you can create adorable bunnies that brighten any space. This project encourages creativity, precision, and personalization, making each bunny unique and meaningful. If you enjoyed this tutorial, feel free to share your honest opinion and suggestions. Your feedback helps inspire more creative and delightful handmade projects.

