Cube Toiletry Bag with Zipper Tutorial is a practical, modern, and highly functional sewing project that appeals to beginners and experienced sewists alike. The Cube Toiletry Bag with Zipper Tutorial focuses on creating a structured yet flexible bag that opens wide, making it easy to see and access all contents at once.
One of the main reasons the Cube Toiletry Bag with Zipper Tutorial has become so popular is its smart shape. The cube structure maximizes internal space without becoming bulky, allowing toiletries, cosmetics, or personal items to stay neatly organized. Unlike flat pouches, this bag stands upright, preventing spills and keeping items visible and accessible.
The Cube Toiletry Bag with Zipper Tutorial is also an excellent skill-building project. It introduces techniques such as sewing boxed corners, installing zippers cleanly, and working with interfacing or stabilizers. While the finished bag looks professional and polished, the construction process is broken into manageable steps that make the project approachable and enjoyable.
Another important aspect of the Cube Toiletry Bag with Zipper Tutorial is versatility. With simple adjustments, the same pattern can be used to create makeup bags, craft organizers, travel pouches, or even small storage bins. This flexibility makes the tutorial a valuable addition to any sewing skill set.
By following the Cube Toiletry Bag with Zipper Tutorial, sewists can create a durable, reusable item that replaces disposable plastic bags and flimsy store-bought pouches. It is a project that combines creativity, practicality, and sustainability in a meaningful way.
Understanding the Structure of the Cube Toiletry Bag with Zipper Tutorial
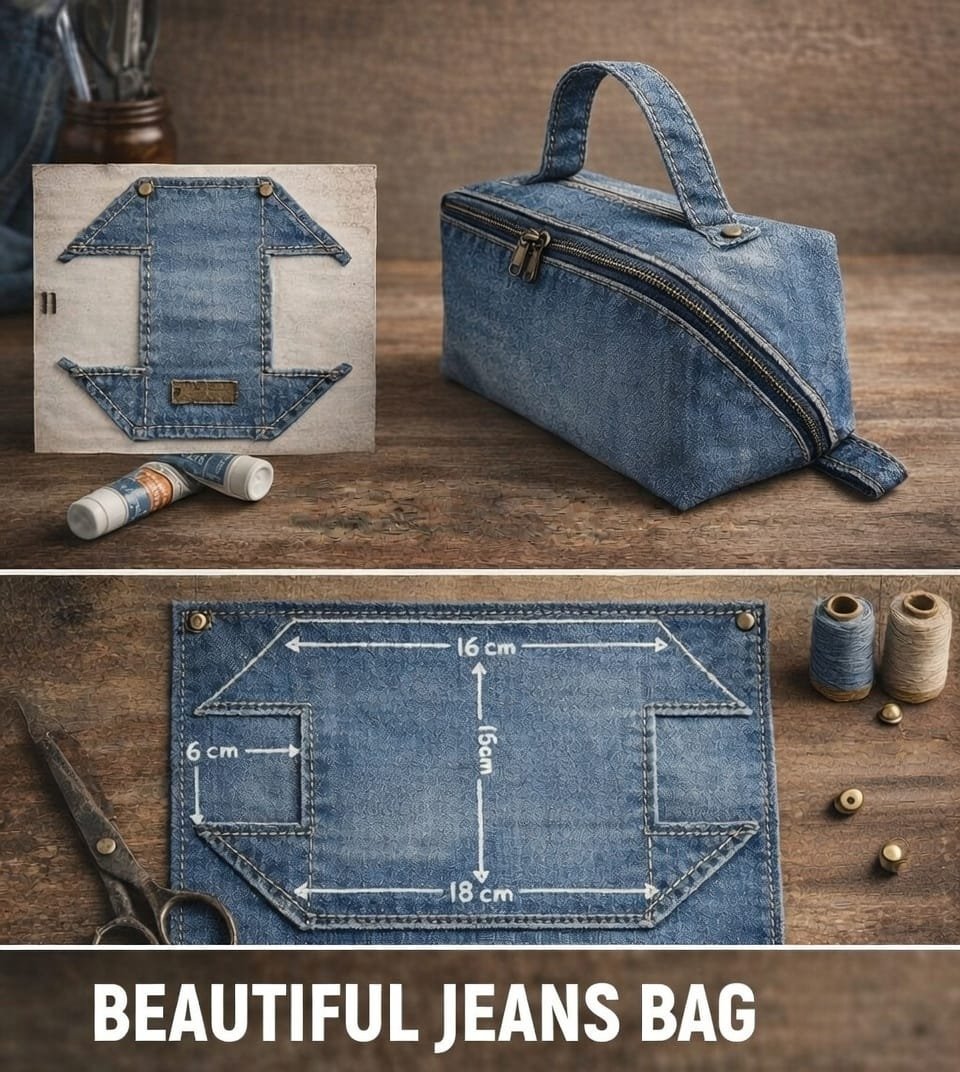
The structure of the Cube Toiletry Bag with Zipper Tutorial is based on a simple geometric concept that delivers impressive functionality. The bag starts as a flat rectangle but transforms into a three-dimensional cube through boxed corners. This construction allows the bag to stand upright and maintain its shape.
In the Cube Toiletry Bag with Zipper Tutorial, the zipper runs along the top edges of the bag, often extending down the sides. This extended zipper opening is what gives the bag its wide-access feature. When fully unzipped, the bag opens almost completely, making it easy to locate and remove items without digging.
The outer fabric provides durability and style in the Cube Toiletry Bag with Zipper Tutorial. This layer is often reinforced with interfacing to help the bag keep its structure. The right balance between flexibility and firmness ensures the bag is sturdy without feeling stiff.
Inside, the lining plays an important role in the Cube Toiletry Bag with Zipper Tutorial. A well-fitted lining protects the outer fabric and makes cleaning easier. Some versions also include interior pockets, which add organization without complicating the design.
The boxed corners are a defining feature of the Cube Toiletry Bag with Zipper Tutorial. These corners are created by folding and stitching the fabric in a specific way, transforming a flat shape into a cube. Mastering this technique opens the door to many other bag-making projects.
Understanding how each component works together allows sewists to follow the Cube Toiletry Bag with Zipper Tutorial confidently and achieve a clean, professional-looking result.
Materials and Preparation for the Cube Toiletry Bag with Zipper Tutorial
Choosing appropriate materials is essential for success in the Cube Toiletry Bag with Zipper Tutorial. The outer fabric should be durable enough to handle frequent use while still being easy to sew. Cotton canvas, quilting cotton with interfacing, denim, or laminated cotton are popular choices.
Interfacing is a key element in the Cube Toiletry Bag with Zipper Tutorial. Medium-weight fusible interfacing adds structure and helps the bag maintain its cube shape. For a softer bag, lighter interfacing can be used, while foam stabilizers create a more rigid, structured finish.
The lining fabric in the Cube Toiletry Bag with Zipper Tutorial is usually a lightweight cotton. Choosing a lining that contrasts with the outer fabric improves visibility inside the bag. A smooth lining also makes it easier to clean spills, which is especially useful for toiletry storage.
Zipper selection is another critical decision in the Cube Toiletry Bag with Zipper Tutorial. Nylon coil zippers are commonly recommended because they bend easily around corners. Using a zipper that is longer than the bag opening simplifies installation and allows for cleaner finishing.
Basic sewing tools are required for the Cube Toiletry Bag with Zipper Tutorial, including a sewing machine, zipper foot, scissors or rotary cutter, pins or clips, and measuring tools. Using clips instead of pins can be especially helpful when working with thicker fabrics.
Proper preparation before starting the Cube Toiletry Bag with Zipper Tutorial saves time and reduces mistakes. Cutting accurately, fusing interfacing carefully, and organizing pieces before sewing all contribute to a smoother sewing experience.
Step-by-Step Sewing Process in the Cube Toiletry Bag with Zipper Tutorial
The Cube Toiletry Bag with Zipper Tutorial typically begins with cutting the outer fabric, lining, and interfacing pieces. Accuracy at this stage is crucial, as precise cuts ensure proper alignment during assembly and a symmetrical final bag.
Next, interfacing is fused to the wrong side of the outer fabric pieces in the Cube Toiletry Bag with Zipper Tutorial. This step provides stability and prepares the fabric for zipper installation. Careful pressing prevents wrinkles or bubbles that could affect the bag’s shape.
Zipper installation is a central part of the Cube Toiletry Bag with Zipper Tutorial. The zipper is sewn between the outer fabric and lining, creating a clean finish on both sides. Sewing slowly and checking alignment helps achieve straight, professional-looking seams.
Once the zipper is in place, the bag body is assembled in the Cube Toiletry Bag with Zipper Tutorial. The outer fabric pieces are sewn together, followed by the lining, usually leaving a small opening for turning the bag right side out.
Creating the boxed corners is a key step in the Cube Toiletry Bag with Zipper Tutorial. This involves folding the corners so that side seams align with bottom seams, then stitching across the corner. This transformation gives the bag its cube shape and allows it to stand upright.
After turning the bag right side out, the lining opening is closed, and final topstitching may be added. These finishing steps in the Cube Toiletry Bag with Zipper Tutorial enhance durability and give the bag a polished appearance.
Customization and Design Variations
One of the biggest advantages of the Cube Toiletry Bag with Zipper Tutorial is its adaptability. Size adjustments are simple, allowing sewists to create small cosmetic bags or larger travel organizers using the same basic construction method.
Fabric combinations offer endless creative possibilities in the Cube Toiletry Bag with Zipper Tutorial. Bold prints, neutral tones, or textured fabrics can dramatically change the look of the bag. Mixing fabrics for the outer shell and lining adds visual interest.
Additional features can be incorporated into the Cube Toiletry Bag with Zipper Tutorial without major modifications. Interior pockets, elastic loops, or mesh sections can help organize smaller items such as brushes or bottles.
The zipper itself can become a design feature in the Cube Toiletry Bag with Zipper Tutorial. Using contrasting zipper tape or decorative pulls adds personality and makes the bag feel more customized.
Seasonal adaptations also work well with the Cube Toiletry Bag with Zipper Tutorial. Holiday-themed fabrics or color palettes can turn the bag into a festive gift, while neutral designs create a timeless, everyday accessory.
These customization options make the Cube Toiletry Bag with Zipper Tutorial a project that stays fresh and engaging, even when repeated multiple times.
Practical Uses and Benefits of the Cube Toiletry Bag
The Cube Toiletry Bag with Zipper Tutorial produces a bag that is exceptionally practical. Its wide opening allows users to see all contents at once, eliminating the frustration of searching through a narrow pouch.
For travel, items made using the Cube Toiletry Bag with Zipper Tutorial are especially useful. The structured shape protects contents, while the compact size fits easily into luggage or backpacks.
At home, the bag can be used for organizing cosmetics, sewing supplies, craft tools, or personal items. The Cube Toiletry Bag with Zipper Tutorial adapts easily to different storage needs.
From a sustainability perspective, the Cube Toiletry Bag with Zipper Tutorial encourages reusable solutions. Handmade fabric bags replace disposable plastic organizers and contribute to more mindful consumption habits.
The finished bag also makes an excellent handmade gift. Items created from the Cube Toiletry Bag with Zipper Tutorial are thoughtful, practical, and suitable for a wide range of recipients.
For small business owners, the Cube Toiletry Bag with Zipper Tutorial offers strong selling potential. Its professional appearance and everyday usefulness appeal to customers seeking quality handmade goods.
FAQ About the Cube Toiletry Bag with Zipper Tutorial
Is the Cube Toiletry Bag with Zipper Tutorial beginner-friendly?
Yes, the Cube Toiletry Bag with Zipper Tutorial is suitable for confident beginners who are comfortable with straight stitching and basic zipper installation.
What fabric works best for the Cube Toiletry Bag with Zipper Tutorial?
Cotton canvas, quilting cotton with interfacing, or denim work well for the Cube Toiletry Bag with Zipper Tutorial.
Do I need special tools for the Cube Toiletry Bag with Zipper Tutorial?
A zipper foot is helpful, but otherwise only standard sewing tools are required for the Cube Toiletry Bag with Zipper Tutorial.
Can I resize the Cube Toiletry Bag with Zipper Tutorial?
Yes, the Cube Toiletry Bag with Zipper Tutorial can be easily resized by adjusting the dimensions of the fabric pieces.
How long does it take to complete the Cube Toiletry Bag with Zipper Tutorial?
Most sewists can complete the Cube Toiletry Bag with Zipper Tutorial in a few hours.
Can I sell items made using the Cube Toiletry Bag with Zipper Tutorial?
Many tutorials allow selling finished items, but it is important to review individual usage terms.
Conclusion
The Cube Toiletry Bag with Zipper Tutorial is a well-rounded sewing project that combines functionality, skill development, and creative freedom. Throughout this article, we explored the structure, materials, sewing process, customization options, and practical benefits of the Cube Toiletry Bag with Zipper Tutorial.
VIDEO TUTORIAL
This project is ideal for anyone looking to create a durable, reusable, and stylish organizer while improving sewing skills. If this guide was helpful, leave an honest opinion and share your suggestions or experiences. Your feedback is valuable and helps inspire future sewing projects.

