If you’re looking for a quilt design that’s both visually striking and fun to make, then the Cross My Mind Quilt – Tutorial is exactly what you need. This quilt block is perfect for creating bold, geometric patterns that pop with color and contrast.
Whether you’re a beginner looking to practice precision or a seasoned quilter who wants to try something new, this Cross My Mind Quilt will provide an enjoyable and rewarding experience.
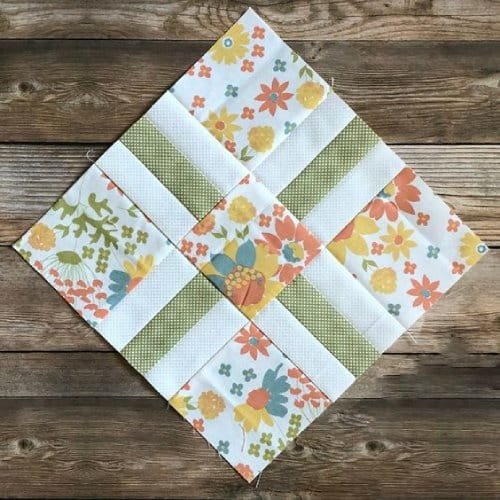
The Cross My Mind Quilt features intersecting lines and crosses that can be customized in endless ways. By playing with fabric choices, you can make this quilt truly unique, mixing and matching colors and prints to create a personalized masterpiece.
The pattern is versatile and works well with solid fabrics, bold prints, or a combination of both. Whether you use it for a full-sized quilt or a decorative wall hanging, this quilt will surely grab attention and become a centerpiece in any space.
Before diving into the step-by-step guide, it’s important to gather all your materials and understand the cutting and piecing process. This Cross My Mind Quilt – Tutorial will break it all down for you in easy-to-follow sections. Get ready to embark on a creative quilting journey!
1. Gathering Materials for the Cross My Mind Quilt
The first step in creating your Cross My Mind Quilt is gathering all the necessary materials. Having the right tools and fabrics on hand will make the process much smoother and more enjoyable.
Start by choosing your fabric. The Cross My Mind Quilt pattern is bold and geometric, so choose fabrics that complement each other. Solid fabrics create clean, modern lines, while printed fabrics can add personality and depth to the quilt. Consider using a mix of solids and prints to create contrast between the background and cross shapes. Typically, you’ll need at least three types of fabric: one for the background, one for the cross shapes, and one for accent pieces.
In addition to fabric, you’ll need the usual quilting tools. A rotary cutter and mat are essential for cutting precise pieces. A quilting ruler will help ensure that your cuts are straight and uniform. You’ll also need pins to hold your fabric pieces in place and a sewing machine with matching thread to stitch everything together.
Next, grab some batting and backing fabric. The batting will add softness and warmth to your quilt, while the backing fabric will cover the underside and provide a neat finish. Don’t forget your iron! Pressing your fabric and seams is crucial for achieving clean, flat blocks that are easy to work with.
Once you have everything ready, you can move on to the cutting stage, where you’ll start to see the pieces of your Cross My Mind Quilt come together.
2. Cutting and Preparing the Fabric
Now that your materials are gathered, it’s time to start cutting your fabric for the Cross My Mind Quilt. Precise cutting is the key to a successful quilt, especially with a pattern like this that relies on crisp, geometric shapes.
Begin by cutting your background fabric. The background will frame the cross shapes, so it’s important to cut these pieces accurately. Depending on the size of your quilt, you’ll need a specific number of squares or rectangles for the background. Measure carefully, and use your rotary cutter and ruler to make clean, straight cuts.
Next, cut the fabric for the cross shapes. These pieces will be placed over the background to form the intersecting lines that are characteristic of the Cross My Mind Quilt. Cut these strips slightly wider than the finished cross shape, as you’ll lose some width when you sew the seams.
If your quilt design includes accent pieces, cut those now as well. Accent fabrics are a great way to add a pop of color or pattern to your quilt. They can be used sparingly to add interest without overwhelming the overall design.
As you cut your fabric, it’s a good idea to label your pieces or lay them out in the order they’ll be sewn. This will help you stay organized and avoid confusion later on. Make sure to double-check your measurements before cutting to prevent any mistakes.
With your fabric cut and ready, it’s time to move on to piecing your quilt blocks. This is where the Cross My Mind Quilt really starts to come to life.
3. Piecing the Cross My Mind Quilt Blocks
Now that you have all your fabric pieces cut, it’s time to start piecing the quilt blocks for your Cross My Mind Quilt. This step involves arranging the pieces and sewing them together to create the individual blocks that will form your quilt top.
Begin by laying out your background and cross pieces. Arrange them so that the cross shapes intersect evenly across the block. Take a moment to ensure that the fabric colors and prints are balanced and that the layout looks visually appealing.
Next, pin the pieces together. Start with the smaller sections of the block, such as the cross arms or background corners. Pin the edges together to keep the fabric from shifting while you sew.
Using a quarter-inch seam allowance, sew the pieces together. Begin with the cross sections, sewing them into strips. Once you’ve sewn the cross sections, attach them to the background pieces. Remember to press each seam as you go. Pressing is important because it flattens the fabric, making it easier to sew subsequent pieces.
Once your blocks are pieced, lay them out to see how the overall quilt top will look. Make any adjustments if needed before moving on to assembling the entire quilt top.
4. Assembling and Quilting the Cross My Mind Quilt
With your individual blocks completed, it’s time to assemble the quilt top for your Cross My Mind Quilt. This is where all your hard work comes together to create a stunning final piece.
Start by laying out the blocks in the desired arrangement. Make sure that the crosses are aligned properly and that the colors and patterns flow smoothly across the quilt. If you’re making a larger quilt, this step may take some time, but it’s important to get the layout right before sewing the blocks together.
Sew the blocks together row by row, making sure to match up the seams between the blocks. Use pins to hold the seams in place and prevent any shifting while sewing.
Once the quilt top is assembled, it’s time to make your quilt sandwich. This involves layering the quilt top, batting, and backing fabric. Smooth out any wrinkles and baste the layers together using pins or a basting spray.
Finally, it’s time to quilt! You can choose to quilt along the lines of the crosses or create an all-over quilting design. If you’re new to quilting, straight-line quilting is a good option for this pattern. More advanced quilters may choose to experiment with free-motion quilting to add more texture and interest to the Cross My Mind Quilt.
After quilting, trim the edges and finish with binding. Your Cross My Mind Quilt is now complete and ready to be enjoyed!
FAQ
1. What is a Cross My Mind Quilt?
The Cross My Mind Quilt is a geometric quilt pattern featuring intersecting cross shapes. It’s a versatile design that can be customized with various fabrics and colors.
2. What fabrics should I use for the Cross My Mind Quilt?
The best fabrics for this quilt include a mix of solids and prints. Choose fabrics that provide contrast between the cross shapes and the background for the most striking effect.
3. How do I cut fabric for the Cross My Mind Quilt?
Precise cutting is essential for this pattern. Use a rotary cutter and ruler to cut squares and strips for the background and cross shapes, ensuring accurate measurements.
4. Can beginners make the Cross My Mind Quilt?
Yes! The Cross My Mind Quilt is suitable for beginners. The pattern is straightforward, and the tutorial guides you step-by-step through the process.
5. What quilting techniques work best for this pattern?
Straight-line quilting or stitch-in-the-ditch works well with this pattern, especially for beginners. More advanced quilters can try free-motion quilting for added texture.
6. How should I finish the Cross My Mind Quilt?
Finish your quilt by binding the edges after quilting. Choose a binding fabric that complements your quilt design for a polished, professional look.
Join our VIP broadcast list and gain access to exclusive patterns, all for free. As a VIP member, you’ll receive the best patterns daily, delivered directly to your device. ✨📱 It’s a unique opportunity to stay up-to-date with the latest trends and designs, curated just for you. Don’t miss out on enhancing your projects and discovering new inspirations with the best patterns every day! 🎨🔝
Conclusion
In this Cross My Mind Quilt – Tutorial, we’ve covered the entire process, from gathering materials to cutting fabric, piecing blocks, and quilting the final product. The Cross My Mind Quilt is a versatile and visually stunning design that can be personalized to suit your style. Whether you’re new to quilting or have years of experience, this project is both enjoyable and rewarding.
We hope this tutorial has inspired you to try your hand at making the Cross My Mind Quilt. If you have any questions, feedback, or suggestions, please leave a comment below. We’d love to hear from you and see your creations!

