The Converging Geese Quilt Pattern is a striking and dynamic design that brings movement and energy to any quilt. In this Converging Geese Quilt Pattern – Tutorial, you’ll learn how to create this eye-catching pattern step by step, making it accessible for quilters of all levels.
Whether you’re new to quilting or looking for a new challenge, this tutorial will help you master the Converging Geese Quilt Pattern.
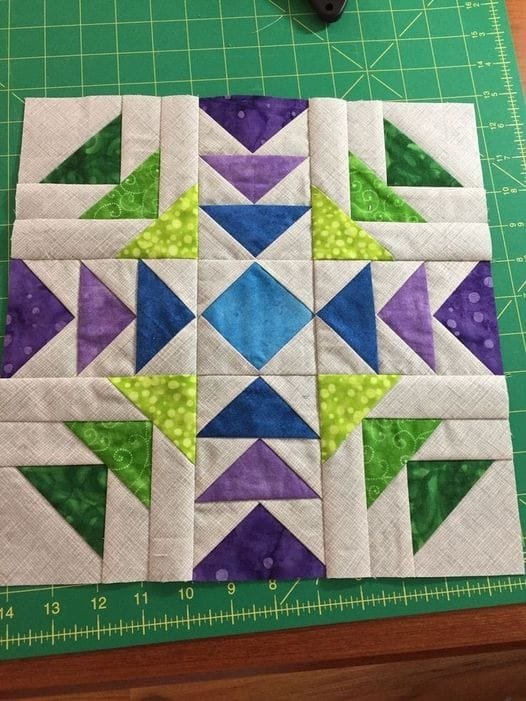
The Converging Geese Quilt Pattern is based on the traditional “Flying Geese” block but with a modern twist. Instead of straight lines, the geese converge towards the center, creating a unique and captivating design.
This pattern offers endless possibilities for color combinations and fabric choices, allowing you to create a quilt that reflects your personal style.
In this tutorial, we’ll walk you through the process of gathering materials, cutting fabric, assembling the blocks, and finishing your quilt. By the end of this tutorial, you’ll have a stunning quilt block that can be used in a variety of quilt projects. Let’s get started!
1. Gathering Materials for the Converging Geese Quilt Pattern
Before diving into the Converging Geese Quilt Pattern, it’s essential to gather all the materials you’ll need. Proper preparation will ensure a smooth quilting experience and a professional-looking result.
- Selecting the Fabric: Choosing the right fabric is crucial for the success of your quilt. The Converging Geese Quilt Pattern works best with a mix of solid and patterned fabrics. Choose contrasting colors to make the geese pop against the background.
- Cutting Tools: A sharp rotary cutter, a cutting mat, and a quilting ruler are essential tools for cutting precise pieces for your quilt. Accurate cuts will make assembling the quilt blocks much easier.
- Sewing Machine: While it’s possible to sew quilt blocks by hand, using a sewing machine will save you time and provide more uniform stitches. Be sure your machine is in good working condition before starting.
- Measuring Tools: A quilting ruler and a seam gauge will help you measure and mark your fabric pieces accurately. This will ensure that your quilt blocks are consistent in size.
- Pins and Clips: Use pins or sewing clips to hold your fabric pieces together while you sew. This will prevent the fabric from shifting and help you maintain straight seams.
- Iron and Ironing Board: Pressing your fabric pieces as you sew is crucial for a neat and professional-looking quilt. Make sure your iron is set up and ready to use throughout the process.
2. Cutting and Preparing the Fabric
Once you’ve gathered your materials, it’s time to cut and prepare your fabric for the Converging Geese Quilt Pattern. Follow these steps to ensure your pieces are cut accurately and ready for assembly.
- Cutting the Background Fabric: Start by cutting your background fabric into squares. The size of the squares will depend on the size of the quilt block you want to create, but typically, 5-inch or 6-inch squares work well for the Converging Geese Quilt Pattern.
- Cutting the Geese: The next step is to cut your geese triangles. To do this, you’ll need to cut smaller squares, which will be folded and sewn into triangles that form the “geese” in your quilt block.
- Marking the Seam Lines: Before you start sewing, use a fabric marker to mark the seam lines on the back of your geese triangles. This will help you sew with precision and keep your pieces aligned.
- Laying Out the Pieces: Lay out your background squares and geese triangles on your work surface. Arrange them in the Converging Geese pattern, with the geese pointing toward the center of the block.
- Pressing the Fabric: Before sewing, press all of your fabric pieces to remove any wrinkles. This will ensure that your fabric lies flat and your seams are crisp.
- Organizing the Pieces: Organize your fabric pieces in the order in which you’ll sew them. This will help keep the process organized and reduce the chances of mistakes.
3. Sewing the Converging Geese Quilt Pattern
Now that your fabric is cut and prepared, it’s time to start sewing the pieces together to form the Converging Geese Quilt Pattern. Follow these steps carefully to achieve the best results.
- Sewing the First Triangle: Start by sewing the first geese triangle onto the background square. Align the edges carefully and use a ¼-inch seam allowance. Press the seam toward the triangle after sewing.
- Adding the Second Triangle: Next, sew the second geese triangle to the opposite side of the background square. Again, use a ¼-inch seam allowance and press the seam toward the triangle.
- Joining the Rows: After sewing the individual triangles onto the background squares, it’s time to join the rows of geese. Make sure to match up the points of the triangles to create a smooth, continuous pattern.
- Sewing the Rows Together: Once your rows are complete, sew them together to form the Converging Geese Quilt Block. Be sure to align the seams carefully to maintain the integrity of the pattern.
- Pressing the Seams: As you sew each section of the block, press the seams to ensure they lie flat. This will make the final block look neat and professional.
- Trimming the Block: After you’ve sewn all the pieces together, use your rotary cutter to trim any excess fabric from the edges of the block. This will ensure that all of your quilt blocks are the same size.
4. Finishing the Converging Geese Quilt Pattern
Once your Converging Geese Quilt Block is complete, it’s time to finish the block and prepare it for assembly into a full quilt. Here are the steps for finishing your quilt block.
- Adding Borders: If you want to add borders to your Converging Geese Quilt Block, now is the time to do so. Borders can help frame the block and make it stand out in your quilt.
- Joining Multiple Blocks: To create a full quilt, you’ll need to sew multiple Converging Geese Quilt Blocks together. Lay out your blocks to decide on the arrangement before sewing them together.
- Pressing the Quilt Top: As you sew the blocks together to form the quilt top, press the seams to ensure that the quilt lies flat.
- Quilting the Layers: Once the quilt top is assembled, it’s time to quilt the layers together. You can quilt by hand or machine, depending on your preference.
- Binding the Quilt: The final step is to bind the edges of the quilt. Binding adds a polished finish and prevents the edges from fraying.
- Final Pressing: After the quilt is bound, give it one final press to ensure all the seams are crisp and the quilt lies flat.
FAQ
What is the Converging Geese Quilt Pattern?
The Converging Geese Quilt Pattern is a modern take on the traditional “Flying Geese” quilt block. In this pattern, the geese triangles converge towards the center, creating a dynamic and eye-catching design.
Is the Converging Geese Quilt Pattern suitable for beginners?
Yes, the Converging Geese Quilt Pattern can be tackled by beginners with some basic quilting experience. The key is to take your time and follow the steps carefully.
What size should the Converging Geese Quilt Block be?
The size of the Converging Geese Quilt Block can vary, but it’s typically made with 5-inch or 6-inch squares. You can adjust the size depending on the dimensions of the quilt you’re making.
What fabrics work best for the Converging Geese Quilt Pattern?
Cotton fabrics are ideal for the Converging Geese Quilt Pattern because they are easy to work with and provide good structure. Choose fabrics with contrasting colors for the background and geese to make the pattern stand out.
Do I need a sewing machine for the Converging Geese Quilt Pattern?
While you can sew the Converging Geese Quilt Pattern by hand, a sewing machine will make the process much faster and more uniform. A sewing machine is recommended for beginners.
How do I incorporate the Converging Geese Quilt Block into a larger quilt?
You can combine multiple Converging Geese Quilt Blocks to create a larger quilt. Arrange the blocks in rows, and sew them together to form the quilt top.
Join our VIP broadcast list and gain access to exclusive patterns, all for free. As a VIP member, you’ll receive the best patterns daily, delivered directly to your device. ✨📱 It’s a unique opportunity to stay up-to-date with the latest trends and designs, curated just for you. Don’t miss out on enhancing your projects and discovering new inspirations with the best patterns every day! 🎨🔝
Conclusion
In this Converging Geese Quilt Pattern – Tutorial, we’ve covered everything you need to know to create a stunning quilt block that brings a modern twist to a classic design.
By following the steps outlined in this tutorial, you’ll be able to craft your own Converging Geese Quilt Block and incorporate it into a larger quilt project.
We hope you enjoyed this tutorial and found it helpful. Please feel free to leave your feedback and suggestions in the comments below—we’d love to hear from you and see your finished quilts!

