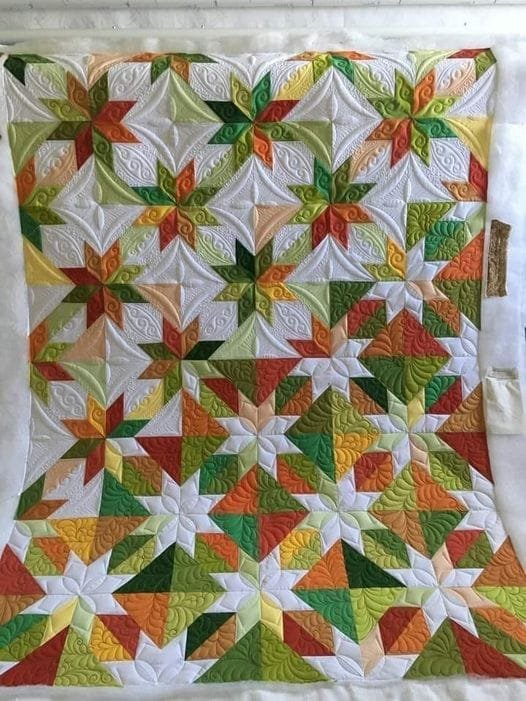
The Confetti Star Quilt is a vibrant and playful quilt pattern that brings a burst of color and joy to any room.
This design features star blocks that look as if they’ve been sprinkled with confetti, making it a favorite among quilters of all skill levels.
In this tutorial, we will guide you through every step needed to create your very own Confetti Star Quilt, from selecting fabrics to assembling the quilt top.
Whether you’re a seasoned quilter or just starting out, this guide will help you create a beautiful quilt that showcases your unique style.
One of the great things about the Confetti Star Quilt is its versatility. You can use a variety of fabric combinations to achieve different looks, whether you prefer a classic color palette or a more modern, eclectic feel.
The pattern typically involves creating multiple star blocks that are then arranged in a way that gives the illusion of movement, reminiscent of confetti falling from the sky. This makes the quilt not only visually striking but also a great project for using up fabric scraps.
As you embark on this quilting adventure, remember that quilting is as much about the journey as it is about the final product. Each stitch you make is a step towards creating something beautiful and functional. So, gather your materials, set up your workspace, and let’s dive into the exciting world of the Confetti Star Quilt!
1. Gathering Materials for the Confetti Star Quilt
Before you start your Confetti Star Quilt, it’s essential to gather all the necessary materials. Having everything on hand will streamline your process and make your quilting experience much more enjoyable.
First, you will need fabric. For the Confetti Star Quilt, consider using a mix of solid fabrics and patterned ones to create visual interest. A typical quilt might use 5-7 different fabrics in varying colors and patterns. Cotton fabric is the best choice due to its durability and ease of handling. For a fun twist, you might opt for fabrics with whimsical prints or bright colors that evoke a sense of celebration.
In addition to fabric, you will need a rotary cutter and a cutting mat for precise cutting of your fabric pieces. A quilting ruler is also essential, as it allows you to measure and cut your fabric accurately. These tools will help ensure that your pieces are uniform in size, which is crucial for the star blocks in your Confetti Star Quilt.
Don’t forget to have a good supply of sewing thread. Choose a thread color that matches your fabric to maintain a cohesive look throughout your quilt. You’ll also need quilting pins to hold your fabric pieces together as you sew, ensuring that everything stays in place.
Lastly, an iron is a vital tool in quilting. Pressing your seams as you go will help your quilt lay flat and look polished. A pressing mat can be beneficial as it allows for better control when ironing small pieces.
With all your materials gathered, you’re ready to begin your Confetti Star Quilt journey!
2. Cutting Your Fabric for the Confetti Star Quilt
Now that you have all your materials ready, the next step is to cut your fabric for the Confetti Star Quilt. Proper cutting is essential for ensuring that your quilt blocks fit together seamlessly.
Start by washing and ironing your fabric before cutting. This step will help remove any wrinkles and ensure that your fabric lies flat, making it easier to cut accurately. After ironing, lay your fabric on the cutting mat and fold it so that you can cut multiple layers at once.
Using your quilting ruler, measure and cut the fabric into the required sizes for the star blocks. A typical Confetti Star Quilt might require squares for the star points and a central square for the star itself. Common sizes for these pieces are 5-inch squares for the star points and 6-inch squares for the center. Make sure to cut enough pieces to create multiple star blocks.
After cutting your squares, you may want to sort them by color and pattern. Organizing your pieces will help streamline the assembly process and make it easier to visualize your design.
Once everything is cut and sorted, take a moment to review your layout. The beauty of the Confetti Star Quilt lies in the mix of colors and patterns, so feel free to experiment with different arrangements before moving on to the sewing phase.
With your fabric cut and organized, you’re now ready to start assembling the star blocks for your Confetti Star Quilt!
3. Assembling the Confetti Star Quilt Blocks
The assembly of the star blocks is where the magic happens in the Confetti Star Quilt. This step will transform your fabric pieces into beautiful star shapes that will come together to create your quilt.
Begin with the center square of your star block. Place it right side up on your workspace. Next, take one of the star point squares and place it right sides together with the center square. Pin them together to hold them in place, ensuring that the edges align.
Using a ¼-inch seam allowance, sew along the edge where the two squares meet. After sewing, press the seam toward the center square. This will create a clean and flat corner for your star.
Continue this process by adding star points to the other three sides of the center square. Make sure to keep track of your layout as you go, as this will help you maintain the overall design of the Confetti Star Quilt.
Once you have attached all the star points, your block should resemble a star shape. Now, you can add additional borders or accent pieces around the star as desired. This step is a great opportunity to mix and match fabrics, adding even more dimension to your quilt.
After finishing your star blocks, be sure to trim any excess fabric to maintain uniformity. A finished star block typically measures 12.5 inches square, but you can adjust the size based on your quilt layout.
With your star blocks assembled, you can now start thinking about how to arrange them for the quilt top.
4. Joining the Confetti Star Quilt Blocks
Now that you have created your star blocks, the final step in the Confetti Star Quilt tutorial is to join them together to form the quilt top. This stage is crucial for ensuring that your quilt design flows seamlessly.
Begin by laying out your star blocks in the desired arrangement. This is the perfect time to get creative! The Confetti Star Quilt allows for various layouts, so don’t hesitate to play around with the positioning of your stars until you find a design that you love.
Once you’re satisfied with the arrangement, start by joining the blocks in horizontal rows. Place two blocks right sides together and pin along the edges. Pay close attention to the seams where the blocks meet to ensure they align correctly. Using a ¼-inch seam allowance, sew the blocks together.
After sewing the rows, press the seams to one side. This step will help create a flatter quilt top and reduce bulk. Once all the rows are complete, join them together in the same manner, aligning the seams as you go.
As you piece the quilt top together, keep checking for alignment and fit. It’s essential to maintain the overall structure of the Confetti Star Quilt design for a polished finish. After all blocks are joined, take a moment to inspect your quilt top for any loose threads or uneven seams. Trim any excess threads to ensure everything is neat and tidy.
Your Confetti Star Quilt top is now ready for the next stages of quilting and finishing!
FAQ about Confetti Star Quilt – Tutorial
Q1: What is the Confetti Star Quilt pattern?
The Confetti Star Quilt pattern features star blocks that are arranged to create a vibrant and dynamic design, resembling confetti scattered across a quilt.
Q2: What materials do I need for a Confetti Star Quilt?
You will need a variety of fabrics (solid and patterned), sewing thread, a rotary cutter, cutting mat, quilting ruler, quilting pins, and an iron.
Q3: How do I cut the fabric for the Confetti Star Quilt?
Cut your fabric into squares for the star points and a central square for the star itself, typically using sizes like 5-inch and 6-inch squares. Use a rotary cutter and quilting ruler for precision.
Q4: Can I customize the colors in my Confetti Star Quilt?
Yes! The Confetti Star Quilt is versatile and can be made using a wide variety of colors and fabric combinations to suit your personal style.
Q5: How do I ensure my quilt blocks are the same size?
Accurate cutting and sewing with a consistent ¼-inch seam allowance will help ensure uniformity in your quilt blocks. Pressing seams flat is also essential.
Q6: What is the finished size of a Confetti Star Quilt?
The finished size depends on how many star blocks you create and how they are arranged. Each block typically measures 12.5 inches square, so the overall quilt size will vary accordingly.
Join our VIP broadcast list and gain access to exclusive patterns, all for free. As a VIP member, you’ll receive the best patterns daily, delivered directly to your device. ✨📱 It’s a unique opportunity to stay up-to-date with the latest trends and designs, curated just for you. Don’t miss out on enhancing your projects and discovering new inspirations with the best patterns every day! 🎨🔝
Conclusion
In this detailed tutorial, we have explored how to create a Confetti Star Quilt from start to finish. From gathering materials and cutting fabric to assembling and joining your star blocks, each step is essential in crafting a beautiful and vibrant quilt. We hope you feel inspired to start your own Confetti Star Quilt project!
If you’ve tried this pattern or have any suggestions, please share your thoughts in the comments below. Your feedback is invaluable to fellow quilters looking to create their own unique designs!

