The Christmas Wreath Quilt Block – Tutorial is a perfect project to bring holiday cheer to your quilting.
Whether you’re a seasoned quilter or just starting, this tutorial will guide you through crafting a festive quilt block that captures the spirit of the season.
Combining creativity, precision, and a touch of holiday magic, this project is an excellent addition to your quilting repertoire.
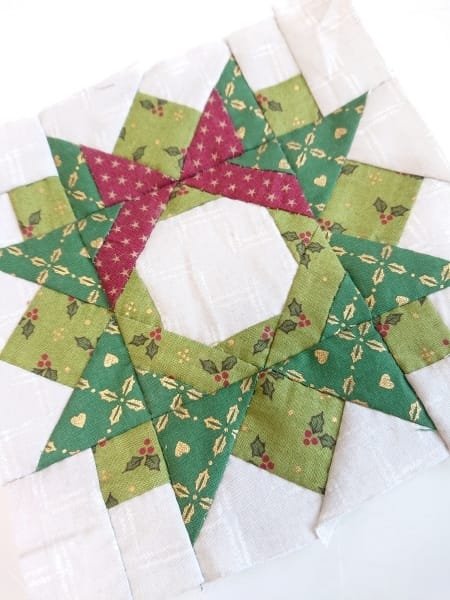
A Christmas Wreath Quilt Block resembles a classic holiday wreath made with fabric instead of greenery.
The design is versatile and can be used for quilts, table runners, or wall hangings, making it a standout piece for your holiday decor.
With the help of this tutorial, you’ll learn the steps to create a beautifully detailed wreath block that will surely impress family and friends.
This project offers a wonderful opportunity to use a mix of fabrics, including festive prints and solids.
From selecting your materials to assembling the block, every step allows for personalization and creativity. Let’s dive into the essential steps to make your Christmas Wreath Quilt Block a reality.
1. Materials and Tools for Your Christmas Wreath Quilt Block
Before starting your Christmas Wreath Quilt Block, gather the necessary materials and tools. Having everything ready will make the process smoother and more enjoyable.
First, choose your fabrics. Select greens for the wreath, reds for accents like berries or bows, and a contrasting background fabric. Fat quarters or fabric scraps work well for this project, so it’s a great way to use leftover materials from previous projects.
Next, prepare your quilting tools. You’ll need a rotary cutter, cutting mat, quilting ruler, and sewing machine. These tools will help you achieve precise cuts and seams, which are essential for creating a polished quilt block.
In addition, gather thread that matches your chosen fabric colors. Neutral or white thread is versatile, but coordinating colors can add subtle details to your quilt block. Don’t forget to have an iron and pressing board on hand for crisp seams.
Finally, consider using a quilting pattern or template for your Christmas Wreath Quilt Block. Patterns can provide guidance and ensure accuracy, especially if this is your first time attempting a wreath design.
2. Cutting and Preparing Your Fabric
With your materials ready, the next step is cutting and preparing your fabric pieces. Accurate cuts are crucial for a neat and professional-looking quilt block.
Start by cutting your fabric into squares and rectangles according to the dimensions specified in your pattern. If you’re designing your own wreath, aim for a circular layout with evenly spaced pieces to mimic the shape of a wreath.
Once the fabric pieces are cut, organize them by color and size. This step helps you visualize the block layout and ensures you don’t miss any pieces during assembly. Lay out the pieces on a flat surface, arranging them in the shape of the wreath to get a sense of how the final design will look.
Consider using fusible interfacing or stabilizer for added structure, especially if your fabrics are lightweight. This will make the assembly process easier and result in a sturdier quilt block.
Press each fabric piece with an iron before sewing to remove wrinkles and set crisp edges. A well-pressed fabric ensures smoother seams and a more professional finish for your Christmas Wreath Quilt Block.
3. Assembling the Christmas Wreath Quilt Block
Now it’s time to assemble your Christmas Wreath Quilt Block. This step involves sewing the fabric pieces together to create the wreath design.
Begin by piecing together the inner sections of the wreath. Sew small squares or rectangles together using a 1/4-inch seam allowance. Press the seams open or to one side, depending on your preference and the pattern instructions.
Next, move on to the outer sections of the wreath. Attach these pieces to the inner section, ensuring the edges align correctly. Take your time with this step to maintain the circular shape of the wreath.
Add details like “berries” or a “bow” using small fabric pieces in red or contrasting colors. These accents can be sewn directly onto the wreath or appliquéd for added texture and dimension. Embellishments make the quilt block more festive and visually appealing.
Once the wreath is complete, attach it to the background fabric. Center the wreath carefully to ensure a balanced design. Sew around the edges to secure it, and press the entire block to set the seams.
4. Finishing Touches and Creative Ideas
After assembling your Christmas Wreath Quilt Block, the final steps include adding finishing touches and exploring creative ways to use your block.
Trim the edges of the quilt block to ensure a clean and even square. This step is essential for easy integration into larger quilting projects, like a full quilt or table runner.
Consider quilting the block to add texture and detail. Use free-motion quilting or straight-line stitching to enhance the wreath design. For example, you could quilt around the edges of the wreath or add swirls to mimic the look of holiday greenery.
If you’re making a standalone project, like a wall hanging or pillow, finish the edges with binding or backing fabric. Binding adds a polished border, while backing fabric completes the project for display or functional use.
Experiment with variations of the Christmas Wreath Quilt Block. Try different color combinations, use metallic fabrics for a touch of shimmer, or add hand embroidery for extra detail. Each variation makes your project unique and personalized.
Lastly, share your completed quilt block with others. Whether it’s a gift, part of a community quilt, or a decoration in your home, your festive quilt block is sure to spread holiday cheer.
FAQ about Christmas Wreath Quilt Block – Tutorial
Q1: Can beginners make a Christmas Wreath Quilt Block?
Yes! The Christmas Wreath Quilt Block is beginner-friendly. By following a step-by-step tutorial and using simple techniques, even those new to quilting can create a beautiful block.
Q2: What size should the quilt block be?
The size of your Christmas Wreath Quilt Block depends on your project. Common sizes range from 12 inches to 16 inches square, but you can adjust the dimensions to fit your needs.
Q3: Can I hand-sew the block instead of using a sewing machine?
Absolutely. While a sewing machine is faster, hand-sewing can add a personal touch. Use a small running stitch and take your time to ensure neat seams.
Q4: How do I choose the best fabrics for this project?
Festive colors like greens, reds, and whites are ideal for a Christmas theme. Cotton fabrics are easy to work with, but you can also experiment with textures like velvet or metallics for added holiday flair.
Q5: Can this block be part of a larger quilt?
Yes, the Christmas Wreath Quilt Block can be combined with other holiday-themed blocks to create a full quilt. Mix and match designs like stars, trees, or snowflakes for a cohesive festive quilt.
Conclusion
In this Christmas Wreath Quilt Block – Tutorial, we explored the steps to create a festive quilt block perfect for holiday decorations. From gathering materials to adding finishing touches, this project combines creativity and craftsmanship to produce a standout holiday piece. Whether used in a quilt, wall hanging, or table runner, this quilt block brings warmth and joy to the season.
We hope you enjoyed this tutorial and feel inspired to try it yourself. Share your experience and let us know how your Christmas Wreath Quilt Block turned out. Feel free to leave suggestions or ideas for future quilting projects. Happy quilting and happy holidays!

