The Christmas Tree Block is a delightful quilting project that brings festive cheer to your holiday decor. This Christmas Tree Block tutorial will guide you through the process of creating your own beautiful block, perfect for quilts, wall hangings, or any other holiday craft. With clear instructions and a few essential tips, you’ll be able to craft a stunning Christmas Tree Block in no time.
Whether you’re an experienced quilter or just starting out, this tutorial is designed to be accessible and enjoyable. The Christmas Tree Block pattern is not only a wonderful way to celebrate the season but also an opportunity to practice your quilting skills. In this guide, we’ll break down the steps and techniques you’ll need to complete your project with confidence. Let’s dive into the world of quilting and create something special for the holidays.
In the following sections, we’ll cover the materials you’ll need, the step-by-step process of assembling your block, and some additional tips to enhance your finished project. So gather your supplies, and let’s get started on this festive quilting adventure!
1. Materials Needed for the Christmas Tree Block
Creating a beautiful Christmas Tree Block starts with having the right materials. Here’s a list of everything you’ll need to complete your project:
- Fabric: Choose a selection of fabrics for your tree, background, and accents. Traditional Christmas colors like green, red, and gold work wonderfully.
- Rotary Cutter and Mat: These tools will help you cut your fabric pieces accurately.
- Quilting Ruler: A clear acrylic ruler is essential for precise cutting.
- Thread: Select a matching or contrasting thread for sewing your block together.
- Fabric Marking Pen: Use this to mark fabric for cutting and stitching.
- Sewing Machine: A reliable sewing machine will make the stitching process much smoother.
Once you have your materials gathered, you’re ready to start assembling your Christmas Tree Block.
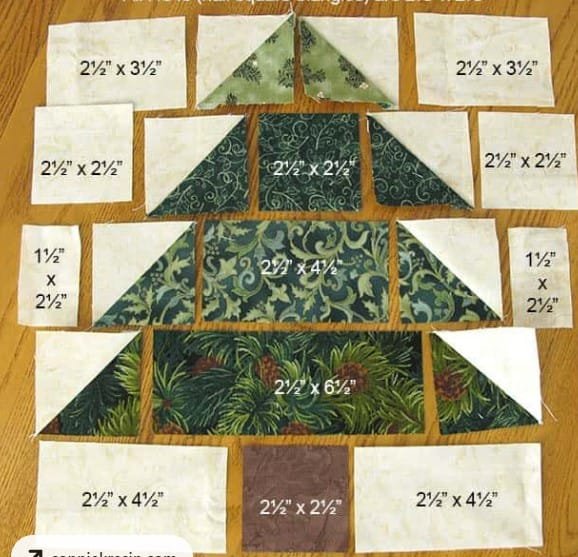
2. Cutting and Preparing Your Fabric
The first step in making a Christmas Tree Block is cutting your fabric pieces. Follow these steps to ensure accuracy:
- Measure and Cut: Using your quilting ruler and rotary cutter, cut out the required fabric pieces according to your pattern. Make sure your cuts are precise for a clean finish.
- Press Fabric: Press your fabric pieces with an iron to remove any wrinkles and ensure they lay flat.
- Marking: Use your fabric marking pen to indicate where you’ll need to stitch or make additional cuts.
- Arrange Pieces: Lay out your cut pieces to get a visual idea of how your block will look before you start sewing.
- Prepare Templates: If your pattern includes templates, cut them out and use them to trace shapes onto your fabric.
- Organize: Keep your fabric pieces organized by placing them in separate containers or bags. This will help you stay on track as you work through the tutorial.
By following these preparation steps, you’ll set yourself up for a smoother sewing experience.
3. Assembling the Christmas Tree Block
Now that your fabric is cut and prepared, it’s time to start assembling your Christmas Tree Block. Here’s how to proceed:
- Sew Pieces Together: Begin by sewing the pieces of your tree together according to your pattern. Use a quarter-inch seam allowance for best results.
- Join Sections: Once you’ve sewn individual sections, join them together to form the complete tree shape.
- Press Seams: After each seam, press it open to reduce bulk and ensure your block lays flat.
- Add Background: Attach your tree to the background fabric, aligning it carefully.
- Trim Edges: Trim any excess fabric from the edges to ensure your block is the correct size.
- Final Press: Give your finished block a final press to smooth out any creases.
These steps will help you assemble a beautiful Christmas Tree Block that’s ready for display.
4. Adding Finishing Touches
With your Christmas Tree Block assembled, it’s time to add those final touches that will make your block stand out:
- Embellishments: Add buttons, sequins, or other embellishments to enhance the look of your tree.
- Quilting: Quilt around the tree and background to add texture and dimension.
- Binding: If you’re using the block for a quilt, attach binding to the edges for a finished look.
- Appliqué: Consider adding appliqué details for extra flair and personalization.
- Embroider: Use embroidery to add text or additional designs to your block.
- Display: Choose a frame or quilt backing that complements your block and display it proudly.
These finishing touches will elevate your Christmas Tree Block and make it a centerpiece of your holiday decor.
FAQ
Q: What size should my Christmas Tree Block be? A: The size of your block will depend on your pattern. Common sizes are 12×12 inches or 18×18 inches, but you can adjust based on your project needs.
Q: Can I use any fabric for the Christmas Tree Block? A: Yes, you can use any fabric, but traditional Christmas colors like green, red, and gold work best. Choose fabrics that are easy to work with and coordinate well.
Q: How do I ensure my Christmas Tree Block is perfectly square? A: Use a quilting ruler and rotary cutter to make precise cuts. Press seams after sewing and trim any excess fabric to ensure your block is square.
Q: Can I make a Christmas Tree Block without a sewing machine? A: While a sewing machine makes the process easier, you can hand-sew the block if needed. Just be sure to use accurate measurements and stitching techniques.
Q: What if I make a mistake while sewing my block? A: Don’t worry! Mistakes can often be corrected. Unpick the stitches, re-align the fabric, and sew again. Practice will help improve your skills.
Q: How do I care for my finished Christmas Tree Block? A: Wash your block according to the fabric’s care instructions. Avoid excessive heat and harsh detergents to maintain its appearance.
Join our VIP broadcast list and gain access to exclusive patterns, all for free. As a VIP member, you’ll receive the best patterns daily, delivered directly to your device. ✨📱 It’s a unique opportunity to stay up-to-date with the latest trends and designs, curated just for you. Don’t miss out on enhancing your projects and discovering new inspirations with the best patterns every day! 🎨🔝
Conclusion
In this Christmas Tree Block tutorial, we covered everything from gathering materials to adding finishing touches. By following the steps outlined, you can create a beautiful, festive block that will enhance your holiday decorations.
We hope you found this guide helpful and easy to follow. If you have any questions or need further clarification, please leave a comment with your thoughts or suggestions. Happy quilting, and enjoy creating your Christmas Tree Block!

