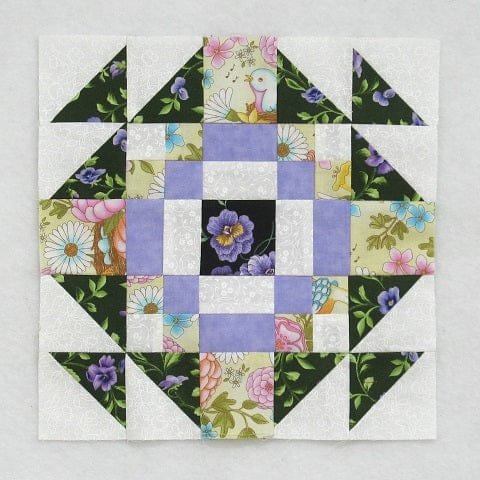
Welcome to the China Doll Quilt Block – Tutorial! This beautiful quilt block is a delightful addition to any quilting project, combining intricate design with the charm of traditional quilting.
The China Doll Quilt Block showcases a unique pattern that resembles a doll’s dress, making it not only visually appealing but also a wonderful way to express your creativity. Whether you are a seasoned quilter or just starting out, this tutorial will guide you through the steps to create your own stunning quilt block.
As you embark on this quilting journey, you’ll find that the China Doll Quilt Block is perfect for various projects, including quilts, table runners, and wall hangings. Its versatility allows you to experiment with different color combinations and fabrics, giving each piece a unique personality.
Additionally, quilting is a relaxing and fulfilling hobby that allows for self-expression and creativity, making it an excellent way to unwind after a long day.
In this tutorial, we’ll cover everything from selecting materials and cutting fabric to piecing the block together and finishing it off. We want you to feel confident in your quilting skills and inspired to create beautiful projects that reflect your personal style. So, let’s dive in and get started on your China Doll Quilt Block!
1. Selecting Your Materials
Before you begin crafting your China Doll Quilt Block, it’s essential to select the right materials. The quality and choice of fabric will significantly influence the final look of your block. Here’s a guide to help you gather what you need:
- Choose Your Fabrics: Opt for a mix of light and dark fabrics to create depth in your block. Traditional China Doll Quilt Blocks often feature bold colors and patterns that evoke a sense of nostalgia. Look for prints that reflect your personal style.
- Fabric Type: Quilting cotton is the go-to fabric for quilt blocks due to its durability and ease of handling. It holds up well to sewing and provides a crisp finish.
- Cutting Tools: You will need a rotary cutter, a cutting mat, and a quilting ruler for precise cutting. These tools ensure that your fabric pieces are accurately sized, which is crucial for a neat and professional-looking block.
- Thread Selection: Choose a high-quality thread that matches your fabric. A cotton thread is a popular choice, as it blends well and provides a smooth finish to your seams.
- Optional Embellishments: Consider adding some fun embellishments, like buttons or embroidery, to your China Doll Quilt Block. These personal touches can make your project even more special and unique.
- Pre-Washing Fabrics: It’s advisable to pre-wash your fabrics to remove any sizing and prevent future shrinkage. This step is essential for ensuring your block maintains its shape and size after washing.
2. Cutting Your Fabric
With your materials gathered, it’s time to cut your fabric for the China Doll Quilt Block. Accurate cutting is vital to ensure your block fits together perfectly. Follow these steps for precise cutting:
- Measure Carefully: Take the time to measure your fabric according to the pattern you are following. It’s essential to get accurate measurements to avoid any mishaps later on.
- Cutting Shapes: The China Doll Quilt Block typically requires various shapes, including squares and triangles. Use your rotary cutter and ruler to cut these shapes accurately.
- Templates: If your pattern includes specific shapes or angles, consider using templates. You can create templates from cardboard or purchase pre-made templates for ease of use.
- Organizing Pieces: As you cut your fabric, organize your pieces by type and size. This organization will help streamline the assembly process and reduce confusion later on.
- Double-Check Measurements: After cutting, take a moment to double-check your pieces. Ensuring that everything is cut correctly will save you time and frustration during assembly.
- Preparing for Sewing: Once your fabric pieces are cut, stack them neatly in the order you will sew them. This preparation makes it easier to grab what you need when you start piecing your China Doll Quilt Block together.
3. Piecing the Block Together
Now that you have all your fabric pieces cut, it’s time to start piecing together your China Doll Quilt Block. This is where your design truly comes to life. Follow these steps for a successful assembly:
- Layout Your Design: Begin by laying out your cut pieces on a flat surface. This visual representation will help you see how the final block will look and allow you to make any necessary adjustments.
- Sewing the Pieces: Start sewing your pieces together according to your layout. Use a quarter-inch seam allowance for accuracy, which is the standard for quilting.
- Pressing Seams: After sewing each seam, press it open or to one side with an iron. Pressing your seams will help flatten them and create a neat finish.
- Joining Sections: Once you have sewn smaller sections, begin joining them together to form the entire block. Make sure all seams line up correctly for a cohesive look.
- Final Assembly Check: After piecing the block together, double-check to ensure everything is aligned and that your block is the correct size. Make any necessary adjustments.
- Press the Completed Block: Give your finished block a final press with the iron to smooth out any wrinkles and ensure that all seams are flat. This step is crucial for a polished appearance.
4. Adding the Finishing Touches
With your China Doll Quilt Block pieced together, it’s time to add the finishing touches that will complete your project. Follow these steps to enhance your block:
- Trimming to Size: Check the dimensions of your finished block and trim it to the desired size if necessary. Ensure all edges are even for a clean finish.
- Adding Borders: Consider adding a border around your block for added interest. This can frame your design and give it a more polished look.
- Layering for Quilting: If you plan to turn your block into a quilt or wall hanging, layer it with batting and a backing fabric. This provides depth and warmth to your finished piece.
- Quilting the Block: Choose a quilting pattern that complements your design. You can opt for simple straight-line quilting or more intricate free-motion quilting to enhance the visual appeal.
- Binding the Edges: Once you have quilted your block, add binding to the edges. Binding not only protects the edges but also gives your project a professional finish.
- Labeling Your Work: Don’t forget to label your China Doll Quilt Block! Add a small label with your name, the date, and any special notes. This personal touch adds a wonderful sentiment to your work.
FAQ
1. What is a China Doll Quilt Block?
The China Doll Quilt Block is a traditional quilt block design that resembles the dress of a doll. It’s known for its beautiful patterns and versatility in various quilting projects.
2. How long does it take to make a China Doll Quilt Block?
Depending on your experience level, making a China Doll Quilt Block can take anywhere from a few hours to a full day, especially if you include the cutting and piecing stages.
3. What materials do I need for this project?
You will need quilting cotton fabric, a rotary cutter, cutting mat, quilting ruler, thread, and optional embellishments to create your China Doll Quilt Block.
4. Is this project suitable for beginners?
Yes! The China Doll Quilt Block is a great project for beginners, as it allows you to practice basic quilting techniques while still creating a beautiful finished piece.
5. Can I use scrap fabrics for this block?
Absolutely! Using scrap fabrics is a fantastic way to create a unique China Doll Quilt Block while being resourceful and eco-friendly.
6. How can I make my block unique?
You can personalize your China Doll Quilt Block by experimenting with different fabric combinations, adding embellishments, or incorporating embroidery for a distinctive touch.
Join our VIP broadcast list and gain access to exclusive patterns, all for free. As a VIP member, you’ll receive the best patterns daily, delivered directly to your device. ✨📱 It’s a unique opportunity to stay up-to-date with the latest trends and designs, curated just for you. Don’t miss out on enhancing your projects and discovering new inspirations with the best patterns every day! 🎨🔝
Conclusion
In this China Doll Quilt Block – Tutorial, we have explored the entire process of creating this charming quilt block. From selecting materials and cutting fabric to piecing together the block and adding finishing touches, you now have all the tools needed to create your own stunning China Doll Quilt Block.
We hope this tutorial inspires you to express your creativity through quilting. Please share your thoughts, experiences, and suggestions in the comments below. Happy quilting!

