The Center Star Quilt Block by Sarah Thomas – Tutorial is a delightful project that combines traditional quilting techniques with a modern flair. This quilt block is not only beautiful but also a fantastic way to showcase your creativity and fabric choices.
Whether you are an experienced quilter or a novice, this tutorial will guide you through every step of the process, ensuring that you can create your own stunning Center Star Quilt Block.
Quilting has long been a cherished craft, allowing individuals to express their artistic vision through fabric and design. The Center Star Quilt Block is a particularly popular design, often used as a focal point in larger quilts or as a standalone piece.
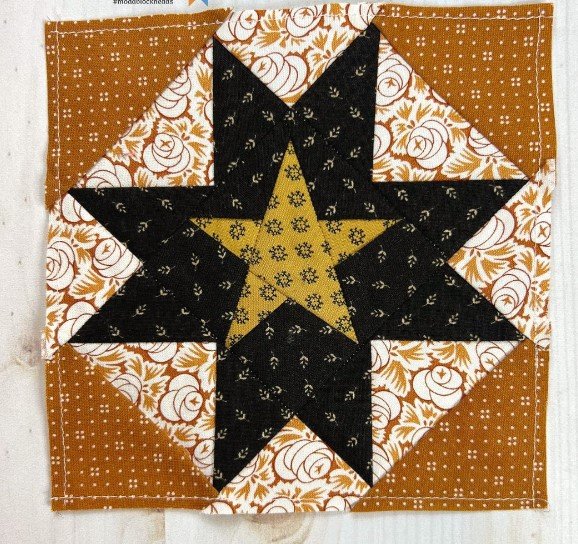
Its unique star shape draws the eye and can be customized in countless ways, making it a favorite among quilters of all skill levels. In this tutorial, you will learn about the materials needed, cutting techniques, assembly, and finishing touches for your quilt block.
As you embark on this quilting journey, remember that each stitch is an opportunity to create something beautiful. Embrace the process, enjoy the rhythm of sewing, and let your creativity shine as you follow this Center Star Quilt Block by Sarah Thomas – Tutorial. Let’s get started!
1. Materials Needed for the Center Star Quilt Block
Before diving into the sewing process, it’s essential to gather all the necessary materials for your Center Star Quilt Block by Sarah Thomas. Having everything prepared will make the entire quilting experience smoother and more enjoyable.
- Fabric Selection: Choose several coordinating fabrics for your star block. You’ll typically need a fabric for the background, contrasting colors for the star points, and a fabric for the center of the star. Select fabrics that complement each other to create a cohesive look.
- Rotary Cutter and Cutting Mat: A rotary cutter is a quilter’s best friend for making precise cuts. A self-healing cutting mat is vital to protect your work surface and ensure clean cuts.
- Quilting Ruler: A clear quilting ruler with grid markings helps you measure and cut fabric accurately. This tool is essential for ensuring your pieces are uniform in size.
- Sewing Machine: A reliable sewing machine is necessary for piecing your quilt block. Ensure it has a quarter-inch foot for accurate seam allowances, which is crucial for a successful quilt block.
- Thread: Choose high-quality cotton thread that matches your fabric choices. A neutral color works well for most projects, but feel free to select a matching thread for added detail.
- Iron and Ironing Board: An iron is essential for pressing seams as you sew. Pressing your fabric helps your pieces lay flat and gives your finished quilt block a polished appearance.
Having gathered these materials, you’re ready to embark on creating your Center Star Quilt Block!
2. Cutting Your Fabric for the Center Star Quilt Block
Once you have your materials ready, it’s time to cut your fabric for the Center Star Quilt Block by Sarah Thomas. Proper cutting is key to achieving a well-made quilt block.
- Cutting the Background Fabric: Start by cutting a square for your background fabric. A common size for the background is 10 inches square. This will serve as the foundation for your star design.
- Cutting Star Point Triangles: Next, you will need to cut triangles for the star points. From your chosen star point fabric, cut eight triangles, each measuring 4.5 inches on each side. These triangles will form the star’s points.
- Cutting the Center Piece: For the center of the star, cut a square from a contrasting fabric. A size of 4 inches is typical for this piece, adding a focal point that draws the eye.
- Creating Half-Square Triangles: Pair your star point triangles with background squares to create half-square triangles. Draw a diagonal line across each square, sew ¼-inch from the line on both sides, and then cut along the line to create two half-square triangles.
- Organizing Your Pieces: As you cut your fabric, keep your pieces organized. Use labeled containers or stack them in piles to avoid confusion during the sewing process.
- Preparing for Assembly: Before you start sewing, lay out your cut pieces on a flat surface. This allows you to visualize the final arrangement of your Center Star Quilt Block and ensure everything is in order.
With all your pieces cut and organized, you’re ready to assemble your quilt block.
3. Assembling the Center Star Quilt Block
Now it’s time for the most exciting part—assembling your Center Star Quilt Block by Sarah Thomas! This step brings your pieces together into a cohesive design.
- Sewing Half-Square Triangles Together: Begin by taking two half-square triangles (one star point and one background) and aligning them right sides together. Sew along the long edge using a ¼-inch seam allowance. Press the seams open to reduce bulk and create a flat surface.
- Creating Star Points: Continue sewing the half-square triangles into pairs. Arrange them in a way that forms the star’s points while maintaining the color scheme you’ve chosen. Double-check your layout to ensure that the star shape remains intact.
- Joining Rows: After completing your star points, it’s time to sew them into rows. Pin the star point units together, aligning seams for a clean finish. Sew each row together, pressing seams open as you progress.
- Final Assembly: Once your rows are complete, join them together to form the entire star block. Carefully align the points and seams for a polished look.
- Trimming the Block: After sewing the pieces together, trim any excess fabric. Your finished block should measure approximately 12.5 inches square, allowing for seam allowances when adding it to your quilt.
- Pressing the Finished Block: Give your completed block a final press with an iron to ensure it lies flat and has a neat appearance. This final touch is important for achieving a professional finish.
With your Center Star Quilt Block assembled, it’s time to add the finishing touches.
4. Finishing Your Center Star Quilt Block
The final step in your journey is to finish your Center Star Quilt Block by Sarah Thomas. This involves adding borders and preparing the block for use in a quilt or as a standalone piece.
- Adding Borders: If you want to add a border around your block, cut strips of fabric measuring 2.5 inches wide. Sew these strips to the edges of your block to frame your star design and add contrast.
- Preparing for Quilting: After finishing your block, you can incorporate it into a larger quilt or use it as a standalone piece. If you plan to quilt it, layer it on top of a batting and a backing fabric.
- Layering for Quilting: If you decide to quilt your block, pin or baste the layers together to prevent shifting. This step ensures that your quilting remains even and neat.
- Quilting Techniques: You can choose to either hand quilt or machine quilt your block. Select a quilting pattern that complements the star design, such as echo quilting around the star points for added dimension.
- Binding the Block: If you’re finishing it as a standalone piece, prepare binding strips by cutting fabric into 2.5-inch wide strips. Sew the strips together, fold them in half, and attach them to the edges of your block.
- Final Press and Care: After binding, give your finished block one last press. To care for your Center Star Quilt Block, wash it gently in cold water and tumble dry on low heat to preserve the fabric’s colors and integrity.
FAQ: Frequently Asked Questions About the Center Star Quilt Block
1. Is the Center Star Quilt Block suitable for beginners?
Yes, the Center Star Quilt Block by Sarah Thomas is beginner-friendly. The tutorial offers clear instructions that are easy to follow, making it accessible for quilters of all skill levels.
2. How long does it take to complete the Center Star Quilt Block?
The time required to complete the block varies based on your quilting experience, but it typically takes around 3 to 5 hours from start to finish.
3. Can I use different fabric types for this quilt block?
Absolutely! While quilting cotton is the most common choice, you can also experiment with flannels or batiks, provided the fabrics are compatible in weight and texture.
4. What is the finished size of the Center Star Quilt Block?
The finished block will measure approximately 12.5 inches square before quilting and binding.
5. How do I care for my finished quilt block?
To maintain your Center Star Quilt Block, wash it in cold water on a gentle cycle. Tumble dry on low heat to preserve the fabric’s integrity and colors.
6. Where can I find more patterns similar to the Center Star Quilt Block?
Many quilting magazines, websites, and blogs offer similar patterns. Joining online quilting communities can provide inspiration and access to a variety of designs.
Join our VIP broadcast list and gain access to exclusive patterns, all for free. As a VIP member, you’ll receive the best patterns daily, delivered directly to your device. ✨📱 It’s a unique opportunity to stay up-to-date with the latest trends and designs, curated just for you. Don’t miss out on enhancing your projects and discovering new inspirations with the best patterns every day! 🎨🔝
Conclusion
In this tutorial, we explored the Center Star Quilt Block by Sarah Thomas – Tutorial. We covered everything from gathering materials to cutting, assembling, and finishing your quilt block. With your newfound skills, you can experiment with different colors and patterns, creating a quilt that reflects your personal style.
We hope this article has inspired you to embark on your quilting journey. Please share your thoughts and suggestions in the comments below. Your feedback is valuable to our quilting community! Happy quilting!

