A Bucket hat pattern is one of the most popular and versatile sewing projects for beginners and experienced makers alike. Known for its practical design, rounded crown, and wide downward brim, the bucket hat is both fashionable and functional.
The appeal of a bucket hat pattern lies in its simplicity combined with endless customization options. You can choose fabrics according to the season, add linings for durability, or play with colors and textures to match your personal style.
Beyond fashion, the bucket hat pattern carries practical benefits. Its brim offers protection from the sun, making it perfect for outdoor activities such as gardening, beach days, or festivals.
Understanding the Basics of a Bucket Hat Pattern
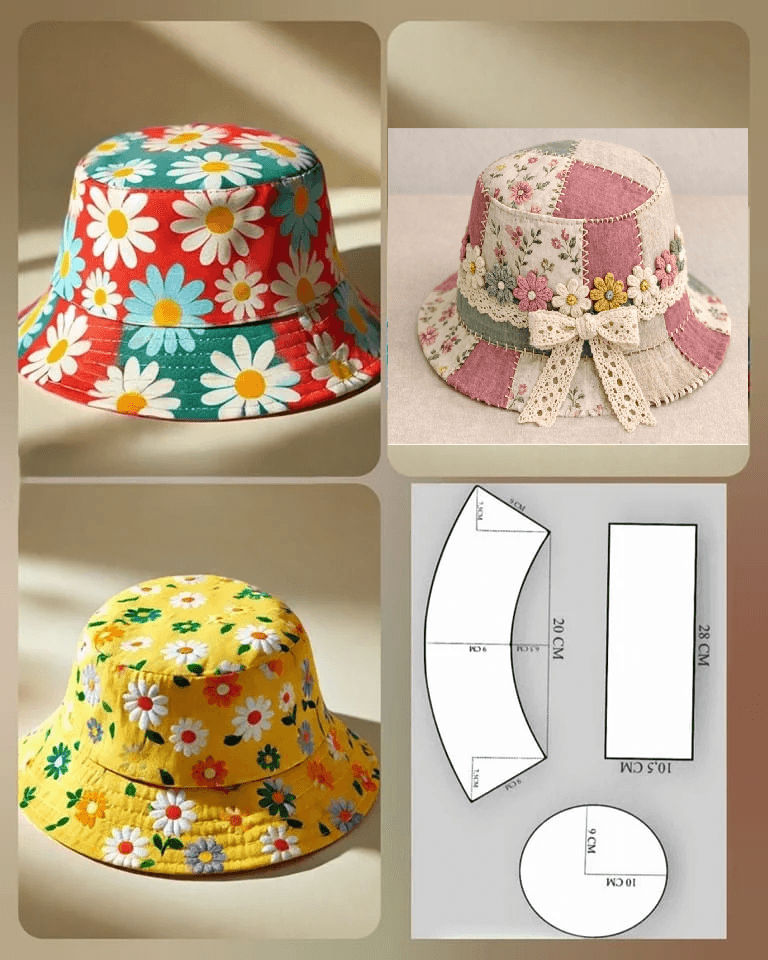
When starting with a bucket hat pattern, it’s important to first understand the basic structure. Typically, a bucket hat is made up of three main components: the crown, the side band, and the brim. Each piece plays an important role in shaping the overall look of the hat, and precise cutting ensures the final result has a professional finish.
The crown is the rounded top piece of the hat. In most bucket hat patterns, it is shaped as a circle or slightly oval. This piece must be cut carefully so that it fits perfectly with the side band. Beginners often find this part challenging, but with practice, sewing the crown becomes second nature.
The side band wraps around the head and connects the crown with the brim. It is usually cut as a rectangle or slightly tapered piece. The length of the band determines the hat’s circumference, so measuring accurately is essential to ensure the hat fits comfortably.
The brim is what gives the bucket hat pattern its signature shape. Depending on the style you want, the brim can be short and subtle or wide and dramatic. Some makers even add interfacing to stiffen the brim and help it hold its shape better.
Many sewing enthusiasts recommend using cotton, canvas, or denim when following a bucket hat pattern, as these fabrics are durable and easy to work with. For a reversible bucket hat, you can use two contrasting fabrics, which adds more versatility to your accessory.
Another key step in working with a bucket hat pattern is paying attention to seam allowances. Keeping consistent seam margins will ensure the hat pieces fit together neatly. Beginners are encouraged to pin or clip pieces together before sewing to prevent misalignment.
Finally, remember that practice makes perfect. Your first attempt at a bucket hat pattern may not be flawless, but each try will improve your sewing skills and confidence. Over time, you will find it easier to adapt the pattern and experiment with creative touches.
Choosing Fabrics and Materials for a Bucket Hat Pattern
One of the best aspects of using a bucket hat pattern is the freedom to experiment with fabrics. Your choice of materials not only affects the look of the hat but also its practicality and durability.
Cotton is one of the most popular choices for a bucket hat pattern. It’s breathable, easy to sew, and comes in a wide variety of colors and prints. This makes it a great choice for beginners. A cotton bucket hat is lightweight and comfortable, perfect for everyday wear.
Canvas and denim are sturdier options. These fabrics make the hat more structured and durable, which is ideal if you want your bucket hat to last a long time. Denim, in particular, has a casual, modern look that pairs well with many outfits.
For reversible hats, it’s best to pick two fabrics that contrast in color or pattern. This way, a single bucket hat pattern can give you two different looks depending on which side you wear. For example, one side can feature a bold floral design, while the other side is a simple solid color for versatility.
Lining fabric is another important detail. Some makers choose to line their bucket hats with lightweight cotton for comfort and durability. This is especially helpful if the outer fabric is rougher, like canvas or denim.
In addition to fabric, you’ll need thread, scissors, pins or clips, and a sewing machine. Some bucket hat patterns also recommend interfacing for the brim, which helps it maintain shape. With these materials prepared, you’ll be ready to start your project.
By carefully selecting fabrics, you ensure your bucket hat pattern not only looks stylish but also serves its practical purpose. The right material can make the difference between a hat that feels handmade and one that looks like it came from a boutique store.
Step-by-Step Guide to Sewing a Bucket Hat Pattern
Following a bucket hat pattern step by step ensures your hat turns out well-fitted and stylish. While each pattern may vary slightly, most follow the same process.
The first step is cutting out your fabric pieces. Using the provided templates or measurements, cut out the crown, side band, and brim. If you’re making a reversible hat, you’ll need to cut two of each piece, one for each fabric choice.
Next, sew the side band into a loop by joining its ends. This will form the base that fits around your head. Make sure the seam is neat, as it sets the foundation for the rest of the hat.
Once the side band is complete, attach it to the crown. Pin them together carefully to avoid puckering, and then sew around the edge. At this point, your bucket hat pattern begins to take shape.
The brim is the next step. Sew the brim pieces together into a loop, just as you did with the side band. Attach interfacing if you want extra structure. Then, pin the brim to the lower edge of the side band and sew it in place.
If you’re making a reversible bucket hat, repeat the same steps with your second set of fabric pieces. Once both hats are complete, place them right sides together, sew around the edges, and leave a small opening to turn the hat inside out.
Finally, topstitch around the brim to close the opening and give the hat a polished finish. At this stage, your bucket hat pattern is complete, and you’ll have a stylish, functional accessory to wear or gift.
Styling and Customizing Your Bucket Hat Pattern
A great advantage of sewing your own bucket hat pattern is the ability to personalize it. From fabric choices to decorative details, you can make your bucket hat truly unique.
One of the simplest ways to customize your bucket hat is by playing with fabric prints. Bright, bold patterns can make a statement piece, while neutral tones create a versatile everyday hat. You can even mix and match fabrics for a patchwork effect.
Embroidery is another fun option. Adding small embroidered designs such as flowers, initials, or symbols can transform your bucket hat pattern into a one-of-a-kind accessory. This is a great way to showcase your creativity and add sentimental value.
You can also experiment with brim sizes. A shorter brim gives a sporty, casual vibe, while a wider brim adds elegance and extra sun protection. By adjusting the brim in your bucket hat pattern, you can create multiple hats with different aesthetics.
Decorative stitching is another option to elevate your design. Topstitching in a contrasting color not only reinforces the seams but also adds visual interest. This small detail can make your bucket hat look professionally made.
FAQ About Bucket Hat Pattern
What is a bucket hat pattern?
A bucket hat pattern is a sewing template that guides you in creating a bucket hat. It includes the crown, side band, and brim, along with measurements or templates.
Is a bucket hat pattern beginner-friendly?
Yes, a bucket hat pattern is suitable for beginners. With basic sewing skills and patience, you can create a professional-looking hat.
What fabric is best for a bucket hat pattern?
Cotton, canvas, and denim are the most recommended fabrics. They are durable, easy to work with, and provide structure to the hat.
Conclusion
Creating your own bucket hat pattern is both enjoyable and rewarding. With just a few materials and some sewing practice, you can design an accessory that is stylish, functional, and uniquely yours. From understanding the structure to choosing fabrics and customizing details, this project offers endless creative possibilities.
VIDEO TUTORIAL
If you found this guide helpful, I’d love to hear your thoughts. Please leave your honest opinion and suggestions so we can continue sharing more sewing ideas and inspiration.

