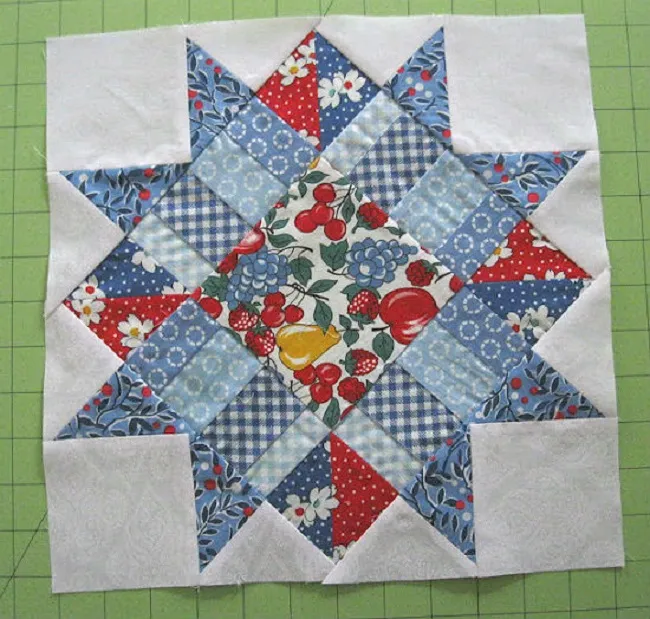
The Boston Star block is a stunning and traditional quilt block that adds a touch of elegance to any quilt project. Whether you’re a seasoned quilter or just beginning your quilting journey, this block is a fantastic way to explore intricate designs while creating a masterpiece.
In this tutorial, we’ll walk you through the steps of making the Boston Star block, providing clear instructions and helpful tips along the way.
This Boston Star block tutorial is designed for quilters of all skill levels. From choosing fabrics to piecing the block together, you’ll learn everything needed to complete this project with confidence.
Not only will you have a beautiful quilt block at the end, but you’ll also gain new techniques to enhance your quilting abilities.
By following this step-by-step Boston Star block tutorial, you’ll be able to create a classic block that can be used in a variety of quilt patterns, or even stand alone as a statement piece. Now, let’s dive into the process and learn how to make this timeless block!
1. Choosing the Right Fabrics for Your Boston Star Block
When making the Boston Star block, selecting the right fabrics is crucial to achieving the desired effect. Here’s how to pick the best fabrics for your project.
First, consider using contrasting colors for your fabrics. This will allow the star pattern to stand out, creating a bold visual effect. For instance, you could use a light background fabric with darker, vibrant colors for the star itself. This contrast makes the star pop and adds dimension to the quilt.
Secondly, pay attention to fabric patterns. Solids or subtle patterns work best for the Boston Star block because they highlight the intricate design of the star. Large, busy patterns can detract from the beauty of the star’s shape, making the block look cluttered.
Third, think about the fabric quality. High-quality cotton fabrics are ideal for quilting because they are durable, easy to work with, and provide a clean finish. Cotton fabrics also hold their shape well, which is essential for maintaining the crisp lines of the Boston Star block.
Fourth, ensure that the fabrics you choose are pre-washed. Pre-washing removes any shrinkage that could occur after piecing the block, ensuring that your quilt maintains its shape and size over time.
Fifth, consider using a cohesive color palette throughout your quilt. Even though the Boston Star block is a focal point, ensuring that the colors of the entire quilt work well together will result in a more polished and professional look.
Finally, gather all the fabrics you plan to use before starting. Having your materials ready will make the process smoother and allow you to visualize how the final Boston Star block will look.
2. Cutting the Pieces for the Boston Star Block
Once you’ve chosen your fabrics, it’s time to cut the pieces for your Boston Star block. Here’s a step-by-step guide to ensure precision in your cutting process.
First, always use a rotary cutter and a cutting mat for accurate and clean cuts. The Boston Star block requires precise measurements, so it’s important to use the right tools to avoid mistakes.
Secondly, follow a cutting template for the star pieces. The star consists of diamonds, squares, and triangles. Each piece needs to be cut carefully to ensure that the seams align perfectly when assembling the block.
Third, cut your fabric pieces slightly larger than needed if you’re unsure of your cutting skills. You can always trim down the pieces later, but it’s difficult to add fabric once it’s cut too small.
Fourth, use a ruler to ensure that your lines are straight. This will help keep your block aligned properly when you sew the pieces together.
Fifth, organize your pieces by size and shape before starting to sew. Laying them out in the order you’ll use them can save time and reduce confusion.
Lastly, check each piece after cutting to ensure it matches the template. Even a small error in cutting can affect the final look of the Boston Star block, so take your time during this step.
3. Assembling the Boston Star Block
Now that you have all your pieces cut, it’s time to assemble the Boston Star block. Follow these steps for a seamless assembly.
First, lay out your pieces on a flat surface, arranging them in the star shape. This helps you visualize the final block and ensures that all pieces are in the correct position before sewing.
Secondly, begin sewing the star’s diamond shapes together. Use a ¼-inch seam allowance for all seams, as this is the standard for quilting. Sewing the diamonds first creates the central star that is the focal point of the block.
Third, press your seams open as you sew. Pressing helps the block lay flat and makes it easier to sew the next pieces accurately.
Fourth, once the star is assembled, add the background triangles and squares around the edges to complete the block. This framing gives the Boston Star block its distinct look.
Fifth, take your time aligning the seams as you add each new piece. Misaligned seams can make the block look uneven and detract from the precision of the design.
Finally, once the block is fully assembled, give it a final press. This will help the block retain its shape and ensure that all seams lie flat.
4. Tips for Perfecting the Boston Star Block
To ensure your Boston Star block looks its best, here are a few tips for perfecting your work.
First, always use a sharp needle when sewing your pieces together. A dull needle can pull or stretch the fabric, leading to uneven seams and a less polished look.
Second, check your seam allowances regularly. Even small variations in seam allowance can throw off the entire block, making it difficult to align pieces correctly.
Third, use a design wall to view your block from a distance. This helps you spot any alignment issues early and allows you to adjust before completing the block.
Fourth, starch your fabric before cutting. Starching helps stabilize the fabric, making it easier to handle and ensuring cleaner cuts and straighter seams.
Fifth, practice makes perfect! The Boston Star block can be challenging, especially for beginners, but with patience and practice, you’ll see improvement with each block you make.
Lastly, don’t rush the process. Take your time to ensure each step is done accurately, and you’ll end up with a beautifully precise Boston Star block that you’ll be proud of.
FAQ about the Boston Star Block
Q: What size should the Boston Star block be?
A: The size of the Boston Star block can vary depending on the project, but a common size is 12×12 inches. Adjust the measurements of your pieces accordingly if you want a larger or smaller block.
Q: Can I use patterned fabric for the Boston Star block?
A: Yes, you can, but it’s recommended to use subtle patterns or solids to avoid distracting from the intricate star design.
Q: How do I ensure my seams align properly?
A: Use pins to hold the pieces in place before sewing, and press seams open to help align them accurately.
Q: Can beginners make the Boston Star block?
A: While the Boston Star block can be challenging, it is possible for beginners to make it with patience and careful attention to detail.
Q: What type of fabric works best for the Boston Star block?
A: High-quality cotton fabric is ideal, as it’s easy to work with and holds its shape well.
Q: Is it necessary to starch my fabric?
A: Starching isn’t mandatory, but it can make the cutting and sewing process easier by stabilizing the fabric.
Join our VIP broadcast list and gain access to exclusive patterns, all for free. As a VIP member, you’ll receive the best patterns daily, delivered directly to your device. ✨📱 It’s a unique opportunity to stay up-to-date with the latest trends and designs, curated just for you. Don’t miss out on enhancing your projects and discovering new inspirations with the best patterns every day! 🎨🔝
Conclusion
In this Boston Star block tutorial, we walked through the entire process of selecting fabrics, cutting pieces, assembling the block, and perfecting the final product. Whether you’re a beginner or an experienced quilter, this block is a wonderful addition to any quilt project. The classic design of the Boston Star block makes it a timeless favorite in the quilting community.
Now that you’ve completed this tutorial, we’d love to hear your thoughts! Let us know your experience and any tips you have for other quilters looking to create their own Boston Star block. Feel free to leave a comment with your feedback and suggestions!

