If you’re looking for a practical and creative way to keep your school supplies, sewing tools, or daily essentials neatly organized, a Binder Pouch Pattern is exactly what you need. This project combines convenience with customization, allowing you to create a personal and functional pouch that fits perfectly into a standard binder.
Many people underestimate how valuable a well-made binder pouch can be. It’s not just a pocket—it’s a storage solution that can hold pens, flash drives, scissors, craft supplies, or even makeup. With the right Binder Pouch Pattern, you can tailor it to suit your needs, style, and personality.
Whether you’re an experienced sewer or a complete beginner, this pattern is fun, fast, and incredibly useful. In this article, we’ll explore how to choose the best materials, how to sew your own binder pouch, tips for customizing it, and much more—all using a reliable Binder Pouch Pattern.
Choosing the Right Materials for Your Binder Pouch Pattern
Selecting the correct materials is the first step to creating a durable and attractive binder pouch. You don’t need fancy equipment, but a few key items can make all the difference in the final result.
Start with fabric. A Binder Pouch Pattern usually works well with cotton or canvas, as they are strong enough to hold your supplies. Quilting cotton is a popular choice for beginners because it’s easy to sew and comes in endless prints.
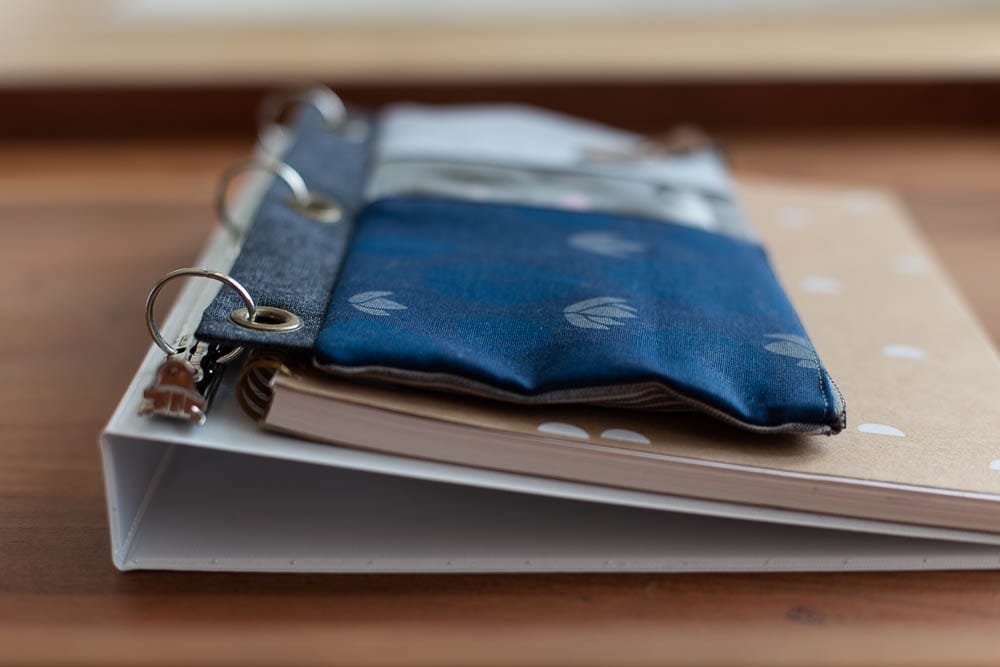
Don’t forget the zipper. A 9″ to 12″ zipper is typically used for this type of pouch. Make sure it matches or contrasts nicely with your fabric to add a unique touch.
You’ll also need clear vinyl or mesh if you want a see-through front panel. This adds functionality by letting you see what’s inside without opening the pouch.
Interfacing is another essential. It gives structure to your pouch and ensures it doesn’t flop around inside your binder. Choose a medium-weight fusible interfacing for the best results.
For the binder attachment, metal grommets or reinforced fabric loops can be added to allow the pouch to fit into a 3-ring binder. Your Binder Pouch Pattern should include placement guides for these.
Finally, consider thread quality. A strong polyester thread will give your stitches the durability they need for daily use, especially if your pouch will carry heavier items like chargers or scissors.
Step-by-Step Guide to Sewing a Binder Pouch
Once you’ve gathered your materials, it’s time to bring your Binder Pouch Pattern to life. This section will guide you through the basic steps so you can create your pouch confidently.
Begin by cutting your fabric pieces based on the Binder Pouch Pattern. Typically, you’ll need two rectangles of fabric, one for the front and one for the back, plus a lining and any interfacing.
Fuse the interfacing to the wrong side of both fabric pieces. This adds the necessary stiffness and helps maintain shape after washing or heavy use.
If you’re adding a clear window, sew it onto the front panel now. Use a zipper foot if necessary to keep your stitches straight and clean around the edges of the vinyl or mesh.
Next, install the zipper. Align it with the top edge of your pouch, right sides together with your main fabric. Stitch carefully to ensure smooth zipper function later.
After attaching the zipper to both panels, open it halfway (don’t forget this step!) and sew around the pouch’s edges, right sides facing each other. Then turn the pouch right-side-out through the zipper.
Add your grommets or sewn loops for binder rings. Follow the measurements in your Binder Pouch Pattern to ensure it fits perfectly into your binder.
Give your pouch a final press, trim any loose threads, and admire your work! You now have a custom-made binder pouch that’s stylish and useful.
Customizing Your Binder Pouch Pattern
One of the best parts of using a Binder Pouch Pattern is how easy it is to personalize. From colors and prints to pockets and embellishments, the possibilities are endless.
Try using different fabrics for the front and back. Mix solids with florals or stripes with polka dots for a fun contrast. This simple change makes your pouch more eye-catching.
You can also add interior pockets or dividers. These are especially useful if you plan to store small items like memory cards, sewing needles, or jewelry.
Embroidery is another popular option. Add your initials, a small design, or even a motivational quote to the front of your binder pouch to give it a personal touch.
Don’t be afraid to experiment with closures. While zippers are most common, you can try magnetic snaps, Velcro, or even a button flap, depending on your skill level.
Another fun idea is to make a themed pouch. For example, a Halloween fabric with pumpkin charms on the zipper makes a great seasonal project.
Finally, consider resizing the Binder Pouch Pattern. You can make a mini version for earbuds or a jumbo version for sketchbooks and tools. As long as you keep the binder-ring measurements correct, you’re free to play with the shape and size.
Practical Uses for Your Binder Pouch
While originally designed for binders, a Binder Pouch Pattern can be adapted for countless purposes. This makes it one of the most versatile sewing projects out there.
Students love them for keeping calculators, pens, sticky notes, and ID cards in one place. A pouch made from your school colors adds school spirit and organization to your backpack.
Crafters find them perfect for storing crochet hooks, small scissors, and spools of thread. You can even create different pouches for each type of craft you enjoy.
Parents use binder pouches as emergency car kits. With a small pouch in the glove box, you can store band-aids, wipes, snacks, and other essentials for quick access.
Travelers enjoy binder pouches for storing passports, itineraries, and travel documents. It slips easily into a binder or bag and keeps everything safe and in one spot.
Teachers use them to organize classroom materials, flashcards, or dry erase markers. When labeled properly, it helps manage classroom clutter with style.
You can even use a modified Binder Pouch Pattern to create a DIY wallet or clutch bag. With a few adjustments and some creativity, the same pattern can evolve into a full range of useful items.
FAQ — Frequently Asked Questions About Binder Pouch Patterns
What is a binder pouch?
A binder pouch is a fabric or vinyl pouch designed to fit inside a ring binder. It holds school supplies, craft tools, or personal items and usually includes a zipper closure.
Can I make a binder pouch without a sewing machine?
Yes, but it will be more time-consuming. Hand stitching is possible, especially if using felt or thick cotton, but a sewing machine ensures cleaner, stronger seams.
Where can I find a good Binder Pouch Pattern?
Many are available in books, sewing blogs, or DIY communities. You can also draft your own based on binder measurements and desired pouch size.
What type of fabric works best for a binder pouch?
Cotton, canvas, and even denim are great options. Choose something sturdy enough to hold weight and maintain shape, especially for daily use.
Is a binder pouch washable?
Yes, if you use machine-washable fabric and interfacing. Always check care labels and consider spot-cleaning if using vinyl or mesh parts.
Can kids make a binder pouch with this pattern?
Absolutely! With supervision, older kids can sew a binder pouch as a fun and educational project. It’s a great introduction to sewing and crafting.
Conclusion
Creating a Binder Pouch Pattern opens the door to countless creative and practical opportunities. From school organization to crafting storage and travel essentials, this versatile pattern offers value for all ages and interests. We explored how to choose materials, sew your pouch, personalize it, and find new uses for it beyond the binder.
If you followed along, you now have the knowledge and confidence to create your own custom binder pouch from scratch. Try experimenting with styles, and don’t be afraid to get creative.
We’d love to hear your thoughts! Share your honest opinion about this article and let us know if you have any tips or questions about working with a Binder Pouch Pattern. Your feedback helps us grow and create even better content for makers like you.

