Welcome to this comprehensive guide on Betty’s Delight Block Quilt – Tutorial! If you’re looking to elevate your quilting skills, this tutorial is perfect for you.
Betty’s Delight is not just any quilt; it’s a beautiful block pattern that combines vibrant colors and intricate designs to create a stunning quilt that will be the centerpiece of any room.
Whether you’re a beginner or an experienced quilter, this project will inspire you to explore your creativity and improve your techniques.
In this Betty’s Delight Block Quilt – Tutorial, we will cover everything from selecting the right materials to completing the final quilt. You’ll learn about the history of the block, the steps to create each piece, and some tips for putting it all together.
Quilting is a rewarding hobby that allows you to express your personality and make cherished gifts for loved ones. So grab your fabric and let’s dive into the wonderful world of quilting!
Throughout this tutorial, we will focus on essential techniques and tips that will make your quilting experience smooth and enjoyable.
By the end, you will have a completed Betty’s Delight Block Quilt that you can proudly showcase in your home or gift to someone special. Let’s get started on this delightful journey!
1. Materials Needed for Betty’s Delight Block Quilt
Before diving into the sewing process, it’s crucial to gather all the necessary materials for the Betty’s Delight Block Quilt – Tutorial. Having everything ready will streamline your workflow and make the process more enjoyable. Here’s a list of materials you’ll need:
- Fabric: Choose a variety of cotton fabrics in different colors and patterns. The traditional approach is to use a mix of light, medium, and dark fabrics to create depth in your quilt. Aim for at least six different fabrics to keep the design dynamic and interesting.
- Rotary Cutter and Mat: A rotary cutter allows for precise cutting of your fabric, while a self-healing mat protects your surfaces and helps you achieve clean cuts.
- Ruler: A quilting ruler is essential for measuring and cutting your fabric accurately. Look for a ruler with both metric and imperial measurements to suit your preference.
- Sewing Machine: While you can sew by hand, a sewing machine will save you time and ensure more consistent stitches. Make sure it’s equipped with a quarter-inch foot for precise seams.
- Thread: Use high-quality cotton thread that matches or complements your fabric. This will ensure durability and enhance the overall look of your quilt.
- Iron and Ironing Board: Pressing your fabric before cutting and after sewing is crucial for achieving crisp seams and a polished finish.
By gathering these materials before you begin, you will set yourself up for success as you create your Betty’s Delight Block Quilt.
2. Understanding the Betty’s Delight Block Design
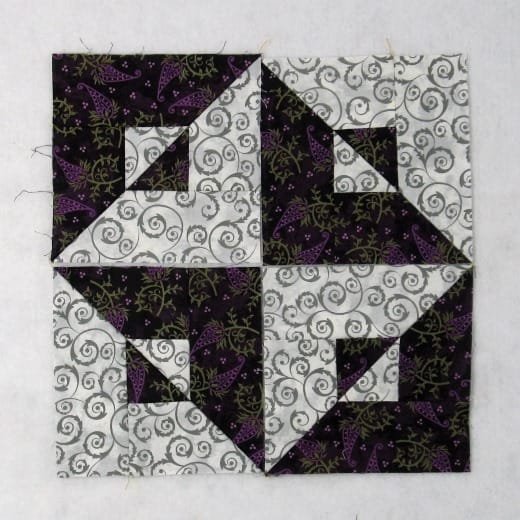
The design of Betty’s Delight Block Quilt features a combination of simple shapes that create an eye-catching and intricate pattern. Understanding the block design is essential for assembling the quilt correctly. Here’s a breakdown of the block design:
- Block Composition: The basic unit of the Betty’s Delight Block consists of squares and triangles. By rotating and combining these shapes, you create a delightful visual effect that draws the eye.
- Color Placement: The placement of colors is critical in this design. By strategically placing lighter and darker fabrics, you can create contrast that highlights the pinwheel effect of the blocks.
- Sizing: Each block can be made in various sizes, depending on your preference for the final quilt size. For this tutorial, we will use 12-inch blocks, which are a popular choice for quilts.
- Assembly: Once you understand the block composition, you can start piecing the individual shapes together. Make sure to align your seams carefully to maintain the overall design integrity.
- Variations: The Betty’s Delight Block can be modified in numerous ways. Consider experimenting with different color schemes, fabric types, or even adding borders to each block for a unique touch.
- Layout: Planning your layout before sewing the blocks together is essential. You can arrange the blocks in a way that creates a pleasing pattern or alternates colors for a more dynamic look.
With a solid understanding of the design, you can approach the next steps with confidence and creativity.
3. Step-by-Step Instructions to Create the Blocks
Now that you have your materials ready and understand the design, it’s time to get into the nitty-gritty of the Betty’s Delight Block Quilt – Tutorial. Here’s how to create the blocks step by step:
- Cut Your Fabric: Start by cutting your fabric into the necessary shapes. For a 12-inch block, you’ll need squares and triangles, typically 4.5-inch squares and 5-inch triangles. Use your rotary cutter and ruler for precise cuts.
- Sew the Squares: Begin by sewing the squares together to create half-square triangles. To do this, place two squares right sides together, sew around the edges, and then cut them apart to form two triangles.
- Assemble the Triangles: Once you have your half-square triangles, arrange them according to your design. Pin them in place and sew them together, ensuring your seams are aligned correctly.
- Join the Block Pieces: After sewing your triangles, join them with the remaining squares to complete the block. Press the seams open to reduce bulk and make the block lay flat.
- Repeat: Continue this process until you have enough blocks to assemble your quilt. A standard lap quilt typically requires around 20 blocks, but this can vary based on your desired quilt size.
- Trim and Square Up: Once all your blocks are complete, use your ruler to trim them to ensure they are all the same size. This is crucial for easy assembly later on.
With these steps, you’ll have beautiful Betty’s Delight Blocks ready for assembly!
4. Putting Together Your Betty’s Delight Quilt
Now that you have your blocks ready, it’s time to assemble them into a quilt. This final stage of the Betty’s Delight Block Quilt – Tutorial is where your vision truly comes to life:
- Lay Out Your Blocks: Arrange your blocks on a large flat surface. Take your time to experiment with different layouts until you find one that you love. Remember to consider color balance and flow.
- Sew the Rows: Once you’re satisfied with the layout, start sewing the blocks into rows. Use a quarter-inch seam allowance to maintain consistency. Iron the seams as you go to keep everything flat and neat.
- Join the Rows: After completing the rows, sew them together to create the full quilt top. Ensure that the seams line up as you work to maintain the design’s integrity.
- Add Borders: If you want to add a border to your quilt, cut strips of fabric and sew them around the edges. Borders can frame your quilt and add an extra touch of style.
- Layer the Quilt: Once the quilt top is complete, it’s time to layer it with batting and backing fabric. Smooth out any wrinkles to ensure a nice finish.
- Quilt It: You can quilt by hand or use a sewing machine, depending on your preference. This step adds texture and secures all the layers together. After quilting, trim any excess batting and backing.
Congratulations! You’ve successfully assembled your Betty’s Delight Block Quilt.
FAQ
Q1: What skill level is required for the Betty’s Delight Block Quilt?
A: This quilt is suitable for intermediate quilters who are comfortable with basic piecing techniques. Beginners can also attempt it with some patience and practice.
Q2: How many blocks do I need for a standard quilt?
A: A standard lap quilt typically requires around 20 blocks, but this can vary based on your desired quilt size.
Q3: Can I use different fabrics for this quilt?
A: Absolutely! The Betty’s Delight Block Quilt can be made with any fabric you like. Experimenting with different colors and patterns can yield unique and stunning results.
Q4: What type of batting is best for quilts?
A: Cotton batting is a popular choice for quilts due to its breathability and softness. Polyester batting offers a bit more loft and is also a good option.
Q5: How do I care for my finished quilt?
A: To care for your quilt, wash it gently on a cold cycle and tumble dry on low heat. Avoid using bleach to preserve the colors and fabric integrity.
Q6: Can I make this quilt larger or smaller?
A: Yes! You can adjust the number of blocks or the size of each block to create a larger or smaller quilt, depending on your needs.
Join our VIP broadcast list and gain access to exclusive patterns, all for free. As a VIP member, you’ll receive the best patterns daily, delivered directly to your device. ✨📱 It’s a unique opportunity to stay up-to-date with the latest trends and designs, curated just for you. Don’t miss out on enhancing your projects and discovering new inspirations with the best patterns every day! 🎨🔝
Conclusion
In this Betty’s Delight Block Quilt – Tutorial, you have learned everything you need to create a stunning quilt that showcases your creativity and skills. From gathering materials and understanding the block design to sewing and assembling the quilt, each step is crucial in achieving a beautiful final product.
We hope this tutorial inspires you to take on your own Betty’s Delight Block Quilt project. Your journey into quilting can be both fulfilling and enjoyable. We’d love to hear your thoughts, experiences, and any suggestions you have for future tutorials. Please share your feedback in the comments below, and happy quilting!

