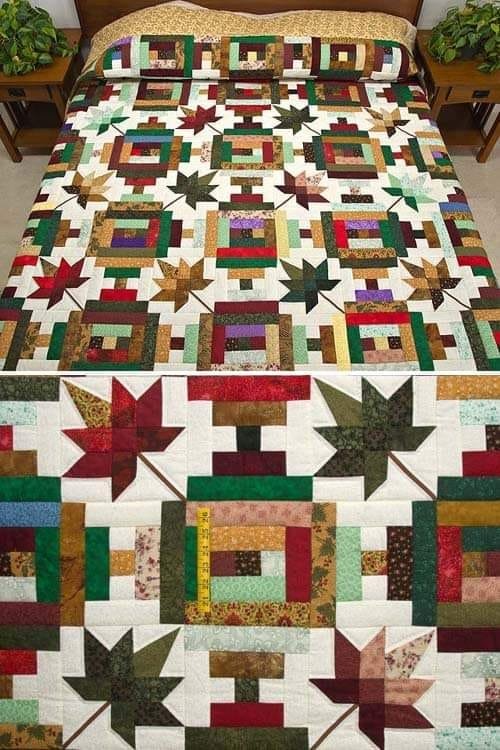
If you’re looking for a cozy, seasonal project to embrace the beauty of fall, the Autumn at the Courthouse Quilt – Tutorial is the perfect choice.
This stunning quilt combines rich autumn colors and a courthouse steps block design to create a masterpiece that’s not only functional but also aesthetically beautiful.
Whether you’re an experienced quilter or just starting, this tutorial will guide you step by step through the process of making your very own Autumn at the Courthouse Quilt.
The Autumn at the Courthouse Quilt – Tutorial highlights the importance of careful fabric selection, precision in cutting, and attention to detail in piecing the quilt together.
Each step in this process brings you closer to crafting a quilt that embodies the warmth and colors of fall. By following this guide, you’ll be able to complete a quilt that captures the spirit of autumn and showcases your craftsmanship.
In this article, we will break down the entire quilting process, from choosing fabrics to assembling the quilt top and finishing it off.
With clear instructions and a focus on optimizing for both beauty and function, this Autumn at the Courthouse Quilt – Tutorial ensures that your project will be a success.
1. Choosing the Perfect Fabrics for Your Autumn Quilt
One of the most exciting parts of any quilting project is selecting the fabrics, and in the Autumn at the Courthouse Quilt – Tutorial, fabric choice plays a huge role in capturing the essence of fall. You’ll want to focus on rich, warm tones that reflect the season.
First, consider choosing fabrics in shades of orange, brown, gold, red, and deep greens. These colors represent the turning leaves, harvest season, and the cozy atmosphere of autumn. You can mix solids with autumn-themed prints like leaves, acorns, or plaid patterns.
Second, texture is an important consideration. Quilting cotton is a popular fabric choice, but you can also incorporate fabrics like flannel or wool blends to add warmth and depth to your Autumn at the Courthouse Quilt. These heavier fabrics will give your quilt a cozier feel, perfect for fall evenings.
Third, think about the contrast between your fabric choices. A successful courthouse steps quilt design relies on alternating light and dark fabrics, so ensure that your chosen fabrics provide a good balance. Too much of one tone can make the design look flat, while contrasting shades will make each step pop.
Next, plan out how much fabric you need. A standard lap-size quilt will require at least five different fabrics, each about one yard in length. The variety of colors will allow you to create a visually interesting quilt that still feels cohesive and thematic.
Finally, don’t forget about the backing fabric. While it’s tempting to focus solely on the quilt top, the backing is just as important. Choose a fabric that complements the front but also adds an extra touch of autumn. Plaid or floral patterns in warm colors can be great options.
2. Cutting and Preparing Your Fabric Pieces
Now that you’ve selected your fabrics, it’s time to cut them into the pieces you’ll need for the Autumn at the Courthouse Quilt – Tutorial. Accuracy is key here, as precise cuts will make the piecing process much easier and ensure that your quilt looks polished.
First, start by cutting your fabric into strips. The courthouse steps design is built from strips of fabric arranged in a square pattern, with each “step” alternating between light and dark colors. You’ll need to cut your fabrics into strips that are 2.5 inches wide for a traditional courthouse steps block.
Second, label your strips according to the pattern. Since you’re alternating between light and dark fabrics, it’s helpful to label each strip with its intended position in the block. This will keep you organized and make the assembly process faster.
Third, square up your fabric. After cutting the strips, it’s important to ensure that all the pieces are perfectly straight. Use a quilting ruler and rotary cutter to trim any uneven edges. Squaring up your fabric will help the quilt lay flat and prevent any distortion as you sew.
Next, consider cutting multiple strips at once. If you’re making a larger quilt, you can speed up the process by layering several pieces of fabric and cutting them together. Just be sure that the fabrics stay aligned to avoid uneven cuts.
Fifth, press your fabric strips before sewing. Pressing the strips with an iron will remove any creases or wrinkles, making the sewing process smoother. This step is especially important for heavier fabrics like flannel, which can hold onto folds more than lighter fabrics.
Lastly, organize your cut pieces into piles based on the block pattern. Separate your light and dark strips and stack them in the order they’ll be sewn. This will make the piecing process much more efficient.
3. Piecing the Courthouse Steps Quilt Blocks
Once your fabric strips are cut and organized, you can start piecing the blocks together. The Autumn at the Courthouse Quilt – Tutorial uses a courthouse steps block, which is a variation of the log cabin design. This block builds out from the center, alternating between light and dark strips.
First, start with the center square. This will be the focal point of your block. Choose a fabric that stands out, like a deep red or orange, and cut it into a small square (around 2.5 inches). This piece will anchor your block.
Second, sew the first two strips to opposite sides of the center square. Begin with a light strip on one side and a dark strip on the other. Use a quarter-inch seam allowance for all seams, and press the seams toward the darker fabric after each addition.
Third, continue adding strips to the block, alternating between light and dark fabrics. Sew strips to all four sides of the square, creating a spiral effect. The block should grow outward with each new “step,” maintaining the alternating color pattern.
Next, check the alignment as you go. It’s important to ensure that each strip is sewn straight and that the corners of the block are square. If you notice any misalignment, fix it early before adding more strips.
Fifth, press each block once it’s completed. Pressing the blocks will help them lay flat and make assembly easier later on. Use steam to set the seams and give the blocks a crisp finish.
Finally, trim the blocks to ensure they are uniform in size. Even with careful cutting and sewing, blocks can sometimes shift slightly during the piecing process. Use a quilting ruler to square up each block, making sure they’re all the same size before assembly.
4. Assembling the Quilt and Finishing Touches
After you’ve pieced all your courthouse steps blocks, it’s time to assemble the quilt top and add the finishing touches. The Autumn at the Courthouse Quilt – Tutorial emphasizes the importance of careful assembly to ensure a polished final product.
First, lay out your blocks. Arrange the blocks on a large, flat surface to plan the layout of your quilt. You can alternate the direction of the blocks for a more dynamic design or keep them all facing the same way for a more uniform look.
Second, sew the blocks together in rows. Begin by sewing the blocks into rows, using a quarter-inch seam allowance. Pin the blocks together to keep them aligned as you sew, and press the seams open after each row.
Third, sew the rows together to complete the quilt top. Once the rows are finished, sew them together to form the full quilt top. Make sure the seams between the rows are aligned to avoid any shifting or uneven edges.
Next, add borders if desired. Borders can frame the quilt and add extra size. For the Autumn at the Courthouse Quilt, consider using a fabric that complements the autumn theme, such as a deep brown or a plaid pattern.
Fifth, create a quilt sandwich. This involves layering the quilt top, batting, and backing fabric together. Baste the layers with safety pins or quilting spray to hold them in place for quilting.
Finally, quilt and bind the edges. Quilt the layers together using either straight-line quilting or free-motion quilting. Then, finish the quilt by adding binding around the edges for a clean, professional look.
FAQ
Q: What size should the finished Autumn at the Courthouse Quilt be?
A: The size of the quilt depends on the number of blocks you create and the size of each block. A standard lap-size quilt is about 50” x 60”, but you can adjust the size based on your preference.
Q: Is this tutorial suitable for beginners?
A: Yes, the Autumn at the Courthouse Quilt – Tutorial is beginner-friendly, especially since the courthouse steps block is a simple design. The step-by-step instructions make it easy to follow along.
Q: What type of fabric is best for this quilt?
A: Quilting cotton is the most common fabric used for this type of project, but you can also use flannel or wool blends for a cozier feel. Choose fabrics that reflect autumn colors and patterns.
Q: How long does it take to complete the quilt?
A: The time it takes to complete the quilt depends on your skill level and how much time you dedicate to the project. On average, it can take around 20-30 hours to complete a lap-size quilt from start to finish.
Q: Can I machine quilt this project?
A: Yes! Machine quilting is a popular option for this project. You can use straight-line quilting or free-motion quilting, depending on your preference.
Q: Do I need special tools to make the Autumn at the Courthouse Quilt?
A: You’ll need basic quilting tools such as a rotary cutter, quilting ruler, and a sewing machine. A walking foot can also be helpful when quilting the layers together.
Join our VIP broadcast list and gain access to exclusive patterns, all for free. As a VIP member, you’ll receive the best patterns daily, delivered directly to your device. ✨📱 It’s a unique opportunity to stay up-to-date with the latest trends and designs, curated just for you. Don’t miss out on enhancing your projects and discovering new inspirations with the best patterns every day! 🎨🔝
Conclusion
The Autumn at the Courthouse Quilt – Tutorial offers a wonderful opportunity to create a cozy, seasonal quilt that embodies the beauty of fall. From selecting the perfect fabrics to piecing together the courthouse steps blocks and finishing the quilt, this guide walks you through every step of the process.
We hope you found this tutorial helpful! If you have any thoughts, suggestions, or questions, feel free to leave them in the comments below. We’d love to hear about your experiences and any ideas for future quilting projects!

