Creating the Ann’s Star Quilt Block is an exciting journey for both beginner and advanced quilters. This traditional quilt block design combines classic shapes and patterns with a timeless appeal, making it a versatile option for a variety of quilt projects.
In this Ann’s Star Quilt Block – Tutorial, we will guide you through each step of the process, ensuring you have everything you need to confidently sew your own quilt block.
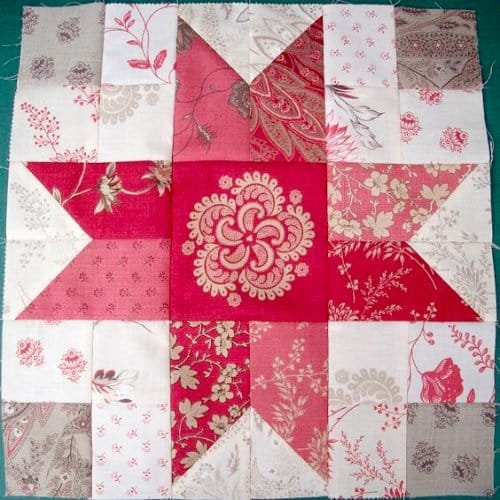
The Ann’s Star Quilt Block is characterized by its intricate geometric pattern, which resembles a radiant star. It’s a favorite among quilters because it provides a beautiful and eye-catching design, while still being relatively simple to construct.
With just a few cuts, some precise sewing, and careful assembly, you’ll be able to create a stunning block that can be used in a full quilt or as a standout feature in a mixed-block design.
Before we dive into the tutorial, make sure you have all the necessary materials on hand. You’ll need fabric in a range of contrasting colors, a rotary cutter, ruler, cutting mat, and sewing machine. With these tools and your creative spirit, you’re ready to get started!
1. Gathering Your Materials for Ann’s Star Quilt Block
The first step in any quilting project is gathering the right materials. For this Ann’s Star Quilt Block – Tutorial, having high-quality supplies will make the process smoother and ensure the final product looks as professional as possible.
- Fabric Selection: The Ann’s Star Quilt Block looks best when you use contrasting fabrics. Choose a light and dark color combination for a bold star design. You can use solids, small prints, or even mix and match different fabric patterns for added visual interest.
- Cutting Tools: A sharp rotary cutter is essential for clean, precise cuts. Use an acrylic ruler and a cutting mat to ensure your fabric pieces are straight and accurately sized.
- Sewing Machine: While you can hand-stitch quilt blocks, using a sewing machine will speed up the process and ensure even seams. Make sure your sewing machine is set up with matching thread.
- Quilting Pins: Quilting pins will help hold your pieces together as you sew. They are especially important when aligning the points of your star block.
- Iron: Pressing your seams is key to getting a clean, professional look. Be sure to have your iron on hand to press as you sew.
With these materials gathered, you are ready to begin creating your Ann’s Star Quilt Block.
2. Cutting and Preparing Your Fabric
Cutting your fabric is one of the most important steps in this Ann’s Star Quilt Block – Tutorial. Accurate cuts will make a significant difference in how your quilt block comes together.
- Step 1: Start by pressing your fabric with an iron to remove any wrinkles. This will help you get more accurate measurements and cuts.
- Step 2: Using your rotary cutter, ruler, and cutting mat, follow the cutting measurements outlined in the quilt block pattern. Typically, you will need to cut squares and triangles for the star points and the background.
- Step 3: It’s crucial to ensure that all pieces are the exact size needed. Double-check your measurements before cutting, as even small inaccuracies can throw off the alignment of the final block.
- Step 4: Group your fabric pieces according to color and size. This will make the assembly process more streamlined, ensuring that you have all your pieces ready for the next step.
- Step 5: Once your fabric is cut, label each piece with the corresponding pattern piece. This will prevent confusion as you begin sewing and assembling the star block.
- Step 6: Remember to keep your fabric pieces organized, especially if you are making multiple blocks for a full quilt.
Taking your time with the cutting process will ensure that your Ann’s Star Quilt Block comes together perfectly.
3. Sewing and Assembling the Quilt Block
Now that your fabric is cut, it’s time to start sewing the pieces together. In this section of the Ann’s Star Quilt Block – Tutorial, we will guide you through the assembly process to create your star design.
- Step 1: Begin by sewing the smaller pieces of fabric together. For the star points, this typically involves sewing triangles together to form squares. Use a ¼-inch seam allowance for all seams to ensure consistency across the block.
- Step 2: After sewing each piece, press the seams open with your iron. This will help reduce bulk and keep the block flat, which is important when piecing the final block together.
- Step 3: Next, sew the smaller units together to create the full star block. Pay close attention to the alignment of the points and corners. Quilting pins can help hold the fabric pieces in place while you sew.
- Step 4: Once the center star is complete, sew the background squares around the edges. This will frame the star and complete the block.
- Step 5: Continue pressing each seam as you go to ensure the block stays flat and neat. Proper pressing will also make it easier to quilt later.
- Step 6: Finally, trim any excess fabric from the edges to ensure the block is the correct size.
At this point, your Ann’s Star Quilt Block should be taking shape and showing off the beautiful star design.
4. Tips for Finishing and Using Your Ann’s Star Quilt Block
In this last section of the Ann’s Star Quilt Block – Tutorial, we’ll cover some finishing touches and ideas for how to incorporate your finished block into a larger quilt project.
- Step 1: Once your block is assembled, give it a final press. This helps to set the seams and gives the block a clean, polished look.
- Step 2: If you are making multiple Ann’s Star Quilt Blocks for a full quilt, repeat the cutting and sewing process for each block. Aim to maintain consistency in your fabric selection and sewing to ensure the blocks fit together well.
- Step 3: Consider experimenting with different color combinations for each block. While a single-color star can be striking, mixing colors adds variety and depth to a larger quilt.
- Step 4: When incorporating your blocks into a quilt, plan out the layout in advance. You can alternate the Ann’s Star with other traditional quilt blocks or create a quilt that solely features the star design.
- Step 5: For quilting, you can either hand quilt or machine quilt over the block. Consider using a quilting design that complements the star pattern, such as echo quilting around the star points.
- Step 6: After completing the quilt top, finish with batting, backing, and binding to complete your quilt. This transforms your individual blocks into a cozy, functional quilt.
By following these tips, you’ll have a beautiful, finished quilt that features the Ann’s Star Quilt Block prominently in the design.
FAQ: Common Questions About Ann’s Star Quilt Block
1. What size is the Ann’s Star Quilt Block?
The size of the Ann’s Star Quilt Block can vary depending on the pattern and your personal preference. Standard sizes are usually 12×12 or 10×10 inches, but you can scale the block up or down to suit your project.
2. Is this block suitable for beginner quilters?
Yes, the Ann’s Star Quilt Block is a great choice for beginners. While it may look intricate, the block is relatively simple to sew once you break it down into smaller units.
3. What fabrics work best for this quilt block?
The Ann’s Star Quilt Block looks best with contrasting fabrics. Choose a light fabric for the background and a darker, bolder fabric for the star to make the design stand out.
4. How can I ensure my star points are sharp?
Sharp star points come from accurate cutting and sewing. Make sure your seams are precise and press them carefully. Using quilting pins to hold pieces in place can also help with alignment.
5. Can I make a full quilt using only Ann’s Star blocks?
Absolutely! A quilt made entirely of Ann’s Star Quilt Blocks can be stunning. You can experiment with different color schemes for each block or keep a consistent theme throughout.
6. How can I customize the Ann’s Star Quilt Block?
You can customize this block by playing with different fabrics, colors, and even altering the size. Some quilters add additional borders around the star to create a larger block with more visual impact.
Conclusion
In this Ann’s Star Quilt Block – Tutorial, we’ve walked through the steps to create this timeless quilt block. From gathering materials and cutting fabric to sewing and finishing the block, we’ve covered all the essentials. Whether you’re making a single block or creating a full quilt, the Ann’s Star design is a beautiful and versatile option that will elevate any quilt project.

