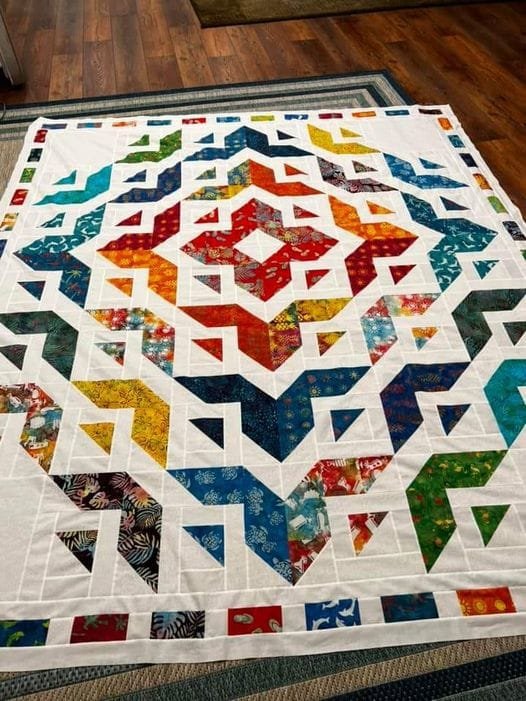
The All Roads Quilt Tutorial – Quilt by Teresa Ponder is a captivating project that showcases both creativity and intricate craftsmanship.
Designed by Teresa Ponder, this quilt is a wonderful representation of geometric patterns and the use of fabric to tell a unique story.
Whether you’re an experienced quilter or just beginning, this pattern provides a rewarding experience that will result in a beautiful quilt to cherish.
As with many quilting projects, the All Roads Quilt Tutorial is about more than just sewing; it’s about expressing creativity through fabric choices, color selection, and the personal touch that each quilter brings to the project.
The geometric design of this quilt offers ample opportunities for personalization, while the straightforward instructions ensure that quilters of all skill levels can successfully complete it.
In this guide, we’ll walk you through the steps of the All Roads Quilt Tutorial, explaining the materials you’ll need, the steps for piecing together this quilt, and helpful tips to make the process smoother.
By the end of this article, you’ll be ready to take on this quilting adventure, whether it’s your first quilt or you’re looking to expand your skills.
1. Materials Needed for the All Roads Quilt
Before diving into the actual quilting process, it’s important to gather all the materials needed for the All Roads Quilt. The right supplies will make your quilting experience much easier and more enjoyable. Here’s what you’ll need to get started:
First, choose the right fabric. For the All Roads Quilt Tutorial, you’ll need a variety of fabrics in different colors and patterns. The design calls for contrasting fabrics to create the geometric road-like pattern, so feel free to experiment with colors and textures. Cotton fabric is often the best choice for quilting due to its durability and ease of use.
Second, select your quilt batting. Batting is the filling that goes between the quilt top and the quilt backing. For this quilt, a medium-weight cotton batting will provide the right amount of loft and softness. Be sure to choose batting that’s a bit larger than your quilt top, so you have enough to trim later.
You’ll also need quilting thread in a color that complements your fabric choices. Threading your machine with quality quilting thread ensures smoother stitching and minimizes the risk of breaks or tangles.
The next essential is a rotary cutter, which is great for cutting fabric into precise shapes. Along with the rotary cutter, you’ll need a cutting mat and a ruler to measure your fabric pieces accurately. Accuracy is key in quilting, and these tools will help you achieve precise cuts for the All Roads Quilt Tutorial.
Lastly, don’t forget your sewing machine, quilting pins, and a quilting needle. If you’re hand quilting, you can skip the machine and opt for hand stitching tools, but a sewing machine speeds up the process significantly. Make sure your sewing machine is equipped with the correct quilting foot for best results.
2. Cutting and Piecing Together the Quilt Blocks
Now that you have all your materials, the next step in the All Roads Quilt Tutorial is cutting and piecing together the quilt blocks. This stage is crucial because the precision of your cuts and the accuracy of your stitching will determine the overall look of the quilt.
Start by cutting your fabric into the necessary shapes according to the pattern. The All Roads Quilt Tutorial usually involves creating blocks that consist of squares, triangles, and rectangles. It’s essential to measure carefully and cut accurately to ensure that the pieces fit together perfectly when sewn.
Next, begin piecing the blocks together. Start by sewing together smaller pieces to form larger sections of the block. Follow the pattern’s instructions closely to ensure that the pieces align correctly. As you sew, press each seam flat with an iron to eliminate wrinkles and ensure the pieces fit snugly.
Once you’ve completed the individual blocks, it’s time to join them into rows. Align the blocks carefully, ensuring that the seams of each row match. Pin the blocks in place before sewing them together to minimize the risk of misalignment.
After the rows are completed, sew them together to form the quilt top. Take your time to make sure everything lines up correctly. A consistent seam allowance throughout the process will help keep the quilt’s design uniform.
Finally, once the quilt top is pieced together, give it one last pressing to flatten all the seams. This ensures that your quilt top is smooth and ready for the next steps in the All Roads Quilt Tutorial.
3. Assembling the Quilt Top, Batting, and Backing
With your quilt blocks pieced together, it’s time to move on to the next step in the All Roads Quilt Tutorial: assembling the quilt top, batting, and backing. This is where all your hard work starts to come together.
Start by laying out the quilt top on a flat surface. Next, spread the batting on top of the quilt backing fabric, which should be slightly larger than the quilt top. Make sure both the backing and batting are wrinkle-free and smooth.
Now, carefully position the quilt top on top of the batting and backing layers. It’s important to center the quilt top on the batting and backing so that there’s an even border around the edges.
Once the quilt layers are aligned, use quilting pins to hold everything in place. Some quilters prefer to use a basting spray instead of pins to temporarily attach the layers, but pins are a reliable option as well.
The next step is quilting, where you’ll stitch through all three layers of the quilt: the top, batting, and backing. You can choose from various quilting techniques, including straight-line quilting, free-motion quilting, or hand quilting, depending on your preference and skill level. For the All Roads Quilt, straight-line quilting is a great choice to emphasize the geometric design.
After quilting, trim any excess batting and backing from the edges of the quilt. This ensures a neat, polished finish. Once the quilt is quilted and trimmed, it’s ready for the final steps of finishing.
4. Binding and Finishing Your Quilt
The final step in the All Roads Quilt Tutorial is adding the binding to your quilt. The binding not only finishes the quilt but also gives it a clean, professional look. Here’s how to add the perfect binding:
Start by cutting strips of fabric for the binding. The strips should be about 2.5 inches wide and long enough to go around the perimeter of the quilt. Join the strips together to form one long strip, and press the seams flat.
Next, fold the binding strip in half lengthwise with the right sides facing out. Begin sewing the binding to the quilt by aligning the raw edges of the binding with the edges of the quilt. Use a 1/4-inch seam allowance to sew the binding onto the quilt.
Once the binding is attached to the front of the quilt, fold it over to the back side and hand stitch it in place using a slip stitch. This step ensures that the binding is securely attached and gives the quilt a clean finish.
After the binding is in place, give your finished quilt a final press with an iron to smooth out any wrinkles. Your All Roads Quilt is now complete and ready for use.
FAQ
Q1: What is the All Roads Quilt?
A1: The All Roads Quilt is a geometric quilt pattern designed by Teresa Ponder. It features a series of interlocking blocks that resemble roads, and it’s known for its versatility and stunning visual appeal.
Q2: What type of fabric is best for the All Roads Quilt?
A2: Cotton fabric is highly recommended for quilting due to its durability and ease of handling. You can choose from solid colors, prints, or even batik fabrics for a unique look.
Q3: How do I choose the right batting for the quilt?
A3: A medium-weight cotton batting works well for the All Roads Quilt, providing both structure and comfort. Choose batting that’s slightly larger than your quilt top to allow for trimming.
Q4: Can I make the All Roads Quilt by hand?
A4: Yes, you can hand sew the All Roads Quilt, but it may take more time. Many quilters prefer to machine sew for faster results.
Q5: How long does it take to make the All Roads Quilt?
A5: The time it takes depends on your skill level and the quilting techniques you use. Typically, it can take anywhere from a few days to a few weeks to complete.
Q6: Can I add my own personal touches to the All Roads Quilt?
A6: Absolutely! The All Roads Quilt Tutorial encourages creativity. You can experiment with fabric choices, colors, and even quilting techniques to make the quilt uniquely yours.
Join our VIP broadcast list and gain access to exclusive patterns, all for free. As a VIP member, you’ll receive the best patterns daily, delivered directly to your device. ✨📱 It’s a unique opportunity to stay up-to-date with the latest trends and designs, curated just for you. Don’t miss out on enhancing your projects and discovering new inspirations with the best patterns every day! 🎨🔝
Conclusion
In this detailed All Roads Quilt Tutorial, we’ve covered everything you need to know, from selecting the right materials to assembling and finishing the quilt. By following these steps, you can create a stunning quilt that reflects both your skill and creativity. Whether you’re a beginner or an experienced quilter, this pattern provides an excellent opportunity to learn new techniques and make a beautiful project.
We’d love to hear your thoughts on this tutorial! Please leave your honest opinions and any suggestions for future tutorials. Happy quilting!

