If you’re looking for a variation on the hourglass quilt block, this free tutorial is the perfect guide. Whether you’re a seasoned quilter or just beginning, adding a twist to the traditional hourglass design can be both fun and rewarding.
In this tutorial, we’ll explore creative ways to modify the classic hourglass quilt block, providing clear instructions to help you achieve a unique and personalized quilt.
The hourglass quilt block is a fundamental design in quilting, known for its versatility and simplicity. But what if you could make it even more interesting? By learning a variation on the hourglass quilt block, you’ll bring new life to this classic pattern, creating a quilt that’s distinct and beautiful.
In this guide, we’ll break down a variation on the hourglass quilt block into manageable steps, ensuring that even beginners can follow along with ease. You’ll discover how to mix and match fabrics, play with colors, and adjust the layout to suit your style. So grab your materials, and let’s dive into this exciting quilting journey!
1. Choosing the Right Fabrics
When working on a variation on the hourglass quilt block, the fabric choice is crucial. Selecting the right combination of fabrics can make or break your quilt design. Here are a few tips to help you get started:
- Contrast: Make sure to pick fabrics that offer a good contrast between light and dark tones. This contrast will make the hourglass shape stand out and highlight the variation on the hourglass quilt block.
- Color Palette: Consider using complementary colors for a more balanced look. Mixing bold colors with softer tones can give your quilt a dynamic feel, adding visual interest to the final product.
- Texture: Experiment with different textures. You can use fabrics with various weaves, from cotton to linen, to add depth to your hourglass quilt block variation.
- Patterned vs. Solid: Mixing patterned fabrics with solid colors can enhance the visual appeal of your quilt. Choose a patterned fabric that complements your solid fabric for a cohesive look.
- Pre-cut Fabrics: Pre-cut fabric bundles like charm packs or fat quarters are great options for this project. They often come in coordinated colors, making it easier to create a harmonious design.
- Personal Style: Ultimately, let your personal style guide you. Choose fabrics that resonate with you and reflect the overall theme you want for your quilt.
2. Cutting and Preparing Your Pieces
The foundation of a variation on the hourglass quilt block lies in precise cutting and preparation. Here are the steps to ensure you’re on the right track:
- Cutting Squares: Start by cutting squares from your chosen fabrics. The size of your squares will determine the size of your quilt blocks. Larger squares will yield bigger quilt blocks, while smaller squares will create more intricate patterns.
- Use a Rotary Cutter: A sharp rotary cutter and a quilting ruler are essential tools for accuracy. Make sure your edges are clean and straight for seamless assembly.
- Half-Square Triangles (HSTs): The traditional hourglass quilt block is built from half-square triangles (HSTs). To create HSTs, take two squares of contrasting fabric, place them right sides together, and draw a diagonal line from corner to corner.
- Sewing the HSTs: Sew along both sides of the diagonal line, and then cut along the line to separate the triangles. Press the seams open or to one side, depending on your preference.
- Trim the Blocks: Trim the HSTs to ensure they are the same size. Accurate trimming is key to maintaining the clean lines of the hourglass quilt block variation.
- Chain Piecing: Chain piecing is a great time-saving technique when creating multiple blocks. Sew several pairs of squares without cutting the thread between them, then cut them apart afterward.
3. Assembling the Hourglass Quilt Block Variation
Now that your pieces are prepped, it’s time to assemble the blocks. Follow these steps to achieve a seamless look:
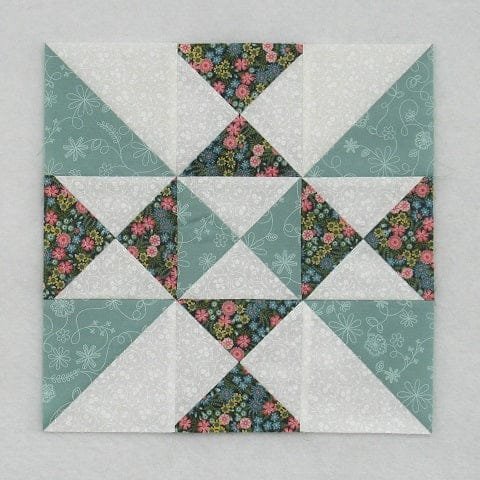
- Arranging the HSTs: Lay out your HSTs to form the classic hourglass shape. For a variation on the hourglass quilt block, try rotating the triangles or switching colors to create a new design.
- Sewing the Block: Once you’re happy with the arrangement, sew the HSTs together. Press the seams as you go to keep the block flat and neat.
- Check for Alignment: Ensure that the points of the triangles align perfectly in the center of the block. This is crucial for maintaining the symmetry of the hourglass quilt block.
- Adding the Variation: To introduce the variation, consider offsetting the triangles or adding additional shapes to the design. You can also experiment with the layout of multiple blocks, creating a mosaic effect.
- Join the Blocks: Once all your blocks are assembled, join them together row by row. Press the seams between rows to keep the quilt top flat.
- Final Layout Adjustments: Before sewing the entire quilt top together, lay out all your blocks to ensure the overall design looks balanced. Make any necessary adjustments to the arrangement.
4. Finishing Touches for Your Quilt
The final step in completing a variation on the hourglass quilt block is to add finishing touches that will bring your quilt to life. Follow these steps for a polished finish:
- Adding a Border: Adding a border can frame your quilt beautifully. Choose a fabric that complements the colors and patterns in your quilt blocks.
- Quilting the Layers: Once your quilt top is complete, it’s time to quilt the layers together. You can either hand-quilt or use a sewing machine, depending on your preference.
- Quilting Pattern: Choose a quilting pattern that complements the hourglass quilt block variation. Straight-line quilting or free-motion quilting are popular choices.
- Binding the Edges: Bind the edges of your quilt using coordinating fabric. Binding provides a clean finish and protects the edges from fraying over time.
- Final Pressing: Give your quilt a final press to smooth out any wrinkles. This step ensures your quilt looks neat and professional.
- Labeling Your Quilt: Don’t forget to add a label to your quilt. Include the date, your name, and any other details you’d like to remember about this project.
FAQ
1. What is an hourglass quilt block? The hourglass quilt block is a simple design made from two triangles that form an hourglass shape. It’s commonly used in traditional quilting and is easy for beginners to learn.
2. What fabrics work best for an hourglass quilt block variation? For a variation on the hourglass quilt block, it’s best to use fabrics that have a good contrast in color or pattern. This helps to emphasize the hourglass shape and any variations you add.
3. Can I make the hourglass quilt block in different sizes? Yes, you can adjust the size of your quilt block by cutting your squares larger or smaller. This flexibility allows you to create quilts of varying scales.
4. How do I ensure my quilt block points align? Accuracy in cutting and sewing is key. Trim your HSTs carefully and check alignment as you sew to ensure the points meet in the center of the block.
5. Can I use pre-cut fabric for this project? Yes, pre-cut fabric bundles like charm packs or fat quarters are ideal for making a variation on the hourglass quilt block. They save time and ensure you have a coordinated color palette.
6. What is the best way to quilt an hourglass quilt block variation? You can quilt your hourglass blocks using straight lines or free-motion quilting, depending on your style. Just make sure the quilting pattern enhances the design.
Join our VIP broadcast list and gain access to exclusive patterns, all for free. As a VIP member, you’ll receive the best patterns daily, delivered directly to your device. ✨📱 It’s a unique opportunity to stay up-to-date with the latest trends and designs, curated just for you. Don’t miss out on enhancing your projects and discovering new inspirations with the best patterns every day! 🎨🔝
Conclusion
In this tutorial, we’ve explored a variation on the hourglass quilt block, offering tips on fabric selection, cutting, assembly, and finishing touches.
Whether you’re new to quilting or an experienced quilter looking to try something different, this project is a great way to challenge your skills while creating a stunning quilt.
If you enjoyed this tutorial, please share your thoughts and suggestions in the comments below – we’d love to hear from you!

