Crochet lovers are always on the lookout for new and exciting patterns to try, and the Wispweave Square – Crochet Pattern is a perfect choice for both beginners and experienced crocheters.
This intricate yet easy-to-follow design offers a delicate and elegant look that can be incorporated into blankets, pillow covers, or even standalone decorative pieces. If you’re searching for a unique way to enhance your crochet projects, this pattern is sure to impress.
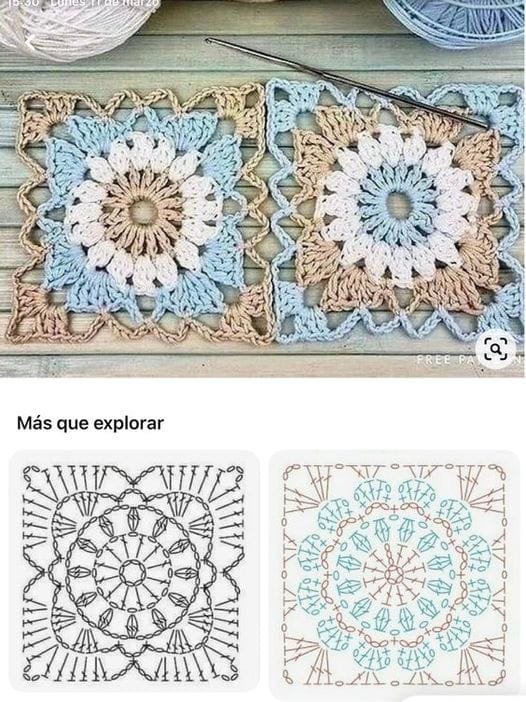
With its charming lace-like structure and intricate textures, the Wispweave Square – Crochet Pattern provides a fantastic opportunity to experiment with colors, yarn weights, and stitch variations.
The beauty of this design lies in its versatility—you can create different sizes by adjusting your hook and yarn type. Whether you want a minimalist monochrome look or a vibrant, multicolored masterpiece, this pattern offers endless possibilities.
In this guide, we will explore the essential materials, step-by-step instructions, creative ways to use the Wispweave Square – Crochet Pattern, and common mistakes to avoid.
By the end, you’ll have everything you need to start your next crochet project with confidence and creativity.
1. Materials and Tools Needed
Before starting the Wispweave Square – Crochet Pattern, it’s important to gather the right materials. Choosing high-quality yarn and the appropriate tools will ensure a polished final result.
- Yarn Selection: The choice of yarn greatly affects the final look. Cotton yarn gives a clean and structured finish, while acrylic offers a softer and more flexible texture.
- Crochet Hook: A suitable hook size depends on the yarn weight. For a more delicate lace-like effect, use a smaller hook, while a larger hook will create a looser, airier square.
- Tapestry Needle: Essential for weaving in loose ends to give the piece a neat appearance.
- Scissors: A sharp pair of scissors helps in cleanly cutting yarn without fraying.
- Stitch Markers: These come in handy for keeping track of rounds, especially in complex patterns.
Taking time to select the right materials ensures that your Wispweave Square – Crochet Pattern turns out just as you envisioned.
2. Step-by-Step Instructions
Once you have all the materials, it’s time to start working on your Wispweave Square – Crochet Pattern. Below is a simplified guide to get you started.
- Step 1: Foundation Chain: Begin with a magic ring or chain four stitches and join with a slip stitch to create a small loop.
- Step 2: First Round: Work a series of double crochet stitches around the loop to form a sturdy center.
- Step 3: Expanding the Square: Use a combination of chain stitches and treble crochet to create the intricate woven effect.
- Step 4: Defining the Edges: Add single crochet or half-double crochet stitches along the edges to maintain the square shape.
- Step 5: Blocking the Square: Gently stretch and pin the finished square to a blocking board to enhance its symmetry and structure.
- Step 6: Weaving in the Ends: Use a tapestry needle to secure any loose ends, ensuring durability and a professional finish.
3. Creative Ways to Use the Wispweave Square
The Wispweave Square – Crochet Pattern can be incorporated into numerous projects. Here are some creative ways to make the most of your finished squares.
- Blankets: Stitch multiple squares together to form a stunning blanket with a textured, airy feel.
- Pillow Covers: Sew squares onto fabric pillowcases for a handmade decorative touch.
- Table Runners: Arrange squares in a linear fashion to create a rustic or modern table runner.
- Wall Hangings: Frame or attach squares to dowels for a unique wall decoration.
- Scarves and Shawls: Join squares with lightweight yarn to create stylish accessories.
- Gift Wrap Accents: Use squares as eco-friendly gift wrap embellishments for an extra personal touch.
4. Common Mistakes and How to Avoid Them
Even experienced crocheters can encounter challenges when working on the Wispweave Square – Crochet Pattern. Here are some common mistakes and tips to prevent them.
- Incorrect Stitch Count: Always count stitches at the end of each round to maintain the pattern’s symmetry.
- Tension Issues: Keeping a consistent tension is crucial for an even look; practice before starting the project.
- Forgetting to Block: Blocking is an essential step that enhances the final appearance of the square.
- Loose Ends Not Properly Woven: Secure all ends properly to prevent unraveling over time.
- Skipping Stitch Markers: Use stitch markers to track your progress and avoid mistakes in complex rounds.
- Choosing the Wrong Yarn: Make sure your yarn choice matches the intended purpose of the finished piece.
FAQ
Q: Can beginners attempt the Wispweave Square – Crochet Pattern? A: Yes! While it may seem intricate, with patience and practice, beginners can master this pattern.
Q: What is the best yarn type for this pattern? A: Cotton yarn is ideal for a structured look, while acrylic yarn provides softness and flexibility.
Q: How do I adjust the size of the square? A: Use a larger hook and thicker yarn for a bigger square or a smaller hook and thinner yarn for a more delicate version.
Q: Can I join multiple squares together? A: Absolutely! These squares can be stitched together to create blankets, scarves, or pillow covers.
Q: Do I need to block the squares? A: Blocking is recommended to maintain the shape and structure of the finished piece.
Join our VIP broadcast list and gain access to exclusive patterns, all for free. As a VIP member, you’ll receive the best patterns daily, delivered directly to your device. ✨📱 It’s a unique opportunity to stay up-to-date with the latest trends and designs, curated just for you. Don’t miss out on enhancing your projects and discovering new inspirations with the best patterns every day! 🎨🔝
Conclusion
The Wispweave Square – Crochet Pattern is a beautiful and versatile design that adds elegance to any crochet project. With the right materials, careful execution, and creative applications, this pattern can be used in a variety of ways to enhance home décor and fashion accessories. By following the step-by-step instructions and avoiding common mistakes, you’ll achieve a professional-looking result.
We hope this guide has inspired you to try the Wispweave Square – Crochet Pattern! Let us know in the comments your thoughts, experiences, and any suggestions you have for future crochet projects. Happy crocheting!

