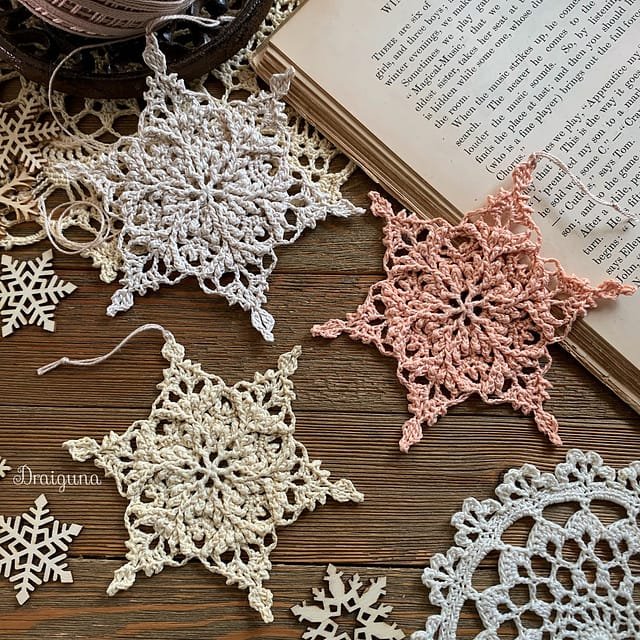
The Winterlight Snowflake is a beautiful and delicate crochet design perfect for adding a touch of elegance to your winter-themed decorations. Whether you’re a beginner or an experienced crocheter, creating this intricate snowflake will bring joy and warmth to your crafting time. In this article, we will explore how to make the most of the Winterlight Snowflake, with tips, pattern details, and creative ideas to inspire you.
Using the Winterlight Snowflake allows you to create stunning holiday ornaments, decorate your Christmas tree, or even make charming gift toppers for friends and family. This pattern is widely appreciated for its delicate appearance and versatility. It’s also an excellent project for those looking to refine their crochet skills or to experiment with new yarns and threads.
As you continue reading, you’ll find helpful guidance on materials, step-by-step instructions, variations, and practical uses of the Winterlight Snowflake. By the end of this article, you’ll feel confident to start your own snowflake collection and bring a frosty, handmade charm into your home.
Materials Needed for the Winterlight Snowflake
SEE MORE PATTERNS
To create your own Winterlight Snowflake, it’s essential to gather the appropriate materials. The right selection will ensure that your snowflake looks delicate while maintaining enough structure to hold its shape beautifully.
First, choose a fine crochet thread. Cotton thread is highly recommended due to its durability and clean finish. White or silver threads tend to highlight the intricate details of the Winterlight Snowflake, but feel free to explore other soft hues that complement your winter decor.
Next, select a suitable crochet hook. For fine threads, a small steel crochet hook between 1.5mm and 2mm works perfectly. This size helps create tight and detailed stitches that define the unique points of the Winterlight Snowflake.
You will also need blocking tools to shape the snowflake after finishing your crochet work. Pins and a blocking board will help keep the snowflake flat and symmetrical, allowing each detail to stand out elegantly.
Additionally, a stiffening solution such as fabric starch or a homemade mix of water and glue can provide added firmness. This ensures that the Winterlight Snowflake maintains its shape over time, especially when used as a hanging ornament.
Finally, keep a pair of sharp scissors and a yarn needle nearby for weaving in the ends. These tools will help you complete your Winterlight Snowflake neatly and professionally, ensuring a polished final result.
Step-by-Step Instructions for Crafting the Winterlight Snowflake
Starting your Winterlight Snowflake involves basic crochet stitches combined in creative ways to form the intricate design. Even beginners can follow these instructions with patience and practice.
Begin with a magic ring, which will serve as the center of the snowflake. Chain a few stitches to create the foundation, then work single and double crochets around the ring to build the first round. This creates the dense core from which the snowflake expands.
After completing the center, progress to the next rounds by incorporating chain spaces and picots. These elements give the Winterlight Snowflake its signature points and lacy appearance. Pay close attention to the stitch count to maintain symmetry.
With each round, the snowflake’s complexity increases. Take your time to read the pattern carefully and ensure your stitches are consistent. Using stitch markers can be helpful for keeping track of your place in the sequence.
Once the crochet portion is complete, proceed to the blocking stage. Gently wet the Winterlight Snowflake, pin it to a board, and shape each point meticulously. Allow it to dry completely to set the shape.
Apply the stiffening solution if desired, especially if you plan to hang the snowflake or use it as a decoration exposed to movement. This step enhances durability while preserving the intricate design.
Finally, inspect your Winterlight Snowflake for any loose ends or uneven sections. Trim excess threads and adjust the shape as needed. Your beautifully crafted snowflake is now ready to be displayed or gifted!
Creative Uses for the Winterlight Snowflake
The versatility of the Winterlight Snowflake makes it ideal for various creative projects beyond traditional holiday decorations.
One popular use is as a Christmas tree ornament. Hanging several Winterlight Snowflakes in different sizes creates a cohesive and elegant winter-themed look that complements both classic and modern tree designs.
Another option is to use the snowflakes as festive gift toppers. Adding a handmade touch to your gift wrapping demonstrates thoughtfulness and creativity, making your presents stand out.
You can also create a Winterlight Snowflake garland by connecting multiple snowflakes with a delicate ribbon or crochet chain. This garland can decorate mantels, windows, or even doorways, adding a whimsical touch to your home.
For those who enjoy wearable crafts, consider incorporating the Winterlight Snowflake into accessories such as brooches or hair clips. This unique addition can bring seasonal charm to your outfits during the winter months.
Additionally, the snowflake can serve as a beautiful coaster or table decoration. Using slightly thicker yarn will give the snowflake more substance, making it practical for protecting surfaces during holiday gatherings.
Finally, the Winterlight Snowflake makes an excellent keepsake or handmade gift. Crafting several snowflakes to give to friends or family members can be a meaningful tradition, sharing the joy of handmade artistry.
Tips and Tricks for Perfecting the Winterlight Snowflake
Achieving the perfect Winterlight Snowflake requires attention to detail and a few handy techniques to streamline your crafting process.
Firstly, maintaining consistent tension in your stitches is crucial. Uneven tension can distort the shape and make blocking more difficult. Practice with scrap thread if necessary before starting your actual Winterlight Snowflake.
Secondly, always count your stitches after completing each round. This simple habit prevents mistakes from compounding, ensuring your snowflake remains symmetrical and professional-looking.
Using high-quality thread enhances the appearance and longevity of your Winterlight Snowflake. Cheaper threads may fray or lose their shape over time, especially if the snowflake is handled frequently.
Don’t skip the blocking process. It’s essential for defining the crisp points of the Winterlight Snowflake and ensuring that the final product looks polished. Taking the time to block properly will make a noticeable difference.
Experiment with different color combinations or add subtle embellishments like beads or sequins to customize your Winterlight Snowflake. Personal touches can make your snowflakes even more special and tailored to your decor style.
Lastly, store your finished Winterlight Snowflake carefully. Keep it flat in a dry, cool place to maintain its shape and prevent any damage. Proper storage ensures that your handmade snowflake can be enjoyed for many seasons to come.
FAQ about the Winterlight Snowflake
1. Is the Winterlight Snowflake suitable for beginners?
Yes, the Winterlight Snowflake is accessible to beginners who are comfortable with basic crochet stitches. With patience and practice, anyone can achieve beautiful results.
2. What type of thread works best for the Winterlight Snowflake?
Cotton crochet thread is ideal due to its strength and crisp finish. White, silver, or pastel colors work beautifully with the delicate design of the Winterlight Snowflake.
3. Can I machine wash the Winterlight Snowflake?
It’s best to hand wash the Winterlight Snowflake gently in cool water, especially if it has been stiffened. Machine washing can distort the shape and damage the delicate structure.
4. How long does it take to make one Winterlight Snowflake?
Depending on your skill level, making a Winterlight Snowflake can take between 1 to 3 hours. More experienced crocheters might complete it faster, while beginners may need extra time.
5. Is it necessary to use a stiffening solution?
While not mandatory, using a stiffening solution helps the Winterlight Snowflake maintain its shape, especially when used as a hanging ornament or decoration that needs durability.
6. Can I sell items made from the Winterlight Snowflake pattern?
Yes, you can sell finished products made from the Winterlight Snowflake, but always respect the original designer’s copyright terms if using a specific pattern.
Conclusion
In this article, we explored the beauty and versatility of the Winterlight Snowflake, from selecting materials to creative uses and essential tips for achieving the best results. Whether you’re decorating your home, crafting thoughtful gifts, or expanding your crochet skills, the Winterlight Snowflake is a delightful project that offers endless possibilities.
PATTERN here
We hope this guide has inspired you to create your own collection of Winterlight Snowflakes. Feel free to share your honest opinions and suggestions—we’d love to hear about your experiences and see how you’ve made this beautiful crochet piece your own!

