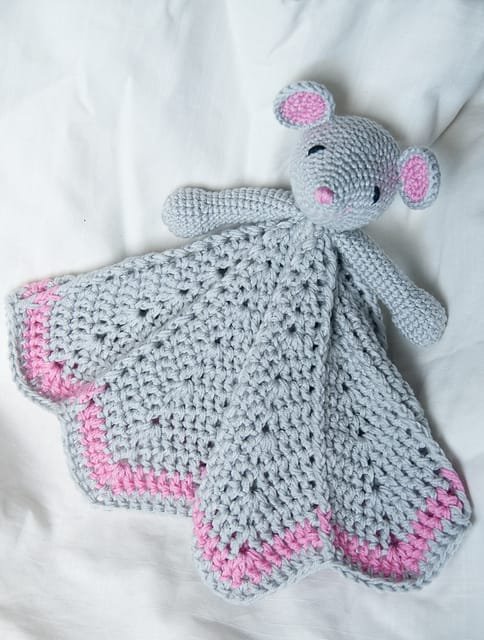
If you’re looking for a charming and easy crochet project, the Wee Mouse Lovey – Crochet Pattern Free Tutorial is the perfect choice. This adorable mouse-themed lovey is a wonderful gift for babies and toddlers, offering both comfort and a playful companion.
Whether you’re new to crocheting or an experienced crafter, this pattern is simple to follow and provides a satisfying result. In this tutorial, we’ll walk you through the entire process step-by-step, ensuring you can create a Wee Mouse Lovey with ease.
This free tutorial will guide you through the necessary materials, stitches, and assembly techniques to craft this adorable Wee Mouse Lovey.
It’s a great project for anyone wanting to make a handmade gift that’s both practical and sentimental. Plus, it’s a fantastic way to use up yarn scraps while practicing your crochet skills.
In the following sections, we’ll cover everything you need to know, from choosing the right yarn to final touches that will bring your little mouse to life. Let’s get started with your Wee Mouse Lovey creation!
1. Materials You Will Need for Your Wee Mouse Lovey
Before diving into the crochet pattern itself, let’s first talk about the materials you’ll need to make your Wee Mouse Lovey. Choosing the right materials is crucial to ensure that your project turns out as cute and cuddly as possible.
Start with selecting your yarn. For the Wee Mouse Lovey, soft and durable yarn is ideal since this project is meant for babies. Cotton or acrylic yarn works well for this project, as both options are soft to the touch and easy to care for. You can choose traditional grey for the mouse, but feel free to get creative with colors, as babies love bright, playful hues.
Next, you’ll need the right crochet hook. Typically, a 4.0mm or 5.0mm hook will work best with medium-weight yarn, but make sure to match your hook size to the yarn you choose.
Don’t forget to gather some fiberfill for stuffing the head of your Wee Mouse Lovey. This will give the mouse its soft and squishy feel, making it perfect for cuddles.
You’ll also need a tapestry needle for weaving in ends and sewing parts of the project together. Finally, consider adding safety eyes or embroidering the face for a safe and adorable finish.
Once you’ve gathered all your materials, you’re ready to move on to creating the main parts of your lovey.
2. Creating the Head and Ears of the Wee Mouse Lovey
The first part of the Wee Mouse Lovey – Crochet Pattern Free Tutorial is crafting the head and ears. This section is key to giving your lovey its distinct, mouse-like appearance.
Begin by crocheting a magic circle, which will form the base of the mouse’s head. From there, use single crochet stitches to work in the round, increasing gradually to shape the head. As you crochet, stuff the head with fiberfill to create a soft, plush texture.
Once the head is complete, it’s time to crochet the ears. The ears are made separately and then sewn onto the head. They are small, semi-circle shapes created with simple crochet stitches. Be sure to crochet two identical ears, making them symmetrical.
Attach the ears to the sides of the head using your tapestry needle. Position them slightly forward on the head to give the Wee Mouse Lovey a cute, alert appearance. You can adjust the placement based on personal preference to make your mouse unique.
With the head and ears assembled, the next step is creating the face. You can use safety eyes for a polished look, but if this is intended for a baby, it’s safer to embroider the eyes and nose using black yarn or embroidery thread.
3. Crocheting the Lovey Blanket Body
Now that the head and ears are complete, we’ll move on to creating the blanket portion of the Wee Mouse Lovey. This part is where the mouse becomes a true “lovey,” offering a soft blanket that babies can hold onto.
The blanket is typically crocheted in a circular or square shape, depending on the pattern style. For this Wee Mouse Lovey, a simple granny square or circle works beautifully. Start by chaining a small number of stitches, then crochet in rounds, increasing as you go to expand the size of the blanket.
You can alternate colors in each round to create a colorful, eye-catching design. Many people choose to use pastel colors for a soft, baby-friendly look, but bright colors are also a great option.
As you crochet, make sure the blanket maintains an even shape. If it starts to curl or warp, you may need to adjust your tension or stitch count. A smooth, flat blanket will make your lovey more functional and comfortable.
Once you’ve reached your desired blanket size, finish off by weaving in the ends. You can make the blanket as large or small as you like, depending on the purpose of the lovey.
4. Assembling and Finishing Touches
Now that all the components of your Wee Mouse Lovey are crocheted, it’s time to assemble the final product and add any finishing touches to bring your mouse to life.
First, securely sew the head onto the center of the blanket. Use a strong, invisible stitch so that the head is firmly attached and can withstand gentle play. Make sure the head is centered for balance, as this will give your lovey a polished, professional look.
Next, add any final details to the face if you haven’t already. This could include adding a small, embroidered mouth or rosy cheeks for extra charm. You can also crochet a small tail for the mouse, attaching it to the back of the head or side of the blanket.
After assembly, give your Wee Mouse Lovey a final inspection. Double-check that all parts are securely attached and that there are no loose ends that could unravel over time. If everything looks good, your lovey is complete!
Give your lovey a gentle wash to remove any dirt or oils from your hands during the crochet process. Once dry, your Wee Mouse Lovey is ready to be cuddled or gifted.
FAQ: Wee Mouse Lovey – Crochet Pattern Free Tutorial
1. Is the Wee Mouse Lovey pattern suitable for beginners?
Yes! The Wee Mouse Lovey pattern is beginner-friendly, requiring only basic crochet stitches like single crochet and double crochet. The tutorial provides step-by-step instructions to guide you through the process.
2. What type of yarn is best for this project?
Soft, baby-safe yarn such as cotton or acrylic is recommended for the Wee Mouse Lovey. These yarns are gentle on a baby’s skin and easy to clean, making them ideal for this type of project.
3. How large should the blanket portion of the lovey be?
The size of the blanket can vary depending on your preference. Typically, lovey blankets range from 12 to 18 inches in diameter, providing a small, manageable size for babies to hold.
4. Can I personalize the Wee Mouse Lovey?
Absolutely! You can customize the colors, add embellishments like bows or hearts, and even modify the facial features to give your Wee Mouse Lovey a unique look.
5. How do I care for the finished Wee Mouse Lovey?
To ensure the longevity of the lovey, hand-wash it in cold water or use a gentle cycle on your washing machine. Allow it to air dry to prevent any damage to the yarn or crocheted stitches.
6. Can I use safety eyes for the mouse face?
Yes, but if the lovey is intended for a baby, it is recommended to embroider the eyes instead. This eliminates any choking hazards and makes the lovey safer for little ones.
Join our VIP broadcast list and gain access to exclusive patterns, all for free. As a VIP member, you’ll receive the best patterns daily, delivered directly to your device. ✨📱 It’s a unique opportunity to stay up-to-date with the latest trends and designs, curated just for you. Don’t miss out on enhancing your projects and discovering new inspirations with the best patterns every day! 🎨🔝
Conclusion
In this Wee Mouse Lovey – Crochet Pattern Free Tutorial, we’ve walked you through the steps to create an adorable and cuddly lovey that’s perfect for babies and toddlers. From choosing the right materials to assembling the mouse and blanket, this pattern is simple yet rewarding. Whether you’re making this for a special gift or for your own little one, the Wee Mouse Lovey is sure to bring smiles and comfort.
We hope this tutorial has been helpful, and we’d love to hear your thoughts! Please share your feedback in the comments and let us know if you have any tips or suggestions for fellow crocheters. Happy crocheting!

