The Tulip Cube Throw Pattern is one of those crochet designs that blend charm, creativity, and functionality into a single project. This delightful pattern features geometric cube-like shapes paired with the timeless beauty of tulip motifs, making it a wonderful addition to your home décor or a heartfelt handmade gift.
The beauty of the tulip cube throw pattern is how it balances complexity and simplicity — it looks intricate, but once you get the hang of the motif repetition, it becomes an almost meditative process.
Whether you’re making it for your living room, bedroom, or as a thoughtful handmade gift, this pattern allows you to inject your personal touch. Imagine a throw made in soft pastels for a spring vibe or bold jewel tones for a striking statement piece.
Understanding the Tulip Cube Throw Pattern
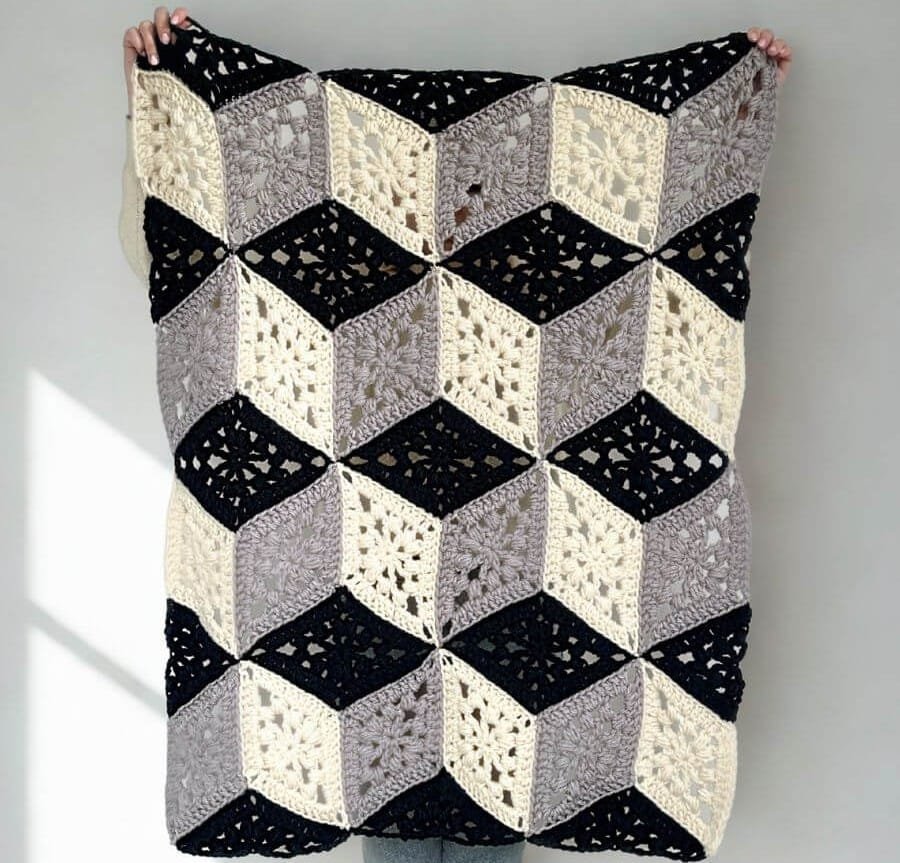
The tulip cube throw pattern combines two beloved crochet elements — the cube motif and the tulip stitch. The cube motif gives the design its striking geometric structure, while the tulip stitch adds a floral elegance that brings life and softness to the pattern. Each block is typically worked separately, then joined together to create the full throw.
This approach offers flexibility because you can work on small motifs at your own pace without committing to an oversized project from the start. It’s perfect for crocheters who enjoy carrying their work on the go, as you can complete a few motifs during breaks or while relaxing at home. Once all motifs are completed, the assembly stage is where the throw begins to reveal its stunning overall design.
Yarn choice plays a crucial role in achieving the desired texture and drape. Soft acrylic or cotton blends work beautifully for this project, offering durability and comfort. The tulip-cube-throw-pattern benefits from yarns that hold stitch definition well, making the tulip details and cube edges stand out more vividly.
Color combinations are another area where you can let your creativity shine. You can stick to a consistent palette throughout the throw or mix and match shades for a playful, eclectic look. For example, alternating tulip colors in each cube motif creates a lively and eye-catching result.
The size of the throw can also be easily adjusted by adding or removing motifs. This makes it possible to create anything from a small lap blanket to a full-sized bedspread. The versatility of the tulip cube throw pattern means you can adapt it to your specific needs without sacrificing style.
Finally, the finishing touches, such as a decorative border, can elevate your throw from beautiful to breathtaking. A scalloped or picot edge complements the floral theme and adds that final polish every handmade piece deserves.
Step-by-Step Approach to Crocheting the Tulip Cube Throw Pattern
Starting your tulip cube throw pattern project begins with gathering all necessary supplies. You’ll need yarn in your chosen colors, a crochet hook that matches your yarn weight, scissors, and a yarn needle for weaving in ends. Having all tools ready before you begin ensures a smoother workflow.
The first step involves learning the basic motif. Each motif starts with a foundation chain, followed by a series of stitches to create the tulip shape. The cube effect is achieved by careful placement of colors and stitches to mimic depth and dimension. Once you’ve mastered one motif, you simply repeat the process until you have the number required for your desired throw size.
Joining motifs can be done in several ways. Slip stitching through back loops gives a clean, flat seam, while whip stitching creates a slightly raised join that can become a design feature. The tulip-cube-throw-pattern is forgiving in this aspect, as either method works well depending on your preference.
After joining, adding a border is highly recommended. Borders not only give your throw a finished look but also help stabilize the edges. Simple single crochet borders work for a clean look, while more decorative options like shell stitches can enhance the floral theme.
Tension control is important in this project. Maintaining even tension ensures that all motifs are uniform in size, making assembly much easier. If you notice your motifs varying in size, take a moment to adjust your hook grip or yarn flow.
Lastly, blocking your throw once it’s complete can make a huge difference. Blocking helps even out stitches, enhances the cube shapes, and smooths the tulip motifs, resulting in a professional-looking finish.
Tips and Tricks for a Perfect Tulip Cube Throw
Consistency is key when working on the tulip cube throw pattern. Setting aside dedicated crochet time each day helps maintain stitch memory and tension, especially for beginners.
Choose your yarn wisely. While cotton offers crisp stitch definition, acrylic provides warmth and durability. A blend of the two might give you the best of both worlds. Consider the throw’s intended use when selecting your yarn.
If you’re aiming for a gradient or ombre effect, arrange your yarn colors in advance to ensure smooth transitions. This technique can add depth and sophistication to the throw, complementing the cube illusion.
Don’t rush the joining process. Take time to align motifs correctly, especially if you’re using multiple colors. Misaligned motifs can disrupt the visual flow of the pattern.
Experiment with borders. Sometimes a contrasting border color can frame the entire throw beautifully, making the central pattern pop.
Finally, remember that this is a creative process. Feel free to adapt the tulip cube throw pattern to suit your style. Changing stitch counts, adding extra texture, or altering tulip placements can make the throw uniquely yours.
Caring for Your Tulip Cube Throw
Proper care will extend the life of your tulip-cube-throw-pattern creation. Depending on the yarn used, you may be able to machine wash your throw, but always check the yarn label for care instructions.
Handwashing in cold water with a gentle detergent is generally the safest method. This prevents stretching, shrinking, and color fading. After washing, gently squeeze out excess water without wringing the fabric.
Lay your throw flat on a clean, dry towel to air dry. Avoid hanging it, as this can distort the shape and stretch the motifs.
Store your throw in a cool, dry place when not in use. Avoid plastic bags for long-term storage, as they can trap moisture and lead to mildew.
If your throw develops snags or loose threads, repair them immediately to prevent further damage. Use a yarn needle to weave in loose ends securely.
Regular maintenance, such as gentle dusting or airing out, can also help keep your throw looking fresh and vibrant over time.
FAQ – Tulip Cube Throw Pattern
1. Is the tulip cube throw pattern suitable for beginners?
Yes, beginners can attempt this pattern with patience. Start with a few practice motifs before committing to a full throw.
2. How long does it take to make a tulip cube throw?
The time varies based on size and skill level, but most crocheters can complete it in a few weeks with regular work sessions.
3. Can I use scrap yarn for this project?
Absolutely! Using scrap yarn can create a vibrant, eclectic throw with a patchwork charm.
4. What’s the best hook size for the tulip cube throw pattern?
It depends on your yarn weight, but most patterns recommend a 4mm to 5mm hook for standard worsted-weight yarn.
5. How can I make my throw softer?
Washing the throw with fabric softener or using a yarn conditioner can help enhance softness without compromising stitch definition.
6. Can I resize the pattern?
Yes, simply add or remove motifs to achieve your desired dimensions.
7. Does the tulip cube throw work for all seasons?
Yes, cotton yarn is great for warmer months, while acrylic or wool blends add warmth for colder seasons.
Conclusion
The tulip cube throw pattern is a crochet project that combines elegance, creativity, and practicality. With its unique blend of geometric cubes and floral tulip motifs, it’s a versatile piece that can be customized to fit any home or style.
VIDEO TUTORIAL
Whether you’re a beginner eager to learn or an experienced crocheter seeking a new challenge, this pattern offers endless possibilities for personal expression. Try experimenting with colors, yarn types, and border designs to make the throw uniquely yours.

