The Seaside Crochet Tote Bag Tutorial is the perfect guide for anyone who wants to create a handmade accessory that combines style and functionality. This project is designed to be beginner-friendly yet detailed enough to keep advanced crocheters engaged.
Crocheting your own tote bag means you can customize colors, textures, and sizes according to your needs. The process is enjoyable, relaxing, and rewarding when you finally hold a finished tote bag made with your own hands.
In this tutorial, we will explore step-by-step instructions, tips for beginners, design variations, and practical uses of the Seaside Crochet Tote Bag. You will learn everything needed to transform yarn into a durable and fashionable accessory.
Why Choose the Seaside Crochet Tote Bag
The Seaside Crochet Tote Bag is not just a simple craft project; it is a lifestyle piece that offers both charm and utility. Whether you are heading to the beach, a picnic, or even the local market, this tote bag stands out as a stylish and eco-friendly choice.
Crochet bags have gained popularity in recent years due to their handmade aesthetic and sustainable appeal. Instead of buying mass-produced plastic or fabric bags, you can make one yourself that is sturdy, reusable, and environmentally friendly.
One of the best things about the Seaside Crochet Tote Bag Tutorial is that it emphasizes versatility. You can adapt the pattern to create a large carry-all or a smaller tote, depending on your personal preference.
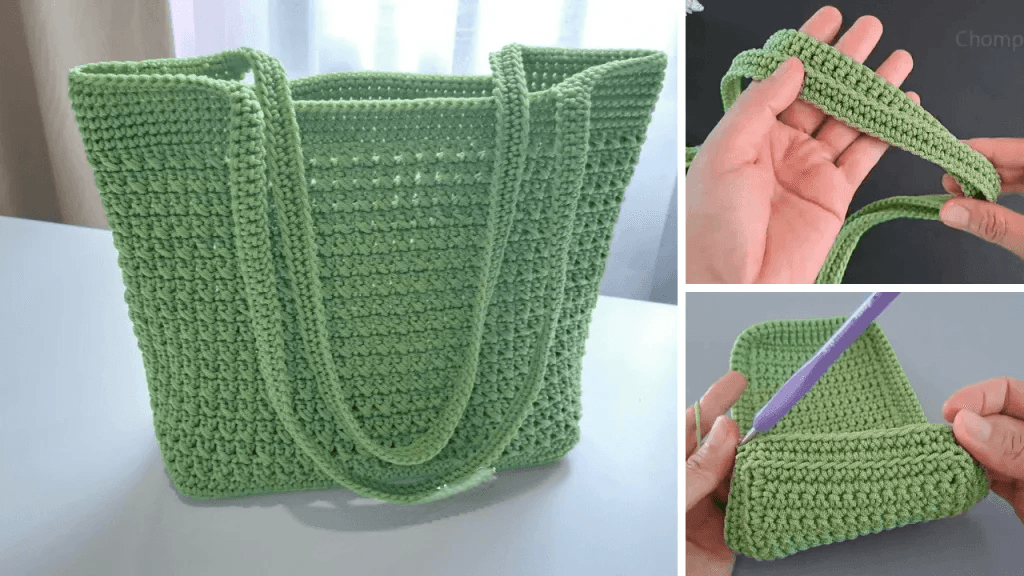
The seaside theme itself makes this bag stand out. Using shades of blue, white, beige, or even sea-green yarn can evoke the calmness of waves and sand. It also makes the tote a fashionable companion for summer outings.
Durability is another key advantage. A well-crafted crochet tote can handle groceries, beach gear, or books with ease. By using strong stitches and quality yarn, the bag becomes not just stylish but also practical.
Lastly, creating your own tote is empowering. The satisfaction of crocheting a functional accessory from scratch is unmatched, and the compliments you receive will make you appreciate your skills even more.
Materials Needed for the Seaside Crochet Tote Bag
To get started with the Seaside Crochet Tote Bag Tutorial, you will need a few essential materials. Gathering them beforehand ensures your project flows smoothly without interruptions.
The most important item is, of course, yarn. For this project, cotton yarn is highly recommended. Cotton is durable, easy to clean, and holds shape well, making it perfect for bags. Choose colors that reflect your seaside theme, like sandy beige, ocean blue, or crisp white.
Next, you will need a crochet hook. The size depends on the thickness of your yarn, but a hook between 4.0 mm and 5.5 mm is usually ideal for tote bags. Always check the yarn label for suggestions.
Scissors are another essential tool. You will need them to cut yarn cleanly, especially when changing colors or finishing off your project. A sharp pair of scissors will make the job much easier.
A yarn needle is also required to weave in ends. This step may feel minor, but it ensures your tote bag looks neat and polished without loose threads hanging.
Optional but useful items include stitch markers, which help track your rounds and pattern progress. They are especially helpful if you are new to crochet or working on a circular base.
Finally, consider adding a lining. While not mandatory, sewing a fabric lining into your tote bag increases durability and prevents smaller items from slipping through the stitches.
Step-by-Step Instructions for the Seaside Crochet Tote Bag
Now let’s dive into the Seaside Crochet Tote Bag Tutorial itself. The steps are straightforward, but attention to detail will help you achieve the best results.
First, start with the base of your tote. Many crocheters prefer a circular or oval base, but a rectangular one works just as well. Chain the foundation stitches, then build rows or rounds until the base reaches the desired size.
Second, move on to the body of the bag. This part usually involves working in continuous rounds. Stitches like single crochet or half double crochet are excellent for strength and structure. Some tutorials also incorporate open stitch patterns to create a breezy seaside look.
Third, as the body grows, keep an eye on the height. A standard tote bag is about 12 to 14 inches tall, but you can adjust it based on how much you want to carry. Adding color changes at this stage is a fun way to create stripes or waves.
Fourth, focus on the handles. Strong, comfortable handles are essential for a functional tote. You can crochet them directly into the body of the bag or create separate straps and sew them on later. Handles should be long enough to fit over the shoulder but not so long that the bag drags.
Fifth, once the handles are complete, weave in all ends carefully with a yarn needle. This step ensures durability and a clean finish. If you want extra reinforcement, double-stitch the handles for added strength.
Finally, block your tote bag if needed. Blocking involves gently shaping the finished crochet piece using water or steam. It helps the stitches settle and the bag maintain its intended form.
Creative Variations and Styling Ideas
The beauty of the Seaside Crochet Tote Bag lies in its adaptability. With a few tweaks, you can make each tote unique and tailored to your taste.
One creative idea is to play with color combinations. Instead of sticking to classic seaside hues, experiment with bold tones like coral, yellow, or even multicolored yarn. This adds personality and flair.
You can also introduce textured stitches into your bag. Adding bobbles, shells, or wave-like patterns creates depth and a tactile design, perfect for a seaside-inspired accessory.
Another variation is size adjustment. Create a mini version of the tote for carrying small essentials, or expand the base for a beach-ready bag large enough to hold towels and snacks.
For added charm, consider embellishments. Attaching tassels, crochet flowers, or seashell decorations can make your tote bag stand out even more. Each detail tells a story and enhances the handmade look.
Adding a lining is both practical and stylish. Choose a fabric with nautical prints, stripes, or anchors to reinforce the seaside theme while also improving functionality.
Lastly, think about gifting opportunities. A handmade Seaside Crochet Tote Bag makes an excellent present for friends or family. Personalize it with their favorite colors or initials to create something truly special.
FAQ About the Seaside Crochet Tote Bag Tutorial
1. Is the Seaside Crochet Tote Bag suitable for beginners?
Yes, the tutorial is beginner-friendly. Basic stitches and clear steps make it approachable, even if you are new to crochet.
2. How much yarn do I need for the tote bag?
On average, 400 to 600 yards of cotton yarn is enough, depending on the size of the bag you want to make.
3. Can I wash my crochet tote bag?
Yes, especially if made with cotton yarn. Hand washing is recommended to maintain shape, but machine washing on a gentle cycle is usually safe.
4. How do I make the bag stronger for heavy use?
Use tight stitches, strong cotton yarn, and double-reinforce the handles. Adding a lining also increases durability.
5. Can I change the size of the tote bag easily?
Absolutely. Adjust the base size and number of body rounds to customize the dimensions of your tote.
6. Is it necessary to block the crochet tote bag?
Blocking is not mandatory, but it helps improve the bag’s shape and gives a more polished finish.
Conclusion
The Seaside Crochet Tote Bag Tutorial provides everything you need to craft a beautiful and practical accessory. From gathering materials and following step-by-step instructions to exploring creative variations, this guide helps you bring your tote bag vision to life.
Making your own tote is not just about utility—it’s about creativity, sustainability, and personal expression. With patience and practice, you can create a bag that suits your style and impresses everyone who sees it.
VIDEO TUTORIAL
Now it’s your turn! Try this project, enjoy the process, and don’t forget to share your experience. Leave your sincere opinion and suggestions about this tutorial—we’d love to hear how your Seaside Crochet Tote Bag turned out.

